Showing posts with label Sources: Rhodes Dough. Show all posts

Monday, April 21, 2014

Strawberries + Pull Apart Bread = Delicious


This was a pull apart bread recipe that I found recently that was just too intriguing. We just had to try it. This was fantastic and it got gobbled up quickly.


Vanilla Strawberry Monkey Bread

Ingredients:

18 Rhodes white dinner rolls, thawed, but still cold
1 small box vanilla pudding
1/2 cup white chocolate chips
1/2 to 3/4 pound strawberries, rinsed, hulled, and sliced
1/2 cup sugar
1/2 cup butter

Directions:

Prepare a bundt pan with baking spray. Place vanilla pudding in a small bowl. Cut rolls into fourths and coat them in the vanilla pudding. Stagger coated rolls inside the bundt pan. Alternately, add slices of strawberries and white chocolate chips. Once all the rolls, strawberries, and chocolate chips have been staggered in the bundt pan, sprinkle any remaining pudding on top of the monkey bread.

Heat the sugar and butter in the microwave for 1 1/2 to 2 minutes, or until sugar dissolves and mixture is syrupy. Pour around the edges and on top of the monkey bread. Spray a piece of plastic wrap with baking spray and cover the pan.

Set in a warm place and wait until the rolls double in size and almost reach the top of the pan.

Bake at 350 degrees F. for 25-35 minutes until browned and the bread is done where the pieces touch each other.

IMPORTANT: Place a baking sheet on the shelf underneath the bundt pan to catch any potential spills. Cover the bread with foil the last 10 minutes, if it is starting to get too brown. Immediately after baking, invert onto plate. Serve warm. Refrigerate leftovers.

Source: Rhodes Dough website. You can find it here.

Saturday, March 22, 2014

From My Childhood--Updated


We used to have something called "Pizza Roll-Ups" all the time when I was younger. They were such an easy meal to throw together. They basically consisted of Rhodes Dough, thawed and risen, that had shredded mozzarella cheese and pepperoni rolled up into it. You then baked it and dipped it in pizza sauce.

Here is my slightly updated version.


Updated Pizza Roll-Ups

Ingredients:

12 Rhodes Dough rolls, thawed and risen
Pizza sauce or marinara sauce, plus additional for dipping
Shredded mozzarella cheese
Favorite pizza topping(s)

Optional Parmesan Topping:
1/4 c. butter, softened
1/4 c. mayonnaise
1/4 c. grated Parmesan (not fresh, bottled kind such as Kraft)
1/4 tsp. garlic powder
1/4 tsp. Italian seasoning

Directions:

Preheat oven to 350 degrees F.

Divide dough into six equal portions. On a floured surface, roll or flatten out dough into a circle. Spread 1-2 tablespoons of pizza or marinara sauce on the dough. Top with about 1 tablespoon of shredded cheese and desired pizza toppings.

Roll up dough. Lay seam side down on an ungreased jelly roll pan. Repeat with the other five rolls.

If using the Parmesan topping, mix all Parmesan topping ingredients together. Brush mixture evenly over each pizza roll-up (it is okay if you have some extra--in fact, you probably will).

Bake in the oven for 20-25 minutes, or until pizza roll-ups are nicely browned.

Serve with additional pizza or marinara sauce for dipping.

Makes 6 pizza roll-ups (to make smaller, kid-sized pizza roll-ups, divide the dough into 10-12 equal pieces in the first step--this will make 10-12 kid-sized servings).

Source: I'm not sure where my mom found the original recipe from. I always liked them, but always felt that it should have sauce on the inside as well as for dipping. These are great with or without the Parmesan topping. The Parmesan topping was inspired by our favorite Parmesan Rolls recipe. Also, we only ever made cheese pizza roll-ups or pepperoni and cheese pizza roll-ups. However, I love to make Hawaiian ones (with Canadian bacon and pineapple tidbits) as well as roll-ups with black olives, sliced mushrooms, etc. Make them however you like!

Saturday, January 19, 2013

Breakfast Breads with a Fruit Kick


I've really been into making some fun bread-based breakfasts lately. I've got to cut it out though because I am not losing the weight I gained for Christmas.

Anyway, let me share two fun and fruity breakfast ideas with you. The first is a lemon pull-apart recipe. The second is a super simply recipe using canned refrigerated crescent rolls and...FRUIT ROLL-UPS! Who knew, right? It was such a cool and unusual idea that I had to try it, and do you know what? It was delicious!

I hope you like them.


Lemon Pull-Aparts

Ingredients:

12 Rhodes Dinner Rolls, thawed but still cold.
Zest from 2 whole lemons
1/2 cup sugar
1/4 cup butter, melted

Citrus Glaze:

1 cup powdered sugar
1 tablespoon butter, melted
2 tablespoons fresh lemon juice

Directions:

Mix lemon zest with sugar. Cut rolls in half and place in a 12-inch sprayed deep dish pizza pan or a 9x13-inch sprayed baking pan. Drizzle 1/4 cup melted butter over rolls. Sprinkle with lemon zest/sugar mixture, reserving 1/2 of mixture to sprinkle on just before baking. Cover with sprayed plastic wrap. Let rise until doubled in size. Remove wrap. Sprinkle on remaining lemon/sugar mixture. Bake at 350 degrees F. for 20-25 minutes. Remove immediately from pan and place on cooling rack. Combine glaze ingredients and mix well. Drizzle over pull-aparts.

Source: Rhodes bread website. You can find the recipe here.


Notes: My husband preferred these warm, and I preferred these after they had cooled completely. Go figure. Try it out and see which way you like them best!


Strawberry Breakfast Crescents

Ingredients:

1 (8-oz) can Pillsbury Refrigerated Crescent Dinner Rolls
4 rolls Betty Crocker Fruit RollUps Strawberry Fruit Snack
2/3 cup powdered sugar
1/4 teaspoon vanilla
2-3 teaspoons milk

Directions:

Heat oven to 350 degrees F. Spray cookie sheet with cooking spray. Unroll dough. Separate into 8 triangles.

Unroll fruit snack rolls; cut each diagonally into 2 triangles. Place each fruit roll triangle on 1 dough triangle (fold or tuck each fruit roll so all is on dough). Roll up each dough triangle, starting with shortest side of triangle and rolling to opposite point; place point side down on sprayed cookie sheet. Curve into crescent shape.

Bake at 350 degrees F. for 12 to 15 minutes or until golden brown. Cool 2 minutes; remove from cookie sheet. Meanwhile, in a small bowl, mix powdered sugar, vanilla, and enough milk until smooth and desired drizzling consistency.

Drizzle glaze evenly over warm rolls. Serve warm.

Nutrition information: Makes 1 servings (serving size is 1 roll). 160 calories, 5 g fat, 0 mg cholesterol, 370 mg sodium, 29 g carbohydrate, 0 g fiber, 18 g sugar, 2 g protein.

Source: I found this on the Pillsbury website. You can find the original recipe here.


Tuesday, January 1, 2013

Don't Fall Apart...Pull-Apart!


Oh, is there anything more sinful than sweet pull apart bread for breakfast, brunch, or dessert? It is way too easy to eat too much of this stuff. Why is it so good and yet so bad?

My advice to you is to make a ton of other things to eat so that people actually eat the recommended serving of these wonderful pull aparts. Or, make these when you have company coming over so they can help you eat it. If you don't make anything else, then someone might just possibly eat the equivalent of 8 rolls throughout the day.

So, enjoy these delicious rolls...with caution!


Above: I made this batch with instant butterscotch pudding. If you use instant pudding, it will still be delicious, but it won't be quite as caramel-like, it will be more sugar coated.


Butterscotch Sticky Rolls (Hot Rolls Pull-Aparts)

Ingredients:

20-22 frozen Rhodes bake-and-serve rolls
1/2 cup pecan pieces, or 1 cup whole pecans, optional
1 (3 oz) box regular (not instant) butterscotch pudding
6 tbsp melted butter
1/2 cup brown sugar
3/4 tsp. cinnamon

Directions:

Thaw rolls just until soft, but still cold. Cut rolls in half. Layer the following ingredients in a greased bundt pan: pecans, if using, soft but cold rolls, and one box regular (not instant) butterscotch pudding.

Combine melted butter, brown sugar, and cinnamon. Drizzle this mixture over the butterscotch pudding and rolls. Let rise until doubled in size, or even with top of bundt pan (roughly 3 hours on the counter, or overnight in the refrigerator). Be careful not to let the rolls rise up over the pan because they will continue to rise as they bake.

Preheat oven to 375 degrees F. Bake for 25-30 minutes. You may want to put a cookie sheet or some aluminum foil under the pan in case the butterscotch drips out of the pan (to avoid it making a mess of your oven).

Immediately after baking, loosen rolls from sides of the bundt pan with a knife and invert onto a serving plate.

Makes 10-12 servings.


Above: Using instant pudding.


Above: Using cook and serve pudding.
 
Source: My family has been making this recipe for years. I believe it was originally found in the newspaper. It is a Rhodes recipe. You can find their current version of the recipe (which is slightly different) here.

Notes: This time (the picture you see above), I used instant pudding because that is what I had on hand. It doesn't lend quite as much butterscotch syrupy goodness, but it still worked and tasted delicious.


The changes that you will find when you compare this version of the recipe to the current version found on the Rhodes Bread website include the following:

The use of 24 rolls instead of 20-22
Using only a 1/2 box of pudding (perhaps they mean 1/2 of a large box of pudding?)
The option/variation to use vanilla pudding in place of the butterscotch
The elimination of the cinnamon in the brown sugar/butter mixture
Melting the butter and brown sugar together instead of stirring the brown sugar into the already melted butter
The new version of the recipe instructs you to dip each of the roll halves into the pudding mix (rather than just pouring the pudding over the top)
The instruction to cover your bread with plastic wrap sprayed with cooking spray while it rises
The baking temperature is decreased to 350 degrees F.
The cooking time is increased to 30-35 minutes
The instruction to cover your pan with foil for the last 15 minutes of baking time


Anyway, as for the changes, I say take 'em or leave 'em. This recipe is absolutely delicious both ways (and believe me, I have made it both ways).

I would definitely suggest rolling the rolls in the pudding mixture. I would also suggest using the whole 3 oz box of pudding mix.

I'm intrigued by the option of using vanilla pudding in place of the butterscotch. I will definitely have to try that one of these days!

We have made this with and without the pecans. It is delicious either way.


Cinnamon Pull-Apart Bread (Cinnamon Sugar Monkey Bread)

Ingredients:

3 cans (7.5 oz each) refrigerated buttermilk biscuits
3/4 cup granulated sugar
1 tbsp. ground cinnamon
1/2 cup butter or margarine, melted

Glaze:
4 oz (1/2 of an 8 oz. pkg.) cream cheese, softened
1/2 cup powdered sugar
1-2 tbsp. milk

Directions:

Heat oven to 350 degrees F.

Cut each biscuit into quarters.

Mix granulated sugar and cinnamon in a medium bowl. Add biscuit pieces, in batches; toss to coat.

Place half the biscuits in greased 12-cup fluted tube pan (bundt pan); drizzle with half the butter. Repeat. Sprinkle with any remaining cinnamon-sugar.

Bake 40-45 minutes or until toothpick inserted near center comes out clean and top is golden brown. Cool in pan 5 minutes; invert onto serving plate. Remove pan.

Beat cream cheese and powdered sugar in small bowl with mixer until well blended. Add 1 tbsp. milk; beat until well blended. Blend in enough of the remaining milk until glaze is of desired consistency. Drizzle over warm bread.

Makes 12 servings.

Nutrition information: 340 calories, 19 g fat, 35 mg cholesterol, 590 mg sodium, 40 g carbohydrate, 1 g fiber, 22 g sugar, 4 g protein.

Source: Kraftrecipes.com. You can find the recipe here.

Notes: My sister-in-law makes a monkey bread very similar to this. She didn't give me the recipe, she just described what she did to make it...and I found this recipe which matched her description perfectly. Except that she doesn't make the glaze for hers. So, when I made this, I skipped the glaze (hence the glaze free pictures). Next time I make this, I will definitely try it with the glaze. It would be great both ways.


Tuesday, July 17, 2012

No Recipe Required


Sometimes it's just nice to throw together a meal without having to hunt down the recipe.

Here are a few of my favorite "no recipe required" meals.  They definitely come in handy for me and I hope they will come in handy for you too.

I would love to hear some of your favorite recipe-free go-to meals too!


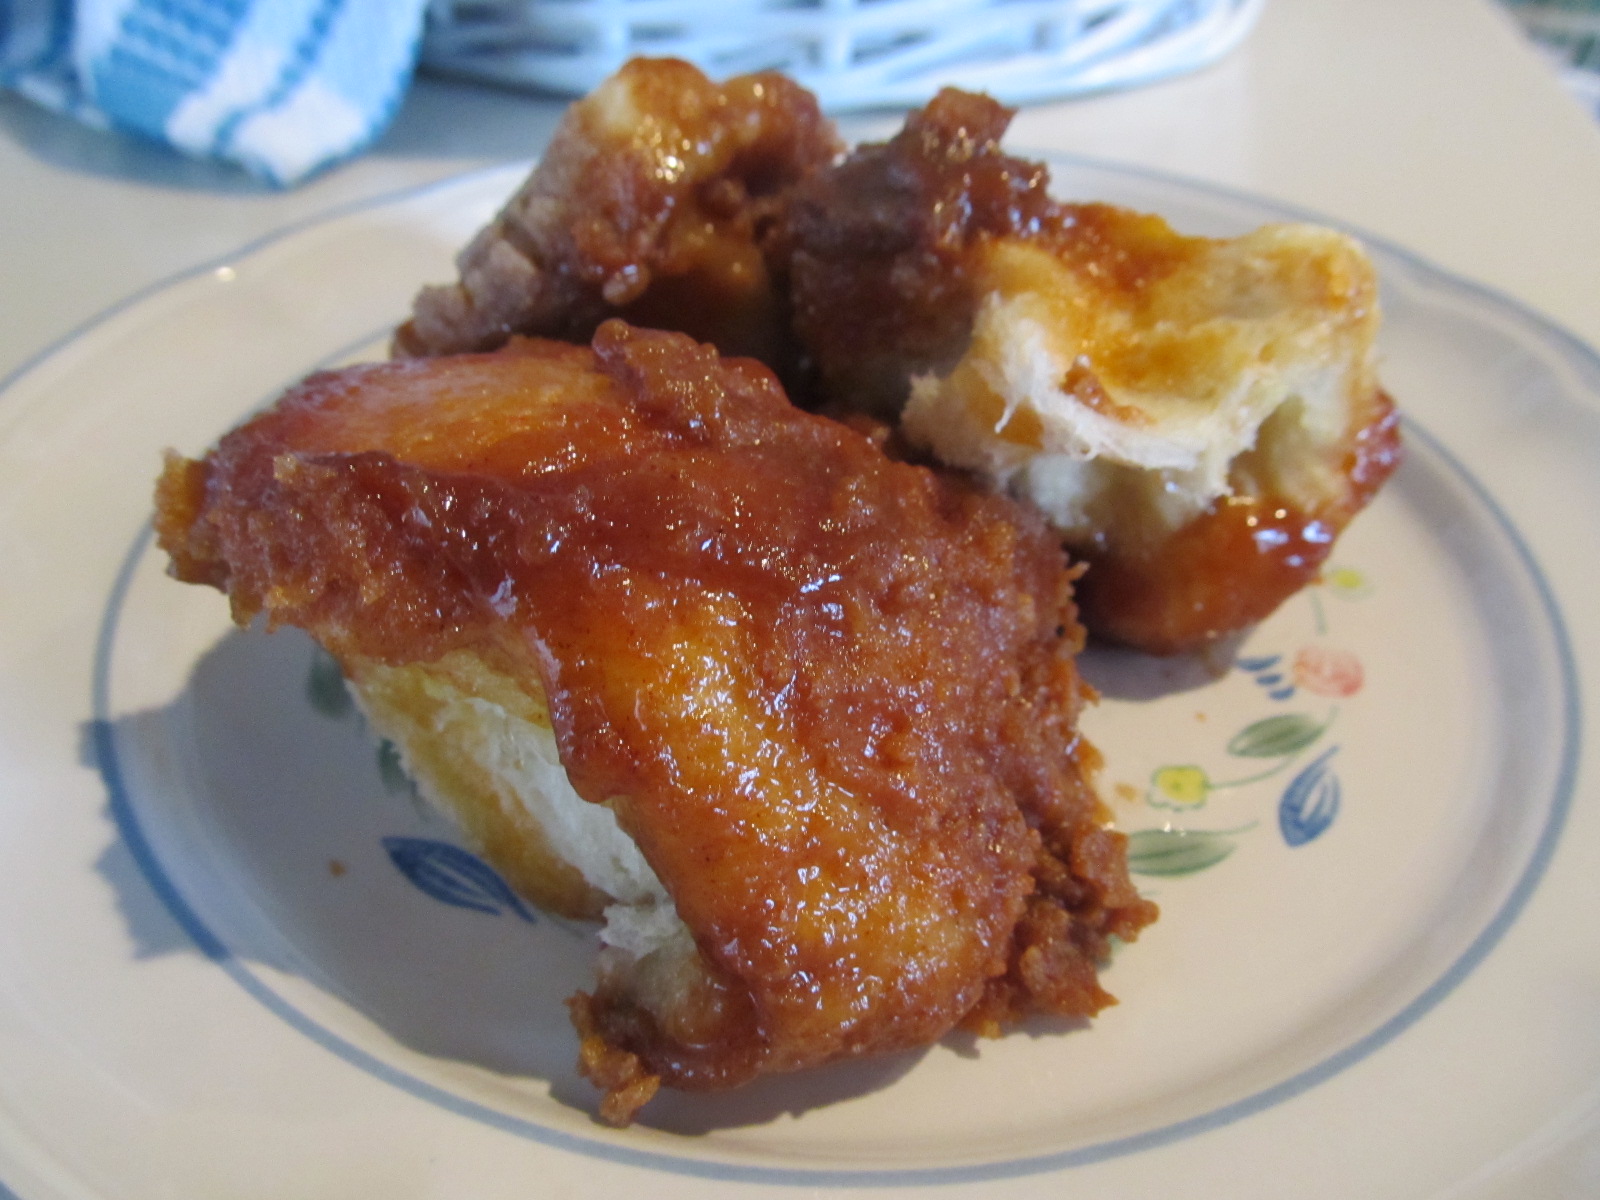
Slow Cooker Ranch Pork Chops with Mashed Potatoes

Ingredients:

4 pork chops
1 packet ranch dressing mix
1 can condensed cream of chicken soup
Instant mashed potatoes or your favorite homemade mashed potatoes

Directions:

Place pork chops in a single layer in your slow cooker.  Sprinkle ranch dressing packet evenly over your pork chops.  Top each pork chop with the cream of chicken soup (1/4 can per pork chop).

Cook on low heat for 6-8 hours.

Serve pork chops and gravy with mashed potatoes.

Source: I saw an idea similar to this one on Pinterest.  You can find the recipe I originally found here.  It's from a blog called "Chef in Training."  Apparently, she got that recipe from another blog called "Real Mom Kitchen", which you can find here.  So, share and share alike!

Notes: I was looking for a meal to make that consisted of things I already had in the house and with the exception of the potatoes from the original recipe, I had everything.  So, rather than making the garlic-Parmesan potatoes that the original recipe called for, I used two packages of Idahoan instant mashed potatoes.  It tasted great and it was a lot easier than making mashed potatoes from scratch!  Though her mashed potato recipe looks fantastic and I'll need to try it.


Kid Friendly Pizza Bites

Ingredients:

1 can refrigerated biscuits (8 biscuits--16.3 oz)
1/2 cup pizza sauce (from a jar)
1/2 cup mozzarella cheese
Toppings, to taste (such as pepperoni, olives, Canadian bacon, pineapple, cooked and crumbled sausage, etc.)
Additional pizza sauce for dipping, if desired

Directions:

Preheat oven to 350 degrees F.

Cut each biscuit into quarters.  In a bowl, mix biscuits, pizza sauce, and toppings until the sauce has evenly coated the biscuits.

Pour biscuit/pizza sauce mixture into a 9-inch pie plate.

Bake for 20 minutes.  Top with mozzarella cheese and bake for another 5 minutes, or until the biscuits are done and slightly browned and the mozzarella has melted.

Source: I found the idea on the Pillsbury website here.

Notes: My boys love pizza, so I thought this would be a nice way to give them what they like and yet still mix it up.  They loved it.  My oldest son loves to dip his pizza bites in pizza sauce and/or ranch dressing.


Breakfast Burritos

Ingredients:

Tortillas
Scrambled eggs (salted and peppered to taste)
Shredded cheese
Salsa
Bacon

Directions:

Top each tortilla with scrambled eggs, shredded cheese, salsa, and bacon.  Roll up like a burrito (or eat it like a taco, if you prefer).

Source: I don't know who came up with this idea, but bless their heart!  

Notes: This makes a super easy, quick, and fulfilling breakfast, lunch, or dinner!


Biscuits and Gravy

Ingredients:

1 can refrigerated biscuits (8 biscuits--16.3 oz)
1 packet white country gravy mix
Sausage, optional (patties, links, or cooked sausage crumbles)

Directions:

Bake biscuits according to package directions.

Prepare gravy according to package directions.

Serve biscuits, halved, and topped with country gravy.  You can either serve the sausage on the side (my preference), or you can mix chopped or crumbled cooked sausage into the gravy.

Source: I don't know where this one came from, so let's just say...Denny's!  Ha ha!

Notes: This is one of my favorite breakfasts.  And it's hearty enough to serve for dinner too.  I prefer not to put the sausage into the gravy because the gravy is surprisingly low-calorie by itself.  So, then I can slather my biscuits in gravy without any guilt and still enjoy my sausage on the side.


Baked Potato Bar

Ingredients:

Large baking potatoes
Favorite toppings (butter, sour cream, shredded cheese, salt, pepper, crumbled bacon, chili, broccoli and cheese, etc.)

Directions:

Preheat oven to 350 degrees F.

Wash and scrub baking potatoes.  Pierce with a fork 3-4 times.  Wrap in aluminum foil, if desired.

Bake potatoes for 1 to 2 1/2 hours (depends on the size of your potatoes).  Check potatoes for doneness by piercing with a fork.  I would plan on at least 2 hours for large potatoes.  If they get done early, you can always keep them warm in a cooler or roasting pan.  But it's better to have them done early than underdone when it's time to eat!

Top potatoes with your favorite toppings.

Source: Just common sense, I guess!  I'll bet people have been doing this for centuries.


Notes: My ideal baked potato has butter, sour cream, salt, pepper, and shredded cheese mixed and mashed together while it is still piping hot.  Yum!

What is YOUR favorite way to eat a baked potato?  Any favorite toppings that I forgot to mention?


Stir Fry

Ingredients:

Chicken, beef, or pork, sliced thinly
Favorite fresh veggies (such as mushrooms, bell peppers, broccoli, water chestnuts, bean sprouts, snap peas, red onions, carrots, etc.)
Or, frozen stir fry vegetable mix
Bottled stir fry sauce (this time, I used House of Tsang General Tsao Sauce...yum!)
Rice

Directions:

Cook meat in a little oil until cooked through (or to desired doneness for beef). Remove meat and place on a plate.  Cover to keep warm.

Cook vegetables until crisp-tender.

Return meat to pan and add desired amount of stir fry sauce. Serve over brown or white rice.

Source: Again, I'm not sure who came up with this, but bless their hearts!

Notes: This is one of those great dinners to throw together than can be done so easily with any mix of meat and veggies that you have on hand.  It's fast and easy, but it's also a nice change of pace from the norm.


Navajo Tacos

Ingredients:

Vegetable oil for frying
Frozen roll dough (2 rolls per person), thawed, and slightly risen
Canned chili or ground beef (seasoned with favorite spices or taco seasoning mix)
Refried beans (or black or pinto beans)
Shredded cheese
Shredded lettuce
Diced tomato
Salsa
Sour cream
Additional favorite toppings: sliced black olives, sliced pickled jalapeno peppers, ranch dressing (or cilantro-lime dressing, salsa-ranch dressing, etc.), cilantro, etc.

Directions:

Heat oil in a deep frying pan or skillet until it reaches 375 degrees F.

Combine two rolls and flatten into a 6-inch circle.  Fry in oil about 30 seconds per side, or until golden brown.  Drain on paper towels.  Repeat until you have the desired amount of fry bread.

Source: I don't know when our family started making this, but Rhodes Bread was probably an influence.  You can find their recipe here.

Notes: I like to go the easy route and top my Navajo tacos with refried beans and chili rather than making seasoned ground beef.  But that's just me!  Do whatever you like!

BLT Sandwiches

Ingredients:

Bread
Bacon (2 slices per person, at least)
Iceberg lettuce
Sliced tomatoes
Mayonnaise
Mustard
Salt and pepper, if desired

Directions:

Cook bacon.  My preferred method is to bake the bacon (because when I make it on the stove-top I always get grease burns!).  You can bake the bacon at 400 degrees F. for 15-20 minutes or until desired doneness or at 350 degrees F for 30-35 minutes (if you want more in-dept directions, check out this fantastic recipe here.).

Toast bread and top with mayonnaise, mustard, salt, and pepper, if desired.

Place bacon, lettuce, and tomato on top of the first slice of bread and top with the remaining slice of bread. Enjoy!

Source: Let's face it, a lot of these "no recipe required" meals are old classics without a known source or origin.  Here's what Wikipedia has to say about it: The BLT evolved from the tea sandwiches served before 1900 at a similar time to the club sandwich, although it is unclear when the name BLT became the norm.

Monday, July 16, 2012

Side Dishes--Bread Edition


I'm sure there will be many more bread editions to come because I think it is so much fun to make homemade bread to serve with dinner (and eat the next day as a snack, breakfast, or with lunch!).

All of the following bread recipes are very easy to make.  I'm still a novice bread maker, so I'm starting out with the basics.  But someday I hope to master the art of breadmaking to such a degree that I can churn out artisan breads such as ciabatta, sourdough, and other such yummy crusty loaves.

But for now, the following is what I have the time and skill to make!


Albers Corn Bread

Ingredients:

1 cup Albers Yellow Corn Meal
1 cup all-purpose flour
1/4 cup granulated sugar
1 tbsp. baking powder
1 tsp. salt
1 cup milk
1/3 cup vegetable oil
1 large egg, lightly beaten

Directions:

Preheat oven to 400 degrees F.  Grease 8-inch square baking pan.

Combine corn meal, flour, sugar, baking powder, and salt in medium bowl.  Combine milk, oil, and egg in small bowl; mix well.  Add milk mixture to flour mixture; stir just until blended.  Pour into prepared pan.

Bake for 20-25 minutes or until wooden pick inserted in center comes out clean.  Serve warm.

Recipe notes:

Recipe may be doubled.  Use greased 13x9-inch baking pan; bake as above.

For muffins: Spoon batter into 10-12 greased or paper-lined muffin cups filling each 2/3 full. Bake in preheated 400 degree oven for 15 minutes.

High altitude (3500-6000 feet): Cornbread--bake for 22-24 minutes.  Corn muffins--bake for 15-17 minutes.

Source: I found this on the back of my box of corn meal.  As you can tell above, it is Albers brand yellow corn meal.


Notes: This was fantastic.  You can serve it with a little butter and drizzled with honey.  Or, you can make your own honey butter by softening 1 cup (2 sticks) of butter and mixing in 1/3 cup of honey (or to your taste).  Either use the softened honey butter, or put the butter into molds and refrigerate until set.


Bannoch

Ingredients:

3 cups flour
1 tbsp. baking powder
1 tsp. baking soda
1 tbsp. sugar
1 tsp. salt
1 1/2 cups buttermilk
1/2 cup sour cream or plain yogurt

Directions:

Preheat oven to 350 degrees.  Into a large bowl, sift flour, baking powder, baking soda, sugar, and salt.  Sift the mixture two more times.  Add buttermilk and sour cream; mix well.  Form dough into a ball and transfer to a lightly floured surface (dough will be sticky). Roll dough into a 12x7x1-inch oval; score the top carefully and transfer to an ungreased baking sheet.  Bake about 30 minutes or until loaf is brown.  Serve warm.

Makes 1 loaf.


Source: Worldwide Ward Cookbook: Secret Recipes! by Deanna Buxton.  Recipe submitted by Clark Manning of the Chevy Chase Ward in the Washington DC Stake.

Notes: I didn't roll the dough out, I simply shaped it into an oval with my fingers.  This was super yummy and made for a very pretty bread.  It looks like it would be a crusty bread like French bread, but it isn't.  It's chewy...more like a savory quick bread.


Zesty Cheddar Bread

Ingredients:

1 1/4 cups fat-free buttermilk
1/4 cup canola oil
1 tablespoons sugar
2 tablespoons finely chopped chipotle chiles in adobo sauce (from 7-oz can)
1/2 cup egg substitute or 2 eggs
2 cups Gold Medal all-purpose flour
3/4 cup shredded reduced-fat sharp Cheddar cheese (3 oz)
2 teaspoons baking powder
1 teaspoon baking soda
1/2 teaspoon salt

Directions:

Heat oven to 400 degrees F.  Grease bottom only of 8x4- or 9x5-inch loaf pan with cooking spray.

In large bowl, stir buttermilk, oil, sugar, chipotle chiles, and eggs until well mixed.  Stir in remaining ingredients just until moistened.  Spread in pan.

Bake 8-inch pan 45-55 minutes, 9-inch pan 40-50 minutes, or until toothpick inserted in center comes out clean (do not underbake).  Cool 15 minutes in pan on cooling rack.  Loosen sides of loaf from pan; remove from pan to cooling rack.  Serve warm, if desired.

Makes 12 servings.

Nutrition information: 1 slice is 150 calories, 6 g fat, 0 mg cholesterol, 410 mg sodium, 19 g carbohydrates, 0 g fiber, 2 g sugar, 5 g protein.


Source: Eat Better America recipe found here.  They are a division of General Mills and feature many of the same recipes as the Betty Crocker website.

Notes: I loved this.  It is a wonderfully easy savory quick bread and it has a fun chewy texture.  I would suggest using it to soak up extra sauce/juices from your favorite Mexican foods. Or lightly butter it.

I haven't been able to try this yet, but I think a fantastic variation would be to use Pepper-Jack Cheese in place of the Cheddar and canned diced green chiles in place of the chipotle peppers.  Hmmm.  Maybe I'll have to try that this week and report back!  Yum!


Mango Salsa Bake

Ingredients:

20 Rhodes™ Dinner Rolls, thawed but still cold
1/4 cup butter, melted
1 cup mango salsa (or favorite chunky salsa)
1 cup grated mozzarella cheese
1 cup grated cheddar cheese
grated Parmesan cheese

Directions:

Brush a 9x13-inch pan with butter. Cut each roll into 4 pieces. Line bottom of pan with rolls. Brush tops of rolls with butter. Top with salsa. Mix mozzarella and cheddar cheeses together and sprinkle over rolls. Sprinkle with Parmesan cheese. Cover with plastic wrap and let rise until double. Remove wrap and bake at 350°F 20-25 minutes.

Source: Rhodes Bread website found here

Notes: I went to a Rhodes Bread demonstration for a Relief Society meeting and they showed us how to make these and served us the finished product.  They are soooo easy and soooo good.  They used the mango salsa from Costco at the demonstration, so when I made it myself, I did the same.  It is super yummy.  If you can't find the mango salsa or don't have a membership, I would suggest that you use your favorite jarred salsa.  If you absolutely have to try the mango (and I wouldn't blame you), here's what I suggest: buy a jar (in the refrigerated section of the produce section) of mangoes.  Chop them up and mix them into your salsa.  You could even add some chopped canned peaches in addition to or instead of the mangoes.  Trust me, this bread is awesome.  It makes a great side served with a Mexican soup or your favorite Mexican dish.


Above: The pictures don't do it justice.  I guess I'll just have to make it again so that I can take more pictures.  Shucks (as I snap my fingers and pull a "poor me" face).  :)