Showing posts with label Cake. Show all posts

Wednesday, January 20, 2021

Ice Cream Cake

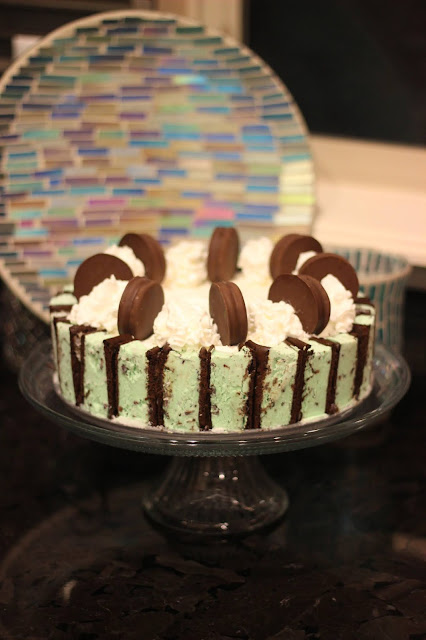
My son broke from tradition this year and rather than a regular cake, he asked me for an ice cream cake for his birthday. He's more of an ice cream fan than a cake fan anyway, so it was fitting. His current favorite flavor of ice cream is mint chocolate chip, so that is what he asked for. To be specific, he asked for a "mint chocolate chip Pokemon ice cream cake." Above is a picture of the cake without the Pokemon cake topper. I looked up a bunch of ice cream cakes online and kind of came up with my own plan that was a combination of a bunch of different ice cream cakes that I found online. 

I saw some gorgeous ice cream cakes in my online searches. I saw a version very similar to the one I made using Neapolitan ice cream sandwiches that was soooo pretty! It would be so cute for a girl's birthday cake. Cookies and cream ice cream sandwiches and a cookies and cream cake would be so good too. I saw a really fun banana split cake ice cream cake too. I love that you can be really creative with these ice cream cakes.


Step 1: While cake layer is baking, crush Oreos with a rolling pin. 


Step 2: Cut ice cream sandwiches. 


Step 2 continued: Place ice cream sandwiches in spring form pan. 


Step 3: Spread crushed Oreos and mag shell on bottom of spring form pan. 

Step 4: Spread first layer of ice cream on top of Oreo/magic shell crust.

Step 5: Top with cake layer and gently press onto ice cream layer below it.


Step 6: Top cake layer with second layer of ice cream. 


Step 7: Top final layer of ice cream with a layer of frozen whipped topping.


 Step 8: Remove from spring form pan and decorate as desired.


Mint Chocolate Chip Ice Cream Cake

Ingredients:

1 box devil's food cake mix (with eggs, water, and oil called for on package)
Mint chocolate chip ice cream sandwiches (I used 7, see notes below)
17-20 Oreo cookies
1 (7.25 oz) bottle magic shell topping
1 quart (56 fl oz) mint chocolate chip ice cream
1 (8 oz) container whipped topping
Oreo Fudge Covered Mint Creme Sandwich Cookies or additional Oreos, for topping
Dairy whipped cream topping, for decorative topping, if desired
Chocolate syrup, for topping, if desired

Directions:

Step 1: Prepare cake mix according to package directions. Divide the batter into four equal portions. You will only need 1/4 of the cake batter for your ice cream cake. Pour 1/4 of the batter into an 8 inch round cake pan that has been sprayed with cooking spray. Bake the thin cake layer in a 350 degree F oven for 13-15 minutes, or until cake is done when tested with a toothpick. Let cake cool completely. See my notes for tips on how you can use the extra batter.

While cake is baking, place 17-20 Oreo cookies in a zip top bag and crush with a rolling pin.

Step 2: While the cake is cooling, remove mint chocolate chip ice cream and frozen whipped topping from freezer to soften. Prepare ice cream sandwiches by cutting them into equal pieces (measuring about two inches long and one inch wide). 

You can get rectangular shaped ice cream sandwiches and square shaped ones. I got square shaped ones. I cut mine into thirds. If you are using rectangular shaped ice cream sandwiches, cut them into fourths (in half length-wise and in half width-wise to get four equal sized rectangular pieces).

Place ice cream sandwich pieces inside of a 10-inch spring form pan along the edges. 

Step 3: Mix a little magic shell topping (about 1/4 cup) with your crushed Oreos, until coated. Then pour the Oreo mixture into the middle of your spring form pan and spread until the bottom is evenly covered. Pour a little more magic shell over the Oreos to ensure full coverage. Place in freezer until set.

Step 4: Once ice cream is softened and crust is set, remove ice cream cake from freezer and evenly spread about two to three cups of ice cream on top of the Oreo/magic shell layer. Place in freezer until set.

Step 5: Remove cake from freezer. Add cake layer. Mine just fit into the middle space. Press cake gently down until it is firmly against the ice cream layer below it. Place in freezer until set.

Step 6: Remove cake from freezer. Add second ice cream layer to cake by spreading about two to three more cups of softened ice cream on top of the chocolate cake layer. Place in freezer until set. Put remaining mint chocolate chip ice cream back in the freezer as well.

Step 7: Remove cake from freezer. Evenly spread top with thawed frozen whipped topping until even with the top of the ice cream sandwiches. Place in freezer until set and ready to serve.

Step 8: Just prior to serving, remove ice cream cake from freezer. Remove spring form pan and decorate as desired. I decorated mine with whipped cream topping and fudge covered Oreos. I used 8 fudge covered mint Oreos and 8 sprays of whipped cream topping around the top of my ice cream cake. Serve with additional whipped cream topping and a drizzle of chocolate syrup or magic shell, if desired.


Notes: You can use the extra batter however you like. You could bake the additional batter in 2-3 additional 8-inch round cake pans and use those layers for a traditional cake. Or you could bake the additional batter in a 9x13 inch pan and frost that. Or you could use the extra batter to make cupcakes. Or you could throw it out if you don't want the extra temptation. Ha ha! I probably should have done that.

Instead, I baked my batter into four separate 8 inch round cake pans so I had four thin cake layers. I did it this way because I had never made this before and I wasn't sure if I would be using one or two layers of cake in my ice cream cake. I used one layer for the ice cream cake, and used the extra layers to make two different flavors of ice cream cakes, because I am crazy like that. More on that later. Those ice cream cakes were very basic.

 
Above: A peek at the layers inside.

 
Above: Yes, I made three ice cream cakes because I am crazy. We had extra flavors of ice cream in our freezer and extra cake layers, so I got creative. Though, I didn't try to be pretty with these ones. This one had a cake layer on the bottom, Moose Tracks peanut butter ice cream, a layer of whipped topping, and then drizzled melted peanut butter and magic shell topping. I figured that this will keep in the freezer for awhile, so why not?

 
Above: This one had a cake layer, Double Dribble ice cream (caramel, chocolate, and vanilla swirl ice cream), another cake layer, a layer of whipped topping, and then a drizzle of magic shell.

Sunday, April 30, 2017

Strawberry Shortcake...Cake Style


My mom made this cake to celebrate my sister's birthday. It was beautiful, delicious, and it got gobbled up quickly by everyone (even the kids!).


Strawberry Shortcake Poke Bundt Cake

Ingredients:

Cake:

1 box Betty Crocker SuperMoist yellow cake mix
1 cup milk
4 oz. cream cheese, softened
3 eggs

Strawberry Poke Mixture:

1 1/2 cups sliced fresh strawberries
1/4 cup granulated sugar
2 teaspoons lemon juice

Cream Cheese Glaze:

3/4 cups powdered sugar
2 tablespoons butter, softened
1 oz. cream cheese, softened
1 to 2 tablespoons milk
1/4 teaspoon vanilla

Garnish:

1 cup sliced fresh strawberries

Directions:

Heat oven to 325 degrees F. Generously spray 10- or 12- cup bundt cake pan with cooking spray with flour.

In large bowl, beat Cake ingredients with electric mixer on low speed 1 minute, scraping bowl constantly. Increase speed to medium, beat 2 minutes, and pour batter into pan.

Bake 40 to 45 minutes or until toothpick inserted in center comes out clean. Cool 15 minutes.

Meanwhile, in food processor or blender, puree Strawberry Poke Mixture ingredients until smooth; transfer to a 4-cup glass measuring cup, and set aside. while still in pan, poke holes in cake with end of wooden spoon at 1/2-inch intervals going almost to bottom. Use wet paper towel to wipe ends of spoon after each poke. Carefully pour poke mixture over holes in cake, using spoon to direct mixture into holes. If necessary, poke existing holes to makes room for more mixture.

Cool 40 minutes, refrigerate in pan 2 hours. Remove from refrigerator, and run metal spatula around outer and inside edges of pan to loosen cake; turn upside down onto serving platter.

In medium bowl, mix Cream Cheese Glaze ingredients with electric mixer on low speed until smooth. If too thick, add additional milk, 1 teaspoon at a time, until desired consistency. Glaze cake as desired; garnish with strawberries.

Source: Betty Crocker website. You can find it here.

Notes: As I said above, this was delicious and everyone loved it!

Monday, November 21, 2016

It's Not Fall Without Pumpkin


So, apparently my mom hates pumpkin. However, I just have to have something with pumpkin in it around this time of year. It's just a flavor that says "autumn" to me.

Here's a great cake to help you take care of your pumpkin cravings this fall.


Pumpkin Layered Magic Cake

Ingredients:

Cake Layer:
1 box Betty Crocker SuperMoist yellow cake mix
1 cup water
1/2 cup vegetable oil
3 eggs

Pumpkin Layer:
1 can (15 oz) pumpkin (not pumpkin pie mix)
1 cup packed brown sugar
1 cup half-and-half
3 eggs
2 teaspoons pumpkin pie spice
1/2 teaspoon salt

Topping:
1 package (8 oz) cream cheese, softened
3/4 cup powdered sugar
1 teaspoon vanilla
1/8 teaspoon salt
2 cups heavy whipping cream
Pumpkin pie spice, for sprinkling

Directions:

Heat oven to 350 degrees F. Spray bottom only of 13x9-inch pan with cooking spray.

In large bowl, beat Cake Layer ingredients with electric mixer on low speed until moistened. Scrape bowl; beat 2 minutes on medium speed. Spread in pan.

In another large bowl, mix Pumpkin Layer ingredients with whisk until smooth. Carefully spoon pumpkin mixture over cake batter in pan.

Bake 48 to 53 minutes or until cake is set when touched lightly in center. Cool 30 minutes. Refrigerate at least 4 hours to chill.

In large bowl, beat cream cheese, powdered sugar, vanilla, and 1/8 teaspoon salt until smooth. Add whipping cream; beat until smooth, and stiff peaks form. Spread over chilled cake. Sprinkle lightly with pumpkin pie spice. Store covered in refrigerator.

Source: Betty Crocker. You can find it here.

Notes: I was worried after I baked this that the pumpkin layer hadn't sunk to the bottom. I really couldn't tell from the outside of the pan, but once I cut into it, it had turned out perfectly. This dessert is so easy to put together and will take care of your pumpkin craving for sure.

Monday, October 10, 2016

Oktoberfest Find


For Oktoberfest this year, we just made some tried and true favorites that we have already previously posted on our blog. You can find some of our favorite Oktoberfest recipes here, here, and here. However, we did make this fantastic new discovery. My mom was reticent to make it because she worried that a lot of us wouldn't eat it because some people in our family aren't huge fans of cherries. Oh, I'm so glad she did make this though. It is fantastic!


German Black Forest Cake

Ingredients:

Cake:

1 cup whole milk
3 large eggs
1/2 cup canola oil
3 teaspoons vanilla extract
2 cups, plus 2 tablespoons all-purpose flour
2 cups sugar
3/4 cup baking cocoa
1 1/2 teaspoons baking powder
3/4 teaspoon baking soda
3/4 teaspoon salt

Filling:

2 cans (14 1/2 ounces each) pitted tart cherries
1 cup sugar
1/4 cup cornstarch
3 tablespoons cherry brandy or 2 teaspoons vanilla extract

Whipped Cream:

3 cups heavy whipping cream
1/3 cup confectioners' sugar

Directions:

Preheat oven to 350 degrees F. Line bottoms of two greased 9-in. round baking pans; grease paper.

In a large bowl, beat milk, eggs, oil, and vanilla until well-blended. In another bowl, whisk flour, sugar, cocoa, baking powder, baking soda and salt; gradually beat into milk mixture.

Transfer to prepared pans. Bake 30-35 minutes or until a toothpick inserted in center comes out clean. Cool in pans 10 minutes before removing to wire racks; remove paper. Cool completely.

Meanwhile, for filling, drain cherries, reserving 1/2 cup juice. In a small saucepan, whisk sugar, cornstarch, and reserved juice; add cherries cook and stir over low heat 10-12 minutes, or until thickened and bubbly. Remove from heat; stir in brandy or vanilla. Cool completely.

In a large bowl, beat cream until it begins to thicken. Add confectioners' sugar; beat until stiff peaks form.

Using a long serrated knife, cut each cake horizontally in half. Place one cake layer on a serving plate. Top with 1 1/2 cups whipped cream. Spread 3/4 cup filling to within 1 in. of edge. Repeat twice. Top with remaining cake layer. Frost top and sides of cake with remaining whipped cream, reserving some to pipe decorations, if desired. Spoon remaining filling onto top of cake. Refrigerate until servings.

Yield: 12 servings.

Nutrition information: 1 slice: 659 calories, 34 g fat, 136 mg cholesterol, 329 mg sodium, 84 mg carbohydrate, 7g protein.

Source: Taste of Home, submitted by Stephanie Travis of Fallon, Nevada. You can find it here.

Notes: This is fantastic and completely worth using your calories on! Don't be tempted to substitute cherry pie filling for this recipe. The pitted tart cherries add so much to this cake.

Friday, August 12, 2016

There Are Never Too Many Versions of Tres Leches Cake


Ahhh, tres leches cake is so good. We have a few versions on our blog already...chocolate version 1, chocolate version 2, the eggnog version, the banana version, and the best classic version (which I need to post on its own with a much better picture rather than in this huge post about Cinco de Mayo). Not to mention our favorite poke cakes which are very similar to tres leches...this pumpkin version among many, for example.

If you love red velvet cake and you love tres leches cake, why not combine the two?


Red Velvet Tres Leches Cake

Ingredients:

Cake:

1 box Betty Crocker SuperMoist devil's food cake mix
1 1/4 cups water
1 tablespoon vegetable oil
4 eggs
2 teaspoons vanilla
1 bottle (1 oz) red food color

Tres Leches:

1 can (14 oz) sweetened condensed milk (not evaporated)
1 cup whipping cream
1 cup Irish cream liqueur (or Irish cream coffee creamer)

Frosting and Decoration:

1 1/2 cups whipped cream
1/4 cup powdered sugar
1 teaspoon vanilla
1/4 cup shaved dark chocolate

Directions:

Heat oven to 350 degrees F (325 degrees F for dark or nonstick pan). Grease or spray 13x9-inch pan. In large bowl, beat cake ingredients with electric mixer on low speed 30 seconds, then on medium speed 2 minutes, scarping bowl occasionally. Pour batter into pan.

Bake 28-32 minutes or until toothpick inserted in center comes out clean. Cool 10 minutes. Poke top of cake every 1/2 inch with wooden skewer.

In small bowl, mix tres leches ingredients. Spoon mixture evenly over top of cake, allowing mixture to soak into holes. Cover; refrigerate 1 to 2 hours or until mixture is absorbed.

In medium bowl, stir together whipped cream, powdered sugar, and vanilla. Frost cake with whipped cream mixture; sprinkle with chocolate shavings.

Source: Found on Que Rica Vida. You can find it here.

Notes: As with all tres leches cakes, this was sooo good!


Sunday, May 29, 2016

You Can't Drink This Version


My son loves root beer floats and asked my mom if she could make a root beer float cake. Well, of course she can! There's a recipe for everything out there these days!


Root Beer Float Cake

Ingredients:

1 box Betty Crocker SuperMoist white cake mix
1 1/4 cups root beer
1/3 cup vegetable oil
3 egg whites
1 teaspoon root beer concentrate or 1 tablespoon root beer flavored syrup
1 container Betty Crocker Rich & Creamy vanilla frosting
1/3 cup crushed root beer flavored hard candies (about 10)

Directions:

Heat oven to 350 degrees F (325 degrees F for dark or nonstick pan). Spray bottom only of 13x9-inch pan with baking spray with flour.

In large bowl, beat cake mix, root beer, oil, and egg whites with electric mixer on low speed 30 seconds, then on medium speed 2 minutes, scraping bowl occasionally. Pour into pan.

Bake 32 to 36 minutes or until toothpick inserted in center comes out clean. Cool completely in pan, about 1 hour.

Stir root beer concentrate into frosting. Spread over cake. Just before serving, sprinkle with crushed candies. (Candies will begin to melt 1 to 3 hours after sprinkled on cake.) Store loosely covered.

Recipe notes: For maximum cake height, keep baking spray off the sides of the pan. The cake will climb the sides of the pan better. For a fun soda fountain touch, insert half of a plastic straw into each piece of cake.

Source: Betty Crocker. You can find it here.

Notes: This wasn't exactly what my son was expecting. I'm not sure what he was expecting though. He ended up pouring root beer on top of his cake and he was happy with it that way. Ha ha! As for the rest of us, we were happy with the cake without pouring root beer on top of it.

Thursday, May 19, 2016

Taking the Easy Way Out

This year, we were in the middle of moving out of our house and into a new one right around my birthday, so I really didn't have the time or energy to bake myself a birthday cake. My son picked me out a cute cake at the grocery store (a pink and purple princess cake, awwww). However, I also saw these and since they were only about $3 each, I got one for each of my boys as well. They were so cute and I loved the idea because you could easily duplicate it at home.


In fact, it took me back to a cake decorating contest we had for an Family Home Evening activity in one of my single's wards years ago. We were give plain white cakes, frosting, and food coloring and given the task of decorating cakes. One girl cut her cake into pieces and created the cutest hot dog cake with fries and ketchup. I thought it was so creative. I can copy things, but I definitely can't come up with ideas like that on my own.

The fries here were made from simply cutting pound cake into slices and providing a dollop of red frosting for the ketchup to dip them in.

Sunday, April 3, 2016

Yay for Poke Cakes!


Who doesn't love a nice, gooey, moist poke cake? This is a pretty wonderful one that will help you satisfy a lot of cravings. Caramel? Check. Nuts? Check. Chocolate? Check.


Chocolate-Caramel-Peanut Poke Cake

Ingredients:

1 box Betty Crocker SuperMoist chocolate fudge cake mix
Water, oil, and eggs called for on cake mix box
2 jars (11.5 oz each) salted caramel sauce
1 cup heavy whipping cream
1 tablespoon powdered sugar
1 cup chocolate-flavored syrup
1/2 cup chopped salted peanuts

Directions:

Heat oven to 350 degrees F. Spray 13x9-inch pan with cooking spray; line with cooking parchment paper.

Make cake as directed on box for 13x9-inch pan. Immediately after removing from oven, poke holes all over cake using chopstick. While cake is still warm, gently spread 1 1/2 jars of the caramel sauce over cake. Cool cake completely, then refrigerate 2 hours.

In medium bowl, beat cream and powdered sugar to stiff peaks. Spread over top of cake; drizzle with remaining caramel sauce and chocolate syrup; sprinkle with peanuts.

Source: Betty Crocker. You can find it here

Notes: Yummy goodness...not a light dessert though, by any means!

Tuesday, February 23, 2016

Birthday Cake Expectations


When I asked my son how he wanted his birthday cake decorated, he said, "I want a cake with puppies and kittens having a picnic at the beach...and I want a shark chasing a puppy in the ocean."

Well!

I wanted the ocean water to look special and after hunting around online, I came up with the idea of using piping gel...but it was a little expensive and I didn't know if it would be delivered in time for my son's birthday. So, then I had the bright idea of looking to see if I could find a recipe for homemade piping gel online. No surprise, I was able to find one! Thank you World Wide Web and thanks to the wonderful blog that posted such a useful recipe! You really have to check out this blog. It has so many amazing ideas! It's called Craftsy.com.


Piping Gel

Ingredients:

1/4 cup cold water
1/4 cup cornstarch
1/2 cup light corn syrup
1 tsp. clear flavor extract (optional)
Gel food coloring (optional)

Directions:

Combine the cold water and cornstarch in a heat-proof container. Whisk until no cornstarch lumps remain. Whisk in the corn syrup until combined.

Microwave for 2-3 minutes on high, stopping ever minute or so to stir. The mixture will bubble up and boil before thickening to the consistency of hair gel. Watch carefully, to avoid boiling over. If it looks like it is about to boil over, remove it from the microwave, stir it, and put it back in the microwave until it has reached the right consistency.

Allow the mixture to cool to room temperature before adding flavoring or color.

If the piping gel becomes too thick, add a tiny amount of water until you achieve your desired consistency. Store piping gel refrigerated in an airtight container for up to three months.

Source: Craftsy.com. You can find the original post here. Be sure to check out this link (and to explore their site). There are amazing cakes to look at as well as some great ideas for how you can use piping gel.

Notes: The piping gel worked great! It didn't taste that amazing by itself, but when paired with the layer of blue frosting I had on the cake underneath it, it was a delicious combination. It helped me get my ocean water just how I wanted to look.

On the other hand, my son clarified that he wanted the shark to actually be eating the swimming puppy, not just chasing it. :) You can't win 'em all, I guess. However, everyone loved the cake and gobbled it up pretty quickly.


Above: We used cut up Fruit by the Foot to make beach towels for the puppies and kittens. I crushed some vanilla wafers in my food processor and sprinkled it on top of the frosting to make sand.


Above: I ordered the toy puppies and kittens from Amazon. We had the palm trees from a play pirate set that the boys already had. I ran them through the dishwasher before using them on the cake. 


Above: The sharks are closing in on that poor puppy. 


Above: If you're like me, you will imagine that the puppy made it to land before being devoured. If you're like my son, the puppy didn't make it. :) I love how kids' minds work...especially my sweet little boy's mind.

Saturday, September 26, 2015

Slightly Different Than Normal


Usually, I make this fantastic carrot cake for my husband's birthday. However, I had just had a baby and was looking for ways to simplify things and had also found this very similar (and quicker) recipe. The carrot cake I usually make is a layer cake and I had always wondered if it would work as a sheet cake, but I had never gotten around to trying it out. This recipe was a sheet cake and I felt that would save me time because frosting a layer cake always takes longer than frosting a sheet cake. This carrot cake is every bit as delicious, moist, and wonderful as the layer cake one.

Rather than shredding the carrots, I followed the layer cakes instructions and instead blended the carrots with the other wet ingredients (except the pineapple) to save time. It worked beautifully. This is one delicious cake!


Mrs. Thompson's Carrot Cake Recipe

Ingredients:

3 cups shredded carrots
1 can (20 ounces) crushed pineapple, well-drained
2 cups sugar
1 cup canola oil
4 eggs
2 cups all-purpose flour
2 teaspoons baking soda
2 teaspoons ground cinnamon

Frosting:

1 package (8 ounces) cream cheese, softened
1/4 cup butter, softened
2 teaspoons vanilla extract
3-3/4 cups confectioners' sugar

Directions:

In a large bowl, beat the first five ingredients until well blended. In another bowl, mix the flour, baking soda, and cinnamon; gradually beat into carrot mixture.

Transfer to a greased 13-in. x 9-in. baking pan. Bake at 350 degrees F for 35-40 minutes or until a toothpick inserted in center comes out clean. Cool completely in pan on wire rack.

For frosting, in large bowl, beat the cream cheese, butter, and vanilla until blended. Gradually beat in confectioners' sugar until smooth. Spread over cake. Cover and refrigerate leftovers.

Yield: 15 servings.

Nutrition information: 1 piece equals 552 calories, 25 g fat, 81 mg cholesterol, 269 mg sodium, 80 g carbohydrate, 2 g fiber, 5 g protein.

Source: Taste of Home, February/March 2013. You can find it here.

Notes: As I said, I used my blender rather than shredding the carrots. I filled my blender to the 3 cup line with baby carrots and then added the oil and eggs. I then blended it until all the carrots were smoothly blended. This is one fantastic and delicious cake. You will notice from the nutrition information that while it has carrots in it, it doesn't necessarily make it a light cake! However, we only have carrot cake once a year for my husband's birthday, so it's worth the splurge.


Above: Ahhhh, the ease of frosting a sheet cake versus a layer cake.

Saturday, August 1, 2015

How Can I Have Some More When I Haven't Had Any?


You're killing me, Smalls! So, if you don't get the title or first sentence of this post, you have never seen The Sandlot. If this is the case, stop reading this post, rent, buy, or borrow this movie, watch it, and then come back to finish reading this. I will wait...

Did you like it? It's such a great movie, isn't it?!

Anyway, here is a fantastic dessert recipe that was inspired by s'mores. Yummy stuff!


Chocolate S'mores Pudding Cake

Ingredients:

2 cups graham cracker crumbs
8 tbsp. butter, melted
1 (15.25 oz) box chocolate cake
1 (3.9 oz) box instant chocolate pudding
2 cups milk
1 (8 oz) container Cool Whip
1 (7 oz) jar marshmallow cream
3 full size Hershey chocolate bars, chopped

Directions:

Combine the graham cracker crumbs and melted butter. Press onto the bottom of a greased 9x13 glass pan.

Prepare the cake mix according to the box directions. Spoon the batter on top of the prepared crust. Bake at 350 degrees F for 28 minutes or until a toothpick inserted in the center comes out clean. Let cool 10 minutes. Use the handle of a wooden spoon to gently poke holes all over the top of the cake. Use a napkin to keep the spoon clean in between pokes.

Whisk together the pudding mix and milk. Pour over the top of the warm cake immediately, filling the holes with the pudding. Use the back of a serving spoon to smooth and press the pudding into the holes more. Try to keep the pudding in the center of the cake instead of the sides.

Cool for 30 minutes, then refrigerate until chilled all the way through.

Stir together the Cool Whip and marshmallow cream. Spread over the cooled cake. top with the chopped Hershey bars.

Yield: 24 servings.

Source: Inside Bru Crew Life. You can find it here.

Notes: This is dessert comfort food at its finest. Tasty--but messy--stuff!

Sunday, April 5, 2015

Easter Feast


Here are a few tasty discoveries we made this Easter. Delicious stuff!


Honey Glazed Ham

Ingredients:

1 (5 pound) ready-to-eat ham
1/4 cup whole cloves
1/4 cup dark corn syrup
2 cups honey
2/3 cup butter

Directions:

Preheat oven to 325 degrees F.

Score ham, and stud with the whole cloves. Place ham in foil lined pan.

In the top half of a double boiler, heat the corn syrup, honey, and butter. Keep glaze warm while baking ham.

Brush glaze over ham, and bake for 1 hour and 15 minutes in the preheated oven. Baste ham every 10 to 15 minutes with the honey glaze. During the last 4 to 5 minutes of baking, turn on broiler to caramelize the glaze. Remove from oven, and let sit a few minutes before serving.

Source: Allrecipes.com, submitted by Colleen. You can find it here.

Notes: We bought a spiral sliced ham and used that instead of scoring our ham. Then we served it with three different ham glazes for everyone to use as dipping sauces instead.


Easy Peach-Jalapeno Ham Glaze

Ingredients:

1/2 cup peach jam
2 tablespoons finely chopped jalapeno chiles

Directions:

In small bowl, stir together jam and jalapeno chiles. Brush over ham the last 45 minutes of baking.

Source: Betty Crocker. You can find it here.

Notes: As mentioned above in the notes for the ham recipe, we didn't use this as a glaze. Rather, we used it as a dipping sauce for the ham. It was very tasty!


Easy Blueberry-Chipotle Glaze

Ingredients:

1/3 cup blueberry preserves
2 tablespoons finely chopped chipotle chiles in adobo sauce (from 7-oz can)
2 tablespoons packed dark brown sugar

Directions:

In small bowl, mix all ingredients with whisk until well blended.

Brush glaze over ham during last 45 minutes of baking.

Source: Betty Crocker. You can find it here.

Notes: Ditto in the notes above. We didn't use this as a glaze. We used it as a dipping sauce and it was fantastic!


Easy Cherry-Lime-Ginger Ham Glaze

Ingredients:

1/2 cup cherry jam
2 tablespoons packed brown sugar
1 teaspoon grated lime peel
1 tablespoon lime juice
1/2 teaspoon ground ginger

Directions:

In small bowl, beat all ingredients with whisk. Brush over ham the last 45 minutes of baking.

Source: Betty Crocker. You can find it here.

Notes: Again, we didn't use this as a glaze this time around, we used it as a dipping sauce for our ham. Super delicious!


Bacon Cheddar Deviled Eggs

Ingredients:

12 eggs
1/2 cup mayonnaise
4 slices bacon
2 tablespoons finely shredded Cheddar cheese
1 tablespoon mustard

Directions:

Place eggs in a saucepan, and cover with cold water. Bring water to a boil and immediately remove from heat. Cover, and let eggs stand in hot water for 10 to 12 minutes. Remove from hot water, and cool. To cool more quickly, rinse eggs under cold running water.

Meanwhile, place bacon in a large, deep skillet. Cook over medium-high heat until evenly brown. Alternatively, wrap bacon in paper towels and cook in the microwave for about 1 minute per slice. Crumble and set aside.

Peel the hard-cooked eggs, and cut in half lengthwise. Remove yolks to a small bowl. Mash egg yolks with mayonnaise, crumbled bacon, and cheese. Stir in mustard. Fill egg white halves with the yolk mixture and refrigerate until ready to serve.

Source: Allrecipes.com, submitted by USEREMILY3260. You can find it here.

Notes: Holy cow, bacon just makes everything better, doesn't it? These were fantastic.


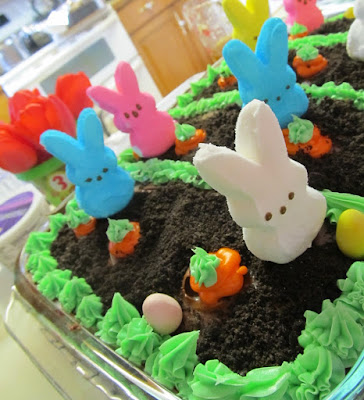
Peeps Easter Garden Cake

Ingredients:

1 box Betty Crocker SuperMoist devil's food cake mix
Water, oil, and eggs as called for on package
1 container Betty Crocker Rich & Creamy chocolate frosting
1 cup chocolate cookie crumbs
1 can (6.4 ounces) Betty Crocker green decorating cake icing
8-12 Peeps marshmallow bunnies
1 can (6.5 ounces) Betty Crocker orange decorating cake icing

Directions:

Preheat oven to 350 degrees. Spray a 9x13-inch pan with cooking spray. Make cake as directed on box. Cool the cake in the pan on cooling rack until completely cooled, 30-60 minutes.

Spread chocolate frosting on top of cake. Sprinkle frosting with chocolate cookie crumbs. Use green icing to make garden rows. 

Insert a toothpick halfway into the base of each Peeps marshmallow bunny. Insert the bunnies, tootpick side down, into the cake.

Use the orange and green icing to make carrots on the cake.

Source: Betty Crocker. You can find it here.

Notes: This was so cute and the kids loved it. We also added some Cadbury chocolate eggs so that the Peeps Easter bunnies could have an Easter egg hunt in the garden as well.