Showing posts with label Halloween. Show all posts

Monday, October 3, 2022

Pirate Dinner!

I decided to do some themed dinners for Halloween. Here is my first (which I actually broke up into two dinners over two separate nights). But who doesn't love a good pirate theme?

The first night, I served the watermelon pirate ship, crab sandwiches, "fish and chips", and chocolate malt ball cannonballs.

The second night, I served the meatballs, veggie desert island, and pirate gold treasure.


Above: First up is the hardest and most time-consuming part of the dinner. After this, everything is easy. Get an oval-shaped watermelon and cut off the top. Use the top to cut into small rectangles to make the sails. Use bamboo skewers to skewer the watermelon rectangles to make the sails. Scoop out the watermelon with a melon baller. You can have just watermelon balls, or you can also add grapes as well. I used some white yarn for the rigging. I also carved a skull and crossbones into the front sail. You could also print a pirate flag and just attach it to the top of one of the bamboo skewers.


Above: Watermelon skin is not easy to carve. So, you might just prefer printing up a pirate flag and attaching it to a bamboo skewer.


Above: Make a palm tree out of a green bell pepper top and a peeled carrot stick. All of the ideas for this that I saw had the palm tree sticking out of a stiff cheeseball shaped like an island. That was my original plan, but we had a heavy eating weekend and I decided that the last thing I needed was a cheeseball, so instead, I decided to prop up my carrot and bell pepper palm tree in some light ranch dressing that I already had on hand. However, I had to create a wedge underneath the dressing so the carrot didn't keep falling over. It was a huge pain and I don't recommend it. Ha ha! Stick to the cheeseball, if you plan to do this.


Above: Awwww, that palm tree was a huge pain, but it looks cute though, doesn't it?


Above: Fish and Chips. Goldfish crackers and Ruffles potato chips. You could layer these in one bowl together, or if you have picky eaters (like I do), you could serve them in two separate bowls.


Above: I used frozen homestyle meatballs cooked on low for 4 hours in my slow cooker with 1 cup grape jelly and 1 cup barbecue sauce for these "cannonballs".


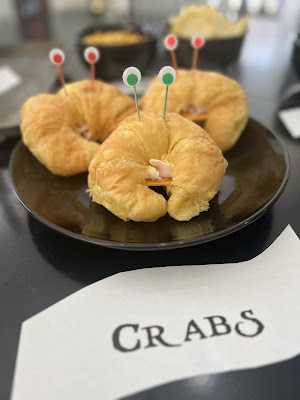
Above: Aren't these crab sandwiches adorable? Use croissants that come in this shape (rounded crescent). Put your favorite sandwich fillings inside. You could make an actual crab sandwich with crab salad. My picky boys wouldn't have eaten that though. So I used mayo, mustard, cheddar cheese slices, and turkey. I made the eyes by using a glue gun to glue googly eyes onto toothpicks.


Above: They turned out so cute! Those eyes gave them such personality! Ha ha!


Above: Dessert was super easy. Get your favorite gold-wrapped candies and voila! Pirate's gold or buried treasure! Whatever you prefer to call it!


Above: You can have a second version of cannonballs and serve chocolate-covered malt balls for dessert.

Halloween Charcuterie Boards

Some years, decorating and holidays seem like a big pain. Other years, I can't wait! So, instead of waiting, I start celebrating a month early! Enjoy these charcuterie boards I have made throughout September.


Above: I found this spider bowl at the Dollar Tree. I decided to focus on a black/dark-themed charcuterie board. Included here are Boar's Head Dark Chocolate Dessert Hummus, figs, dark chocolate dipped strawberries (the chocolate was tinted with black food dye), Oreos with chocolate filling, moondrop grapes, prunes, chocolate animal crackers, blackberries, blueberries, chocolate Twizzlers, dried blueberries, black licorice candies, dark chocolate Raisinets, and Brookside Dark Chocolate, Pomegranate Flavor.


Above: My focus for this one was to go with shades of black, purple, brown, and white. Included here are moon drop grapes, purple cauliflower, figs, dates, black olives, blue corn tortilla chips, sliced baguettes, beef jerky, Boar's Head Superiore Uncured Sopressata, MontChevre fresh goat cheese (blueberry vanilla), Boar's Head Uncured Peppered Salame, dark chocolate malt balls, blackberries, and another kind of blueberry cheese that I can't find the name of right now. Ha ha.


Above: That's the blueberry cheese I can't find the name of. But these boards don't have to be recreated exactly. Just take inspiration from these and use your own favorite black, purple, brown, and white foods.


Above: MontChevre fresh goat cheese (blueberry vanilla).


Above: Purple cauliflower, blue corn tortilla chips, purple carrots, salsa (in the black bowl to the side), cilantro ranch (green goddess dressing could also be used), and fig jam (it went with the charcuterie board above...it was fantastic with the crackers/baguettes, cheese, and salami).


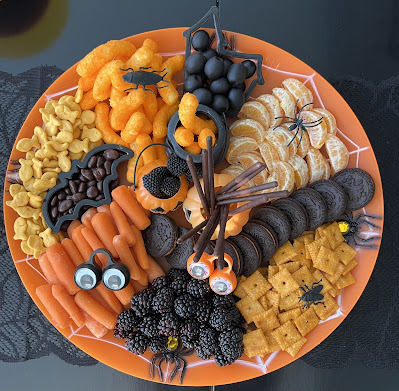
Above: My theme here was orange and black foods. Included are orange Cheetos Puffs, black olives, Cuties orange segments, Halloween orange and black Oreos, Cheez-Its, blackberries, baby carrots, dark chocolate Raisinets, Goldfish crackers, Haribo Raspberries Gummi Candy (just the blackberry ones), chocolate Pocky Biscuit Sticks, and various Halloween trinkets (that I have had for years, but I cleaned first, of course!).


Above: Orange, black, and white focus. Moon drop grapes, blue corn tortilla chips, purple gummy bears, orange gummy bears, Fritos Honey BBQ Flavor Twists, crunchy California rolls, and more cleaned Halloween trinkets. 


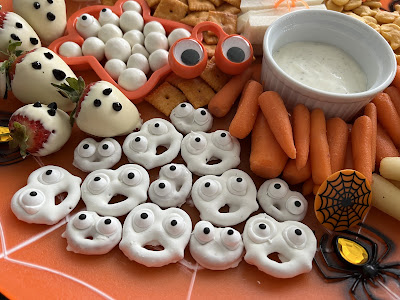
Above: My focus here was orange and white foods. We have Cheez-Its, Goldfish crackers, jicama sticks, ranch dressing, baby orange carrots, baby white carrots, white vanilla candy coating dipped strawberries, white yogurt dipped pretzels, white yogurt dipped malt balls, and more cleaned Halloween trinkets.


Above: My theme here was a black and white plate. I was hoping the white bowls placed the way they were would look like eyes and a mouth. Not sure if it succeeded, but something to learn from in the future! I used Oreos with chocolate filling, black olives, dark chocolate malt balls, blackberries, bite-sized vanilla wafers, string cheese, moon drop grapes, vanilla yogurt-dipped malt balls, and more cleaned Halloween trinkets.


Above: This is just a tiny one with a red and black theme. One of these days, I will have to make a big one. Chocolate hummus, moondrop grapes, raspberries, blueberries, and strawberries.

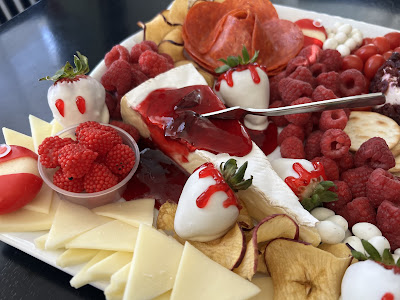
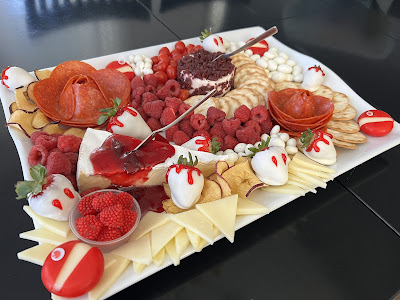
Above: The theme here was red and white with blood/vampires. I should have given the Babybel cheese some fangs with blood to keep with the theme. Ha ha. Oh, well. Next time. Included here are white vanilla candy coating dipped strawberries with red gel frosting for blood drips and fang marks dripping with "blood", pepperoni roses, water crackers, raspberries, grape tomatoes, Haribo Raspberries Gummi Candy (red raspberries only), a wedge of brie cheese with homemade plum jam drizzled on top (any red jam or jelly would work), apple chips, yogurt covered almonds, yogurt covered peanuts, mozzarella cheese sliced into a triangle shape, Babybel cheese, and a cranberry covered cheese that I can't find the name.


Above: That's the cranberry cheese I can't find the name of. But, really, the point is for you not to recreate these charcuterie boards exactly, but for you to be inspired by them. Put your own favorite red and white foods in your board!


Above: Here is a green and purple fruit tray. Red grapes, moon drop grapes, blackberries, blueberries, and sliced green apples. If you soak the green apples in Sprite, the acidic acid keeps them from browning and makes them less tart.


Above: Here is a green and purple/black fruit and veggie snake tray. In hindsight, I wish I had replaced the purple carrots with black olives. I sliced an English cucumber into slices and left the end intact for the head. I cut out two circles for the eyes and cut out a slit to slide the tongue into. The eyes and tongue are made out of a mini red pepper. This tray has blackberries, purple cauliflower, purple carrots, blueberries, and English cucumber. (Well, and red mini sweet pepper for the eyes and tongue). I served ranch dressing for dipping on the side.


That's it! For now...

Have fun creating holiday charcuterie boards of your own!

Monday, October 31, 2016

Halloween Treats, Part 2

The parade of Halloween Pinterest ideas continues! These are the last of the Halloween treats I made this year.


Above: These mummy juice boxes were a little sparse on their wrappings. I had two rolls of white duct tape and I could only find one--the one that was almost out of tape. I used a glue gun and glued googly eyes on the juice box and wrapped it in strips of white duct tape. The verdict: I wish I had more tape to fully cover the juice boxes. The kids loved these. They thought they were so fun.


Above: Cheese and pretzel witch's brooms. I cut cheese sticks into thirds and then cut the bottoms to look like broom bristles. Then I stuck a pretzel in the top carefully (to avoid splitting the cheese, which was really easy to split). The verdict: this was one of my boys' favorite Halloween snacks, and one of the easiest to make. However, another night, I just cut cubes of cheese and gave them a pile of pretzel sticks and they stabbed the cheese with the pretzels themselves and ate it that way just as happily.


Above: Hot Dog Mummies. I cut the hot dogs so it looked like they had arms and legs and then I wrapped them in strips of refrigerated crescent roll dough. I baked them according to the package directions for the dough until they were nicely browned. Then I gave them little dots of mustard for the eyes. The verdict: I have made these before without cutting the hot dogs to give them arms and legs. Honestly, it is much faster and easier to do it that way and they still look just as cute. Of course, my boys just unwrapped the crescent strips, ate the hot dogs, and discarded the crescent rolls.


Above: Halloween Sharpie magic!


Above: Fruit cup Jack-o'-Lanterns. These can be made with mandarin oranges, mangoes, or peaches. These were cute and easy. The verdict: of course, my kids refused to eat them, so I ate them!


Above: Easy cheese ball Jack-o-Lanterns. Plastic bags decorated with a black Sharpie and filled with cheese puff balls. The verdict: my kids actually ate these. Wow! Ha ha!


Above: Popcorn ghosts. Kettle corn popcorn (just popped from a store bought package) mixed with mini marshmallows. The verdict: one of my boys ate only the popcorn and the other picked out only the marshmallows.


Above: Ghosts in the Graveyard Cake. I made this for a neighbor when I took dinner in to her and her family. I used Peeps ghosts, candy pumpkins, Milano cookies decorated with black gel frosting, a yellow cake mix, and a can of store bought chocolate frosting. Easy peasy.


Above: Those ghost Peeps sure are cute.


Above: English muffin mummy pizzas. I used canned pizza sauce spread on split English muffins and I sprinkled a little shredded mozzarella cheese on top. I then used strips of string cheese to create bandage strips on the mummies and finally topped them off with two olive eyes. I lightly broiled them in the oven until the cheese was melted. When my oldest boy was really little, I made these for him and for the longest time, he would call sliced olives "mummy eyes." He would ask me for months after that if he could have some mummy eyes to eat.


Above: Octopus mini pot pies. By the way, I realize that this octopus pot pie has only 7 legs. One of my boys pulled off the eighth leg and ate it before I got a good picture. I also made a mini Jack-o'-Lantern pot pie, but all of my pictures of that one turned out blurry. It was a cute one though!


Above: Here's my full-size mummy pot pie. I used this recipe for the filling and used strips of puff pastry for the topping...oh, and of course, two olive eyes. I baked it until the strips of puff pastry were nicely browned (which took longer than I expected). This turned out delicious. My kids, of course, wouldn't eat it.


Above: Spider cheese and crackers. Ritz crackers, Easy Cheese (sprayable cheese), and sliced olives cut and placed on the cheese to look like spiders. The verdict: my boys did not eat these either. Ha ha!


Final verdict: Well, I learned that my oldest son is creeped out by food that looks spooky. He wouldn't even eat some gummy eyeballs that I had bought. My younger son loved helping me make these. Ultimately, my boys just wanted snacks when they got home from school and they didn't really care much what those snacks looked like as long as it sounded good to them and filled their hungry stomachs quickly. So, while all of these Halloween treats were adorable, it wasn't really worth the time for me to make them..for me, at least. Maybe they would feel differently about snacks like this next year. Maybe if I had girls instead of boys, they would have loved them. Who knows? Kids are unpredictable that way. Oh well. I had fun making them and I thought they were cute! I probably won't go to the time and expense to make all of these (or so many of them) next year...unless my kids actually ask me if I can do it for them.