Showing posts with label Dessert. Show all posts

Friday, December 25, 2020

Hot Cocoa Bombs


I think everybody either made or tried hot cocoa bombs this season. It was the "it" holiday sweet. First of all, I apologize for the length of this post. Once you get the hang of these, they aren't too bad to make at all. However, there is a bit of a learning curve to them. But practice makes perfect! Also, even if they aren't perfect, they will still taste fantastic.

I researched a lot of videos on YouTube before attempting these. Speaking of, I made my own video (my first ever for this blog!) because you really have to see how it is done to truly understand how to do it. Watch this 5 minute video (the link is for those viewing the mobile version, or if you are viewing the web version, you can click on the same video below, which for some reason, won't even appear on the mobile version), and then we can talk about what I learned through this process.


One of the videos I first researched insisted that tempered chocolate was a must because it was far superior taste-wise than using melting wafers.

So, I then studied up on tempering chocolate and even bought a spatula with a built in thermometer (you can find that here). I tried the microwave tempering method (where you keep the chocolate under a certain temperature so that it never becomes untempered), and I am not sure if my thermometer wasn't reading the temperature correctly or what, but my chocolate apparently became too hot (even though my thermometer said I was still okay) and therefore my chocolate became untempered. I know this, because it never regained that snap sound that tempered chocolate makes once it hardens again, it was dull rather than shiny, and it was a little soft.

So, then I did the stove top method to temper my chocolate...and it worked! I had beautifully tempered dark chocolate...and as soon as I tried to remove it from the mold, it cracked and shattered (that beautiful snapping sound that proves that you have correctly tempered your chocolate was totally there. Ha ha). Perhaps if I had done a thicker layer of chocolate or a second layer of chocolate, it would have been strong enough to remove from the mold without breaking. I guess I won't know for now, because at that point, I went to plan B (using melting wafers).

In my research, I learned that tempering milk and white chocolate is even harder than tempering semi-sweet or dark chocolate (because the temperatures that you temper at are different. They are lower temperatures than with dark chocolate).

I learned that chocolate melting wafers aren't really considered true chocolate because they don't contain cocoa butter. Candy melts or melting wafers contain added oils to help the chocolate solidify and hold its shape.

I also learned that chocolate chips can't be tempered. They don't have cocoa butter and they are too soft for tempering. In order to temper chocolate, you have to start with tempered chocolate. Tempered chocolate contains cocoa butter. For instance, a chocolate bar that snaps when you break off a square and contains cocoa butter is tempered. A chocolate chip never really snaps. It is soft, even when it holds its shape. A chocolate chip's composition is specifically made the way it is so that they can be soft and chewy at room temperature so you have a soft and chewy chocolate chip cookie instead of a cookie with a chocolate crunch. Tempered chocolates have that snap, shine, solidity, and the ability to hold its shape at room temperature.

You can add vegetable oil to chocolate chips to help it hold its shape at room temperature better, but then that makes them very similar to melting wafers anyway.

So, here's what I learned through a lot of trial and error:

For this particular recipe, tempering is not for me. It might be for you, but it is not for me! I am too much of a chocolate amateur. It just makes this recipe more time consuming and difficult. 

If tempering is for you, and you are a skilled chocolatier, feel free to buy high quality tempered chocolate, chop it up, melt it down, make sure it is tempered again and make your beautiful pure chocolate cocoa bombs.

I, however, wanted something that would not only be delicious, but also faster and easier for me, personally, to assemble and produce on a larger scale.

Straight chocolate chips taste amazing in this recipe, though they melt easily. So, they are hard to handle when you are forming the balls because they will melt in your hands as you are touching them. You can hide a lot of flaws with drizzled chocolate and toppings though. Also, they will retain their shape best if stored in the refrigerator. 

As mentioned above, if you add a little shortening (2 tablespoons shortening for every 2 cups of chocolate chips), you can make your own version of chocolate candy coating that will work better for these cocoa bombs and can be stored at room temperature, rather than in the fridge.

It is easier to make these hot cocoa bombs with bare hands rather than while wearing gloves. You kind of need your bare skin to handle the chocolate. The gloves make things too slippery.

Chocolate chips with or without shortening taste great in this recipe.

Candy melts or melting wafers also taste great in this recipe.

When I made mine, I used melting wafers, straight chocolate chips, and chocolate chips with shortening. I thought all of them were delicious, so I suggest you use what you are most comfortable with.

Finally, you will need a medium size silicone mold. There are bigger ones, but they are way too big for your standard size mug. You can find the one I used here.


Hot Cocoa Bombs

Ingredients:

2 cups chocolate chips or melting wafers
2 tbsp shortening (only if using chocolate chips)
1 scoop hot cocoa (any flavor) per bomb
1 scoop mini vanilla dehydrated marshmallows per bomb
Sprinkles, crushed candy, crushed cookies, etc. for decorative topping, if desired
1 cup steaming hot milk (any kind) per bomb, for serving

Directions:

Melt chocolate chips or melting wafers in a microwave safe container at 30 second intervals, stirring between each, until completely smooth.

Add a spoonful of melted chocolate to each mold indentation. Using the back of the spoon, spread chocolate evenly over each indentation.

Place mold in the freezer for 5 minutes, or until completely set.

Once set, carefully remove the chocolate from the molds.

Gather your hot cocoa and mini marshmallows for easy assembly.

Place a microwave safe glass dish in the microwave. Microwave for 1-2 minutes or until hot.

Carefully place warm dish next to the chocolate shells. Place one shell half, seam side down, on the warm plate to clean up and slightly melt the edges.

Fill that shell half with a scoop of hot cocoa. Top that with a scoop of mini marshmallows.

Place second shell half, seam side down, on the warm plate to clean up and slightly melt the edges.

Carefully place the two shells together, smoothing the seam with your finger and using additional melted chocolate to help seal it together, if necessary.

Repeat until you run out of chocolate and/or you have the desired amount of cocoa bombs.

Let the bombs sit until completely set. 

Using a squeeze bottle or spoon, drizzle completed bombs with additional melted chocolate that has cooled slightly. You don't want to use chocolate that is too hot or it will melt a hole right through your bomb and ruin all of your hard work! (Yes, I am speaking from experience. RIP cocoa bomb that got drizzled with chocolate that was too hot) 

Immediately top with sprinkles, crushed candies, or crushed cookies, if using. If you wait too long, the chocolate drizzle will set and the toppings won't stick to it.

When ready to serve, you can explode your cocoa bomb one of two ways. You can place a cocoa bomb in the bottom of a mug and slowly pour 1 cup of steaming hot milk on top. Or, you can prepare a mug of steaming hot milk and gently place the bomb into your mug of milk.

Source: Holy cow, this is everywhere. All you have to do is Google it to find videos and/or recipe links all over the place. For me, it started when my sister found an ad saying they would be available at Costco. We searched and never found them, so we decided to make our own.

Notes: Please watch the video above, because honestly, these aren't too hard to make once you get the hang of it, but it is a completely visual recipe. You kind of have to see how it is done for it to totally make sense.

I love Ghirardelli melting wafers. That's what I used for the hot cocoa bombs in all but one (the final) picture. Even in that picture, I used the Ghirardelli melting wafers for half of those cocoa bombs. I found them in my local grocery store. If you can't find them locally, you can find them here.

I found dehydrated vanilla mini marshmallows on Amazon, here.

If doing a large batch, a squeeze bottle is easiest for drizzling chocolate. If doing a small batch, a spoon is easier. I used a squeeze bottle similar to these ones here.

The easiest way to steam milk is to put one cup of milk in a microwave safe container and microwave for 1 minute. Stir. After one minute, that is a good temperature for kids. If you like it hotter, microwave for an additional minute.

Also, if you long for the taste of real, tempered, cocoa butter packed chocolate, but can't figure out how to make them work in your molds without them shattering, simply put a couple of squares of high quality chocolate in a mug, add a scoop of hot cocoa, add some mini marshmallows, and then add some steaming hot milk and just enjoy it with the knowledge that you didn't make a huge mess of your kitchen in the process. 

Hot Cocoa Bomb Flavor Combinations:

  • Dark chocolate melting wafers, raspberry hot cocoa, red nonpareil sprinkles
  • Dark chocolate melting wafers, peppermint hot cocoa, crushed peppermint candies
  • Dark chocolate melting wafers, dark chocolate hot cocoa, chocolate sprinkles
  • Dark chocolate melting wafers, mint truffle hot cocoa, green sugar or crushed wint-o-greens candies
  • White chocolate melting wafers, white chocolate hot cocoa, red sugar
  • White chocolate melting wafers, pumpkin spice hot cocoa, cinnamon sugar or a little nutmeg
  • Dark or milk chocolate melting wafers or chocolate chips, salted caramel hot cocoa, finely chopped toffee, butterscotch candies, and/or coarse salt
  • Dark or milk chocolate melting wafers or chocolate chips, toasted coconut hot cocoa, toasted shredded coconut, finely chopped
  • Milk chocolate chips, peanut butter cup hot cocoa, crumbled Nutter Butter or other peanut butter cookies
  • White chocolate melting wafers, cookies and cream hot cocoa, crushed Oreo cookies
  • Dark chocolate melting wafers or milk chocolate chips, cookies and cream hot cocoa, crushed Oreo cookies
  • Milk chocolate chips, English toffee hot cocoa, finely chopped toffee
  • Milk chocolate chips, hazelnut hot cocoa, finely chopped hazelnut chocolate candy bar
  • Milk chocolate chips, mocha or macchiato flavored hot cocoa, chocolate sprinkles
  • Milk chocolate chips, Mexican style hot cocoa, cinnamon sugar
  • Milk chocolate chips, milk chocolate hot cocoa, mini chocolate chips or chopped chocolate 
  • Milk chocolate chips, cherry hot cocoa, red sugar  
  • Wherever your taste buds and your creativity take you! 


Above: This is the only picture that I took of the hot cocoa bombs that I made as gifts for my family. It was honestly such a process, I had so much to learn, and I was so under the gun to get them delivered on time that pictures didn't even occur to me until I was literally about to drop the last gift plate on my sister's porch. So, I grabbed my cell phone and snapped a few quick pics. Ha ha. Do yourself a favor and have a few trial runs to get comfortable with these before planning to make 50 at once to deliver while you are under a deadline to do it. 

The top two are dark chocolate Ghirardelli melting wafers, peppermint hot cocoa mix, mini marshmallows, and topped with crushed peppermint. The two below that are dark chocolate Ghirardelli melting wafers, raspberry hot cocoa mix, mini marshmallows, and topped with red nonpareils. The two  with red sugar are milk chocolate chips, milk chocolate cocoa mix, mini marshmallows, and red sugar sprinkles. 

The final one with green sprinkles is a mini long story. I ordered Ghirardelli milk chocolate melting wafers on my online pickup order, but then they were unavailable. This was the substitute the store made. Dang online order substitutions! Am I right? They looked like melting wafers, but turned out to be more like chocolate chips. They worked, but I didn't add shortening because I thought they were melting wafers. The result was that these were the hardest to assemble because they were so prone to melting. They exploded nicely when milk was poured on them though. So, that was milk chocolate wafers, milk chocolate hot cocoa, mini marshmallows, and green sprinkles.

I then made three more (the ones in all of the rest of the pictures), just so I could take pictures for this blog post. Ha ha! Those are dark chocolate melting wafers, raspberry hot cocoa, and red nonpareils and dark chocolate melting wafers, peppermint or candy cane hot cocoa, and crushed peppermints.

Above: You can also make them UFO-style. Instead of using the hot plate method to fuse the shell halves together, you pipe slightly cooled melted chocolate onto the edges and then put them together. You then roll the bomb in sprinkles, crushed candy, or chopped cookies for decoration. These are milk chocolate chips (without shortening), raspberry hot cocoa, and red sugar. These were my very first attempt at hot cocoa bombs. You can kind of see that when I handled them, the tops became less shiny and dull. These tasted like ambrosia though.

Again, sorry for the long post, but I hope my errors and learning experiences along the way will help you avoid problems in your own hot cocoa bomb journey.

However you decide to make them, I hope you love them as much as we did!

Thursday, December 24, 2020

Scottish Trifle: Old


This is the old Scottish Trifle recipe that we always had for dessert on Christmas Eve while I was growing up.


Scottish Trifle

Ingredients:

Angel food cake (pre-made from your grocery bakery or homemade)
17 oz. frozen raspberries
4-5 tbsp. orange juice
3 oz. raspberry Jell-O
4 oz cook and serve vanilla pudding, with milk called for on package instructions
1/2 pint whipping cream
1/2 cup granulated sugar, or to taste
1/2 cup blanched sliced almonds
Maraschino cherries

Directions:

Thaw and drain raspberries, reserving juice.

Crumble cake on bottom of large serving bowl or trifle dish. Pour orange juice over cake. Spoon drained fruit over the top.

Using reserved raspberry juice, prepare Jell-O using slightly less water (about 3/4 cup boiling water and 3/4 cup cold water/juice mixture). Pour Jell-O liquid mixture over raspberries and crumbled angel food cake. Chill to set.

Prepare cook and serve pudding according to package instructions. Chill completely.

Spread chilled pudding on top of trifle. Chill completely.

Beat whipping cream until soft peaks form. Add in sugar and continue beating until incorporated.

When ready to serve, spread whipped cream on top of trifle and sprinkle with almonds (toasted or untoasted, according to your preference) and maraschino cherries.


Source: My mom found this in the recipe section of the Deseret News around 30 years ago. I couldn't find it on their site, but you are welcome to peruse their recipe archives!


Notes: We always use a store-bought pre-baked angel food cake. It is just easier that way, and they are delicious. The original recipe also says that you can used canned raspberries. In that case, you wouldn't drain or strain them. You would just use water to prepare the Jell-O. After trying the new version and the old version of Scottish Trifle, we decided that we would probably try to make a new hybrid version next year. The consensus was that we loved the homemade custard and fresh raspberries in the new version, but we loved the added flavors from the orange juice and raspberry juice in the old version. So, stay tuned for December 2021 for yet another version of Scottish Trifle. Ha ha!

Wednesday, December 23, 2020

Scottish Trifle: New


Scottish Trifle: New Way

Ingredients:

1 angel food cake (pre-made by your grocery bakery, or homemade)
1 recipe homemade custard, fully chilled (see below)
2 cups heavy whipping cream
1/2 cup granulated sugar, or to taste
Slivered blanched almonds
2 pints fresh raspberries

Directions:

Beat heavy whipping cream until soft peaks form. Sprinkle in sugar and continue beating until incorporated.

Cut or tear angel food cake into bite size cubes. Spread a layer of angel food cake onto the bottom of a trifle dish or large bowl. Sprinkle evenly with fresh raspberries.

Top angel food cake and raspberries with homemade custard. 

Top custard layer with whipped cream. Chill until ready to serve.

Preheat oven to 400 degrees F. Spread slivered blanched almonds onto foil covered baking sheet. Bake almonds, stirring occasionally, until lightly browned and toasted. Let cool completely.

When ready to serve, sprinkle top of the trifle with toasted slivered almonds and fresh raspberries.

Source: This was a combination of this recipe that I found and the old one, found here, that we used to make while I was growing up.

Notes: I used a pre-baked angel food cake from my grocery bakery. It is just nice to simplify things when everything else has so many steps. The reason my trifle bowl doesn't look very full is that I split this recipe in half and separated it into two trifle bowls so I could keep one half for our family and give the other half to my mom. Pictured is the one I gave to my mom. If I put the entire recipe into one trifle bowl, it would fill it to the top. You could even alternate layers, if desired, and do six layers instead of three (1. angel food cake and raspberries, 2. custard, 3. whipped cream, 4. angel food cake and raspberries, 5. custard, 6. whipped cream, raspberries, and toasted almonds).


Homemade Custard

Ingredients:

4 cups heavy whipping cream, scalded
5 egg yolks
1 cup sugar
1 teaspoon vanilla

Directions:

Beat the yolks with the sugar until it is light and forms a ribbon when the beater is lifted.

Add the scalded cream slowly in a stream, stirring. (You can also use the mixer on low speed)

Transfer the custard to a heavy saucepan and cook it over moderately low heat, stirring until it thickens, but do not let it boil. Remove the pan from the heat and stir in vanilla. Strain the custard through a fine sieve into a metal bowl. Set in a bowl of ice. Let it cool, stirring occasionally, then chill, covered.

Source: My sister-in-law, Angie Adams.

Notes: The longer you let it chill, the thicker it will be. I recommend making it a day before you need to assemble the trifle, and letting it chill overnight. This is rich and heavenly stuff.

Saturday, December 19, 2020

Mom's Chocolate Chip Cookies


We have two amazing chocolate chip cookie recipes on this blog. One of them can be found here. The other one can be found below. We posted it nearly a decade ago, here, but my mom made a batch for us for Christmas, so I felt it deserved another post.


Chocolate Chip Cookies

Ingredients:

1 lb. butter or margarine
1 1/2 cups white sugar
2 cups brown sugar
3 eggs
6 cups flour
1 1/2 tsp. salt
1 1/2 tsp. baking soda
2 tsp. vanilla
2 bags (4 cups) chocolate chips)
Walnuts, if desired

Directions:

Cream together butter, white sugar, and brown sugar.

Then add eggs, flour, salt, baking soda, and vanilla. Once incorporated, add chocolate chips, and walnuts, if using.

Mix well. Put on ungreased cookie sheet with small ice cream scoop. Bake at 350 degrees F for 8-10 minutes.

Source: My mom found this in a ward/church cookbook about 30 years ago. She mentioned in the comments below that it was a recipe either submitted by Jo Hatch and/or Sharon Boam.


Notes: We originally added pecans to this as well, but since my son developed a tree nut allergy, we have omitted the nuts.


Friday, December 18, 2020

Choose Your Flavor


My mom has mentioned a number of times that her mom used to make candy cane cookies that had anise and almond flavoring. However, her mom never passed on a recipe to them. I decided to try my hand with the internet and see if I can find a recipe that was close to what her mom used to make. She said this one came pretty darn close and brought back a lot of memories.

Now, you can have a lot of fun with the flavorings on these cookies. I found a lot of different options online. Some recipes used 1 1/2 teaspoons almond extract for the red dough and 1 teaspoon almond extract for the white dough. Some recipes used 1 teaspoon peppermint extract for the red dough and 1 teaspoon vanilla extract for the white dough. The version my mom always had used 1 teaspoon anise extract for the red dough and 1 1/2 teaspoons almond extract for the white dough.

I made these cookies two ways. I made one batch using the anise extract for the red dough and almond extract for the white dough. Then I made another batch where I used peppermint extract for the red dough and vanilla extract for the white dough. It was fantastic both ways. These are light, soft, and chewy butter cookies. I think you will love them. Besides being delicious, they were also adorable.

Christmas Candy Cane Cookies

Ingredients:

1/2 cup shortening
1/2 cup butter, softened
1 cup confectioners' sugar
1 large egg, room temperature
2 1/2 cups all-purpose flour
1/2 teaspoon salt
1/2 teaspoon red food coloring (or more, to get your desired color)
1/2 cup peppermint candy, crushed, optional
1/2 cup sugar, optional

Flavorings:


1 1/2 teaspoons almond extract
1 teaspoon vanilla

Or:

1 teaspoon peppermint extract
1 teaspoon vanilla extract

Or:

1 teaspoon anise extract
1 1/2 teaspoons almond extract

Directions:

In a large bowl, cream the shortening, butter, and confectioners' sugar until light and fluffy, 5-7 minutes. Beat in egg. Combine flour and salt; gradually add to the creamed mixture. Divide dough in half; mix the food coloring into 1 portion. Then mix in the extracts: almond, peppermint, or anise into the red dough and vanilla or almond into the white dough.  

Cover each portion of dough separately and refrigerate for 2 hours or until easy to handle. I put each into a separate zip top bag.

Just before removing dough from the refrigerator, mix crushed peppermint candy and sugar together, if using.

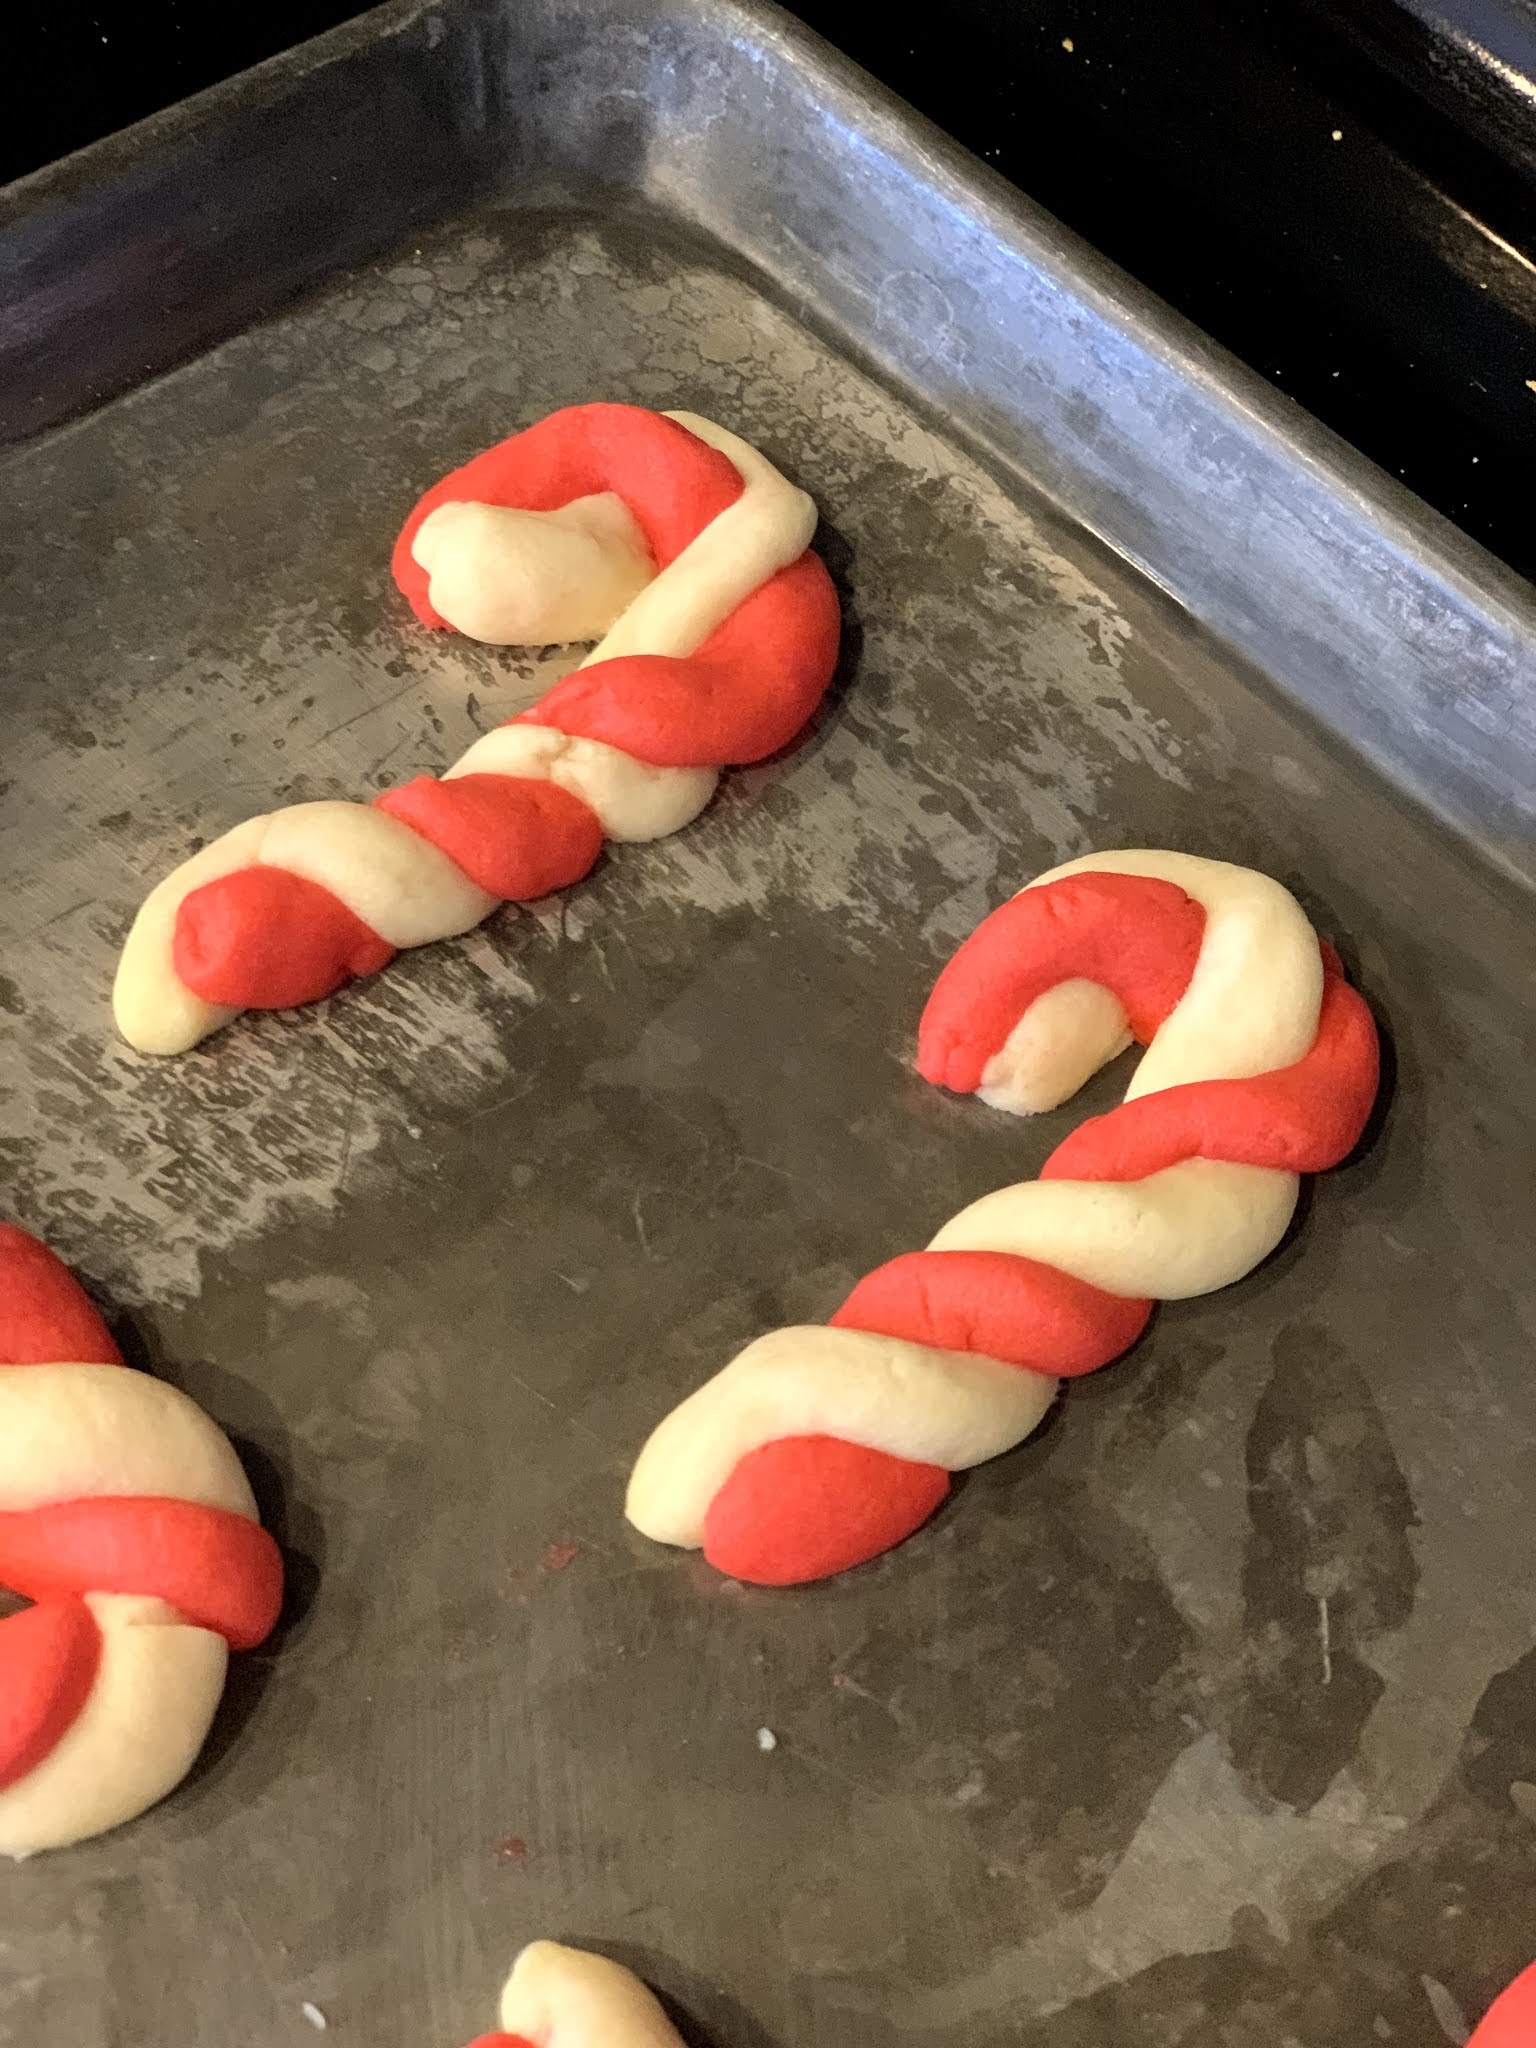
Shape 1 teaspoon plain dough into a 4-inch rope. Shape 1 teaspoon red dough into a 4-inch rope. Place ropes side by side; pres together lightly and twist carefully. Be gentle to avoid breaking or cracking the dough. Place on an ungreased baking sheet; curve top of cookie down to form handle of cane. Repeat with remaining plain and red dough, placing cookies 2 inches apart on baking sheets. I kept the dough I wasn't currently working with in the refrigerator to keep it chilled.

Bake at 375 for 8-9 minutes or until set. Sprinkle the candy mixture lightly on top of the warm cookies. Remove to wire racks to cool completely.

Nutrition information: 1 cookie: 86 calories, 4 g fat, 48 mg sodium, 11 g carbohydrate (6 g sugars, 0 g fiber), 1 g protein.


Source: I found variations of this cookie recipe all over the internet. I followed this one from Taste of Home. you can find it here. However, here are some more versions of the recipe. Another Taste of Home version, here. This Taste of Home version is cinnamon flavored with crushed red hots! You can find it here. Don't feel like making dough? This version, here, uses refrigerated sugar cookie dough. This was the only one I found that used anise flavoring. You can find it here. I am not sure why it was so poorly reviewed. Probably someone who doesn't like anise flavoring. But I love it! A cute three color candy cane with red, green, and white, here. Version one from Allrecipes.com, here. Version two from Allrecipes.com, here. Version three from Allrecipes.com, here.


 Above: I could have spaced them a little more and fit nine cookies to a pan, all facing the same direction, but this is how I did mine this time.


Notes: I LOVED the anise and almond flavor combination. The anise flavoring was not overpowering. This is not eating a black jellybean cookie, I promise. It is subtle and just such a lovely flavor combination. It was so good. I also loved the peppermint flavored cookies as well. Though the almond and vanilla flavor combination might be the most kid friendly. As you can see from all the versions I found, you can experiment with what works best for you! Also, definitely check out the tricolor candy canes (red, green, and white). Those were really fun and cute too!

Friday, November 27, 2020

Pie Drop!

Since we didn't get to spend Thanksgiving together as a family, my mom decided to do a pie drop instead. She made a bunch of different kinds of pie (while cooking with a mask on) and then drove around and dropped them off on our porches. Then we had a Zoom meeting that night to visit after we had all had our Thanksgiving dinners.

Here are the recipes for the pies she made for us! The pictures don't do the pies justice because I couldn't give them the beautiful presentation they deserved, but they were absolutely delicious. My mom made seven pies. We felt that five of them were absolute keepers as is. The Shaker Lemon Pie and the Candied Orange Pie won't be posted because they need a bit more tweaking and experimenting to get them just right before posting them.

Key Lime Pie VII

Ingredients:

1 (9-inch) prepared graham cracker crust
3 cups sweetened condensed milk
1/2 cup sour cream
3/4 cup key lime juice
1 tablespoon grated lime zest

Directions:

Preheat oven to 350 degrees F.

In a medium bowl, combine condensed milk, sour cream, lime juice, and lime rind. Mix well and pour into graham cracker crust.

Bake in preheated oven for 5-8 minutes, until tiny pinhole bubbles burst on the surface of the pie. Do not brown. Chill pie thoroughly before serving. Garnish with lime slices and whipped cream, if desired.

Nutrition information: 8 servings. 553 calories; 10.9 g protein; 84.7 g carbohydrates; 20.5 g fat; 45.3 mg cholesterol; 324.5 mg sodium.

Source: Allrecipes, recipe by AnnRichardson. You can find it here.

Notes: This was just fantastic. Refreshing citrus flavor and pretty presentation.

Above: I tried to transfer them so that I could get pretty pictures of these beautiful and delicious pies. It didn't work. Ha ha. I lost some of the graham cracker crust in the transfer. However, this was a beautiful and surprisingly sturdy (though creamy) pie. Seriously, a keeper. The other pies didn't transfer at all. So, what you see in the mix with all of the other pies is what you get.

Peanut Butter Pie

Ingredients:

1 cup powdered sugar
1 cup natural-style, reduced-fat creamy peanut butter (such as Smucker's)
1 (8-ounce) block 1/3-less-fat cream cheese, softened
1 (14-ounce) can fat-free sweetened condensed milk
12 ounces frozen fat-free whipped topping, thawed
2 (6-ounce) reduced-fat graham cracker crusts
20 teaspoons fat-free chocolate sundae syrup

Directions:

Combine powdered sugar, peanut butter, and cream cheese in a large bowl; beat with a mixer at medium speed until smooth. Add milk; beat until combined. Fold in whipped topping. Divide mixture evenly between crusts; chill 8 hours or until set (pies will have a soft, fluffy texture). Cut into wedges; drizzle with chocolate syrup.

Nutrition information: 20 servings (each pie will be cut into 10 slices), 302 calories; 10g fat; 3.8 g saturated fat; 3.3 g mono fat; 2.8 g poly fat; 6.9 g protein; 45.8 g carbohydrates; 1 g fiber; 11 mg cholesterol; 0.6 mg iron; 252 mg sodium; 59 mg calcium.

Source: My Recipes. You can find it here.

Notes: This was a favorite, especially with all of the guys. Rich and decadent, and yet, as you can see, lightened up. 

Maple Chess Pie

Ingredients:

1 (9-inch) unbaked pie crust
1/2 cup butter or margarine, softened
1 1/2 cups white sugar
3 eggs
1 tablespoon yellow cornmeal
1 tablespoon white vinegar
1 teaspoon maple extract
5/8 cup chopped pecans, optional

Directions:

Preheat oven to 425 degrees F. Press the pie crust into the bottom and up the sides of a 9-inch deep dish pie plate.

In a medium bowl, beat the butter, sugar, and eggs until light and fluffy. Stir in the cornmeal, vinegar, and maple extract until well blended. Fold in pecans (if using) so they are evenly distributed. Pour into the unbaked pie crust.

Bake for 10 minutes in the preheated oven, then reduce the heat to 350 degrees F. Bake for 30 additional minutes, or until the top of the pie is golden brown, and the filling is set. When removing the pie from the oven, gift it a gentle shake. If there is no movement, the pie is set. The pie will thicken and shrink slightly upon cooling.

Nutrition information: 8 servings. 457 calories; 4.8 g protein; 50.1 g carbohydrates; 27.6 g fat; 100.3 mg cholesterol; 225 mg sodium.

Source: Allrecipes recipe by David Robinson. You can find it here.

Notes: We left out the nuts because of my son's tree nut allergy. It was smooth and melt in your mouth delicious.


Debbie's Easy No-Bake Cheesecake

Ingredients:

1 pkg. (8 oz.) cream cheese
1/4 cup sugar
1 cup sour cream
2 tsp. vanilla
2 cups whipping cream
1 graham cracker pie crust
1 can favorite pie filling (such as cherry, blueberry, strawberry, raspberry, or peach)

Directions:

Blend together cream cheese, sugar, sour cream, and vanilla. Whip 2 cups whipping cream and sweeten to taste with sugar. Combine whipping cream and cream cheese mixture. Pour into graham cracker crust. Freeze at least 1/2 hour before serving. Top with pie filling of choice.

Source: My mom got this recipe from her friend, Debbie, many years ago. 

Notes: This time, we topped it with strawberry pie filling. This one always brings back childhood memories for me.


Apple Butter Pie

Ingredients:

8 ounces gingersnaps
3 tablespoons butter, melted
1 (14-oz) can sweetened condensed milk
1 cup spiced apple butter
3 large egg yolks
1 1/2 tsp apple cider vinegar
Garnishes: whipped cream, crumbled gingersnaps

Directions:

Preheat oven to 350 degrees F. Pulse gingersnaps in a food processor 20 times or until finely ground. With processor running, pour apple butter through food chute, processing until blended. Press mixture into a 9-inch pie plate.

Bake at 350 degrees F for 15 minutes. Cool on a wire rack 5 minutes.

Meanwhile, whisk together sweetened condensed milk and next 3 ingredients. Pour into prepared crust. Bake at 350 degrees F for 15 minutes. Chill 2 to 24 hours.

Sources: My Recipes. You can find it here.

Notes: The My Recipes test kitchen noted that they used Smucker's Spiced Apple Butter. I thought this was so good. Before I knew what it was actually called, I referred to it as the gingerbread pie because it reminded me so much of gingerbread. This one is a keeper!

Wednesday, November 25, 2020

Depression Era Pie


I had to try this pie. It seemed fitting this year. I was fascinated by the shortages that we have had because of the pandemic and how they compared to the shortages people had during the depression. 

At the beginning of the pandemic/beginning of shutdown, bread, flour, sugar, eggs, milk, toilet paper, paper towels, tissue, sanitizing wipes, and many cleaners disappeared from the shelves.

During the Great Depression, people really had to make things stretch. Casseroles and soups were a way to stretch protein and vegetables to fill hungry stomachs. People still had a sweet tooth, and desserts were also often simplified to make a few simple ingredients go a long way. This pie is one of those recipes.

I actually thought it was very good. It was a lot like a custard pie...without the egg and milk. I think you will like it too! Heads up though, it is very sweet, so a little is enough to take care of your sweet tooth fix.


Water Pie

Ingredients:

1 (9-inch) deep-dish pie crust, unbaked
1 1/2 cups water
4 tbsp all purpose flour
1 cup sugar
2 tsp vanilla
5 tbsp butter, cut into five pieces

Directions:

Preheat oven to 400 degrees F and set empty pie crust on a baking sheet.

Pour 1 1/2 cups water into the pie crust.

In a small bowl, stir together flour and sugar. Sprinkle evenly over water in crust. Don't stir.

Drizzle vanilla over water in pie crust. Place pats of butter on top of this.

Bake at 400 degrees F for 30 minutes. Reduce heat to 375 and cover sides of crust, if needed, to prevent burning. Continue cooking for an additional 30 minutes.

The pie will be watery when you pull it out of the oven, but will set as it cools. Allow to cool completely and then cover and place in the refrigerator to completely chill before cutting.

Source: Southern Plate. You can find it here.

Sunday, May 14, 2017

Gooey Sugar Cookie Bars


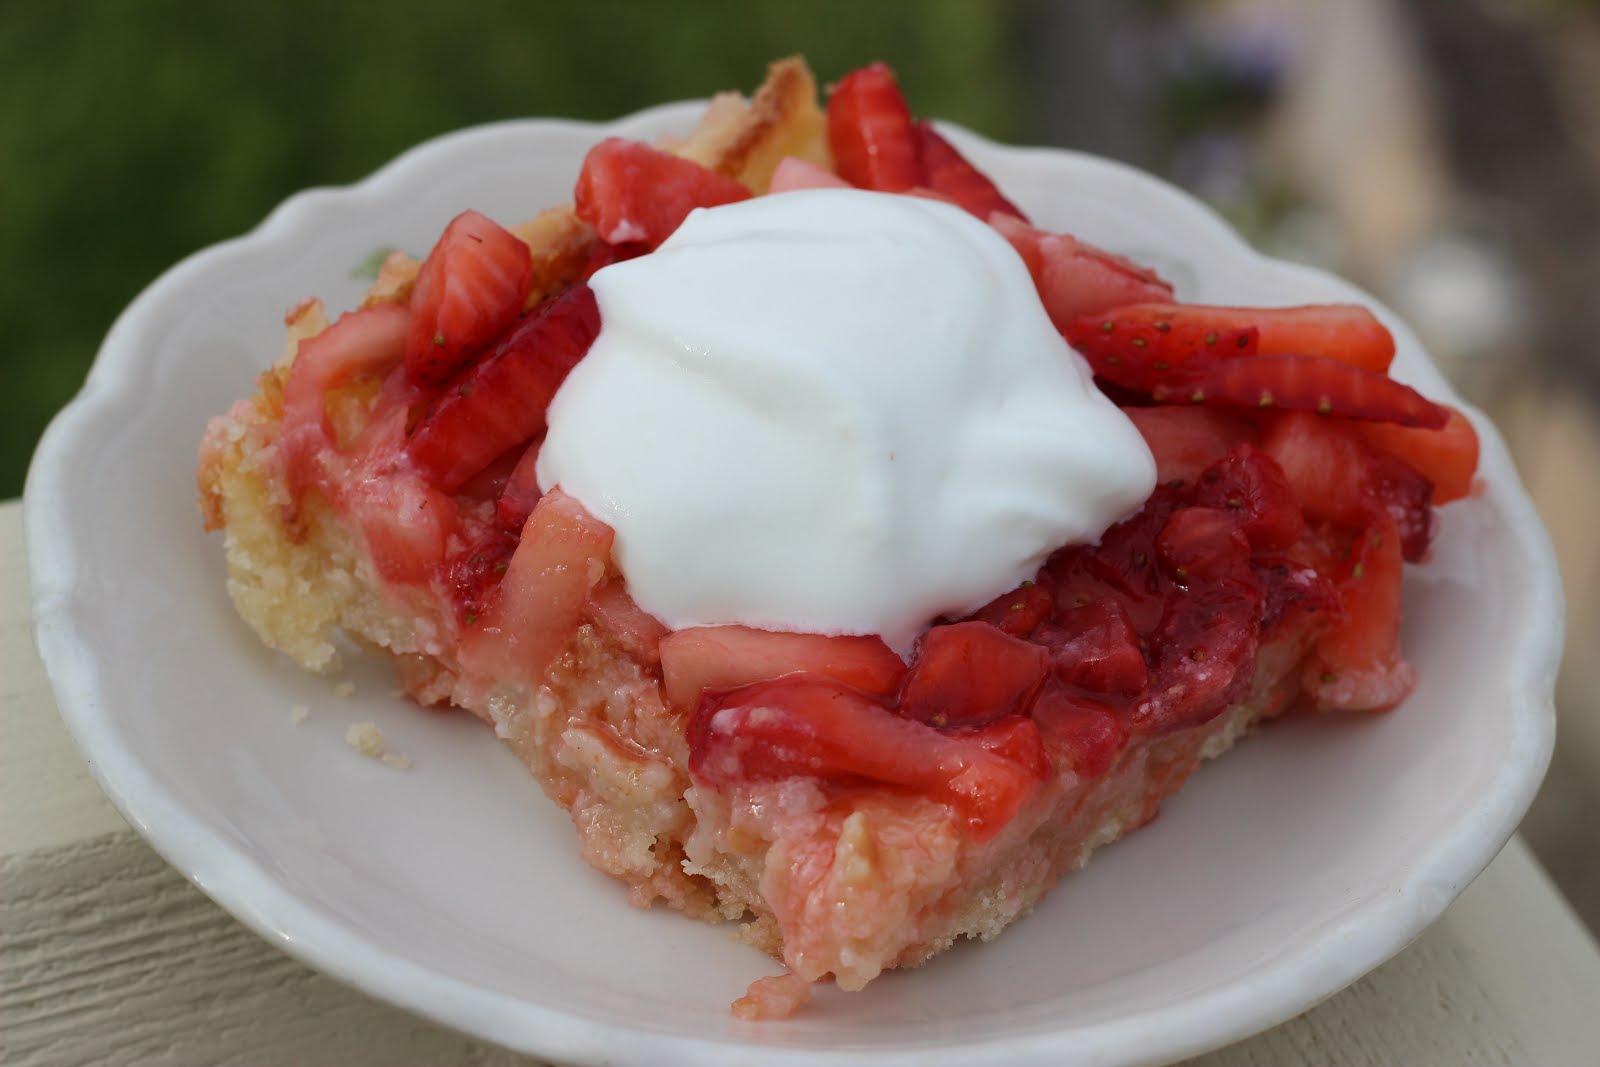
Here is a dessert that will hit the spot. It is the perfect dessert if you are craving fresh strawberries.


Gooey Sugar Cookie Bars

Ingredients:

Bar:

1 pouch (1 lb 1.5 oz) Betty Crocker sugar cookie mix
1/2 cup butter, softened
1 package (8 oz) cream cheese, softened
3 1/2 cups powdered sugar
2 eggs
1 teaspoon vanilla
1/3 cup butter, melted

Topping:

3 cups coarsely chopped strawberries (about 1 lb)
2 tablespoons powdered sugar
2 teaspoons fresh lemon juice
1 cup heavy whipping cream, whipped

Directions:

Heat oven to 350 degrees F. Spray bottom of 13x9-inch pan with cooking spray.

In large bowl, stir cookie mix and 1/2 cup softened butter until mixture forms coarse crumbs. Spread mixture evenly in pan; press lightly.

In large bowl, beat cream cheese, 3 1/2 cups powdered sugar, eggs, and vanilla with electric mixer on low sped until blended; scrape bottom and side of bowl. beat on high speed until smooth. Beat in 1/3 cup melted butter until blended. Pour over cookie mixture; spread evenly.

Bake 30 to 35 minutes or until golden brown. Cool completely, about 2 hours.

Just before serving, in medium bowl, mix strawberries, 2 tablespoons powdered sugar, and the lemon juice. Let stand 10 minutes, stirring occasionally. To serve, cut bars into 5 rows by 3 rows. Top each with strawberries and a dollop of whipped cream. Cover and refrigerate any remaining bars.

Source: Betty Crocker website. You can find it here.

Notes: This was really tasty and addicting.

Sunday, April 30, 2017

Strawberry Shortcake...Cake Style


My mom made this cake to celebrate my sister's birthday. It was beautiful, delicious, and it got gobbled up quickly by everyone (even the kids!).


Strawberry Shortcake Poke Bundt Cake

Ingredients:

Cake:

1 box Betty Crocker SuperMoist yellow cake mix
1 cup milk
4 oz. cream cheese, softened
3 eggs

Strawberry Poke Mixture:

1 1/2 cups sliced fresh strawberries
1/4 cup granulated sugar
2 teaspoons lemon juice

Cream Cheese Glaze:

3/4 cups powdered sugar
2 tablespoons butter, softened
1 oz. cream cheese, softened
1 to 2 tablespoons milk
1/4 teaspoon vanilla

Garnish:

1 cup sliced fresh strawberries

Directions:

Heat oven to 325 degrees F. Generously spray 10- or 12- cup bundt cake pan with cooking spray with flour.

In large bowl, beat Cake ingredients with electric mixer on low speed 1 minute, scraping bowl constantly. Increase speed to medium, beat 2 minutes, and pour batter into pan.

Bake 40 to 45 minutes or until toothpick inserted in center comes out clean. Cool 15 minutes.

Meanwhile, in food processor or blender, puree Strawberry Poke Mixture ingredients until smooth; transfer to a 4-cup glass measuring cup, and set aside. while still in pan, poke holes in cake with end of wooden spoon at 1/2-inch intervals going almost to bottom. Use wet paper towel to wipe ends of spoon after each poke. Carefully pour poke mixture over holes in cake, using spoon to direct mixture into holes. If necessary, poke existing holes to makes room for more mixture.

Cool 40 minutes, refrigerate in pan 2 hours. Remove from refrigerator, and run metal spatula around outer and inside edges of pan to loosen cake; turn upside down onto serving platter.

In medium bowl, mix Cream Cheese Glaze ingredients with electric mixer on low speed until smooth. If too thick, add additional milk, 1 teaspoon at a time, until desired consistency. Glaze cake as desired; garnish with strawberries.

Source: Betty Crocker website. You can find it here.

Notes: As I said above, this was delicious and everyone loved it!

Sunday, February 5, 2017

Blast From My BYU Past


Almost anyone who has ever been to the Wilkinson Center and the Cougar Eat (whether you attended BYU or not) has tried a BYU mint brownie...and if you haven't, you have probably heard of them. Well, in my BYU alumni email, they shared the recipe one fine day and I am going to share it with you as well.

They didn't divulge their whole recipe. That's probably how they preserve the legacy of these brownies. Ha ha! They shared the brownie recipe and the mint icing frosting recipe, but not the chocolate frosting recipe. They suggested using 12 oz. of canned chocolate frosting, or your favorite recipe for chocolate frosting. However, I found another blog with the recipe for these brownies and the author had cleverly altered the mint frosting recipe to make the chocolate frosting as well.


BYU Mint Brownies

Ingredients:

Brownies:

1 cup margarine or butter
1/2 cup cocoa
2 tbsp. honey
4 eggs
2 cups sugar
1 3/4 cup flour
1/2 tbsp. baking powder
1/2 tsp. salt
1 cup chopped walnuts, optional (I omitted these because of my son's tree nut allergy)

Mint Icing:

5 tbsp. margarine or butter
Dash of salt
3 tbsp. milk
1 tbsp. light corn syrup
2 1/3 cup powdered sugar
1/2 tsp. mint extract
1-2 drops green food coloring

Chocolate Icing:

5 tbsp. butter
Dash of salt
3 tbsp. milk
1 tbsp. light corn syrup
2 1/3 cup powdered sugar
1/3 cup cocoa

Directions:

Brownies:

Melt margarine or butter and mix in cocoa. Allow to cool. Add honey, eggs, sugar, flour, baking powder, and salt. Mix well. Add nuts, if desired. Pour batter into a greased 9x13-inch baking pan. Bake at 350 degrees for 25 minutes. Cool.

Mint Icing:

Soften margarine or butter. Add salt, corn syrup, and powdered sugar. Beat until smooth and fluffy. Add mint extract and food coloring. Mix. Add milk gradually until the consistency is a little thinner than cake frosting.

Frost cooled brownies with mint icing. Place in freezer to stiffen icing while preparing chocolate icing.

Chocolate Icing:

Soften margarine or butter. Add salt, corn syrup, and powdered sugar. Beat until smooth and fluffy. Add cocoa. Mix until smooth.

Remove brownies from freezer and carefully top with chocolate frosting. If you would like, you can place the brownies in the freezer again to allow the frosting to set and to allow for smoother cutting of the brownies.

Source: My BYU Alumni email and a blog called Your Home Based Mom by LeighAnne Wilkes. You can find that blog here. You can find it on BYU's site here.

Notes: I didn't freeze my brownies after adding the chocolate icing and before cutting them. As a result, the cutting process was a little messy. The brownies could have looked neater and prettier if I had frozen them prior to cutting them. Oh well! The brownies were still delicious though!

Monday, November 21, 2016

It's Not Fall Without Pumpkin


So, apparently my mom hates pumpkin. However, I just have to have something with pumpkin in it around this time of year. It's just a flavor that says "autumn" to me.

Here's a great cake to help you take care of your pumpkin cravings this fall.


Pumpkin Layered Magic Cake

Ingredients:

Cake Layer:
1 box Betty Crocker SuperMoist yellow cake mix
1 cup water
1/2 cup vegetable oil
3 eggs

Pumpkin Layer:
1 can (15 oz) pumpkin (not pumpkin pie mix)
1 cup packed brown sugar
1 cup half-and-half
3 eggs
2 teaspoons pumpkin pie spice
1/2 teaspoon salt

Topping:
1 package (8 oz) cream cheese, softened
3/4 cup powdered sugar
1 teaspoon vanilla
1/8 teaspoon salt
2 cups heavy whipping cream
Pumpkin pie spice, for sprinkling

Directions:

Heat oven to 350 degrees F. Spray bottom only of 13x9-inch pan with cooking spray.

In large bowl, beat Cake Layer ingredients with electric mixer on low speed until moistened. Scrape bowl; beat 2 minutes on medium speed. Spread in pan.

In another large bowl, mix Pumpkin Layer ingredients with whisk until smooth. Carefully spoon pumpkin mixture over cake batter in pan.

Bake 48 to 53 minutes or until cake is set when touched lightly in center. Cool 30 minutes. Refrigerate at least 4 hours to chill.

In large bowl, beat cream cheese, powdered sugar, vanilla, and 1/8 teaspoon salt until smooth. Add whipping cream; beat until smooth, and stiff peaks form. Spread over chilled cake. Sprinkle lightly with pumpkin pie spice. Store covered in refrigerator.

Source: Betty Crocker. You can find it here.

Notes: I was worried after I baked this that the pumpkin layer hadn't sunk to the bottom. I really couldn't tell from the outside of the pan, but once I cut into it, it had turned out perfectly. This dessert is so easy to put together and will take care of your pumpkin craving for sure.

Monday, November 7, 2016

Turning Cereal Into Dessert


I know, I know. Most cereal is sweet enough that it could be considered dessert, but if you want to turn it into a technical dessert, these recipes are for you.


Cookie Cereal Marshmallow Treats

Ingredients:

4 tablespoons butter
10 oz. marshmallows (1 large bag)
6 cups cookie cereal
1 bag white melting chocolate/candy coating wafers
Mini chocolate chips

Directions:

Melt the butter in a large pot and add the marshmallows. Stir the marshmallows until completely melted and smooth. Add cookie cereal and stir to combine.

Press cookie cereal into a buttered cookie sheet (you can line the sheet with foil to make for easier removal).

Press flat and let the cookie cereal treats sit until completely set and cooled.

Cut treats into squares. Melt the white chocolate according to the package directions. Dip half of each treat square into the melted white chocolate. Tap off any excess chocolate.

Place dipped treats on a sheet of waxed paper and sprinkle with mini chocolate chips. Let treats sit until chocolate has set.

Source: Big Bear's Wife. You can find the recipe here.

Notes: We didn't melt the white candy coating wafers and dip the treats into the melted chocolate. We simply sprinkled the candy coating wafers on top along with the mini chocolate chips. We did this to cut down on time, but still incorporate the white chocolate flavor.


Honey Nut Cheerios Peanut Butter Bars

Ingredients:

1 cup white sugar
1 cup light corn syrup
1 cup peanut butter
6 cups Honey Nut Cheerios
1/2 cup chocolate chips (optional)

Directions:

Butter a 9x13-inch baking pan and set aside.

In a large pan, melt sugar and corn syrup over medium heat until it barely comes to a boil. Remove from heat and stir in peanut butter. Add Cheerios, 2 cups at a time and stir until fully coated.

Press mixture into a 9x13-inch dish.

Optional: Melt 1/2 cup chocolate chips in the microwave for 1 minute and drizzle chocolate on top of the bars.

Store leftovers in an air-tight container for up to 3 days.

Source: I Heart Nap Time. You can find it here.

Notes: These were quite tasty!


Cookie Butter and White Chocolate Cheerios Marshmallow Treats

Ingredients:

7 cups Honey Nut Cheerios
2 tablespoons unsalted butter
1/3 cup Biscoff cookie spread
1 (10 1/2 ounce) bag miniature marshmallows
3/4 cup white chocolate chips

Directions:

Line a 9x13-inch baking pan with foil and coat with non-stick cooking spray; set aside.

In a large pot over medium-low heat, melt the butter and Biscoff cookie spread. Add in the marshmallows and stir constantly until completely melted. Toss in the white chocolate chips and stir.

Remove pot from the stove and fold in the Cheerios cereal until evenly coated with the melted marshmallows.

Pour mixture into the prepared pan and press into pan.

Cut into squares after mixture has fully set and cooled.

Store leftovers in an airtight container for up to 3 days.

Source: Belly Full. You can find it here.

Notes: I would increase the cookie butter next time. It was a very subtle taste and I would like to make the cookie butter flavor more prominent. I would use at least 1/2 cup next time.

Sunday, October 16, 2016

Another Delicious Dessert!


Lemon-Raspberry Cheesecake Slab Pie

Ingredients:

1 box Pillsbury refrigerated pie crust s
2 packages (8 oz each) cream cheese, softened
1/2 cup sugar
1 1/2 cups sour cream (not reduced-fat or fat-free)
1 tablespoon grated lemon peel (2 large lemons)
1/2 cup fresh lemon juice (2 large lemons)
1/2 cup raspberry jam or preserves

Directions:

Let box of refrigerated pie crusts stand at room temperature 15 minutes. Place oven rack in lower one-third of oven; heat oven to 350 degrees F.

Place 1 pie crust on top of second pie crust. With rolling pin, roll out pie crusts into rectangle a little larger than pan; tuck pastry in bottom and up sides of pan.

In bowl of stand mixer with paddle attachment or with hand mixer, beat 2 packages (8 oz each) cream cheese, softened, and 1/2 cup sugar on medium-high speed 5 minutes or until light and fluffy. Add 1 1/2 cups sour cream, 1 tablespoon grated lemon peel, and 1/2 cup fresh lemon juice; beat on low speed about 1 minute or until combined. Pour batter over crust in pan; spread evenly with spatula.

Place 1/2 cup raspberry jam or preserves in small resealable food-storage plastic bag; cut off very small bottom corner of bag. Starting at one long side of pan, squeeze bag to make 7 crosswise rows of jam. Starting at one short side of pan, pull butter knife lengthwise about 10 times through all crosswise rows of jam.

Bake on lower oven rack 35 to 40 minutes or until center of filling is set. Remove from oven to cooking rack; cool 10 minutes. Refrigerate at least 30 minutes before cutting and serving.

Source: Pillsbury website. You can find it here.

Notes: This is really easy and very tasty and satisfying.