Sunday, December 20, 2020

Mom's Snickerdoodles


You know the saying, "Nobody makes 'em like mom?" This is true of snickerdoodles. I still haven't figured them out. My mom made us a batch of snickerdoodles in a Christmas care package, and they tasted like childhood and heaven. Light, fluffy, and cakey. Soooo good. Here is her recipe.


Giant Snickerdoodles

Ingredients:

1 cup margarine, softened (use a good brand that is preferably marked "good for baking")
1 1/2 cups plus 2 tbsp. sugar
2 eggs
2 3/4 cups flour
2 tsp. cream of tarter
1 tsp. baking soda
1/4 tsp. salt
2 tsp. cinnamon

Directions:

In a large mixing bowl with mixer at medium speed, cream butter, 1 1/2 cups sugar, and eggs until light and fluffy, scraping sides of bowl occasionally. In a separate bowl, combine flour, cream of tartar, baking soda, and salt. Add to creamed mixture until well blended, but do not overmix. 

Refrigerate at least 1 hour to chill dough.

Preheat oven to 375 degrees F. Combine remaining 2 tablespoons sugar and cinnamon in a flat open bowl. 

*Important: Prepare balls of dough for one batch of cookies at a time. Keep unused dough refrigerated. The texture of the cookies is dependent on the dough remaining chilled right up until baking.

Shape dough into 2-inch balls and roll in cinnamon-sugar. Place 3 inches apart on ungreased cookie sheets. Bake 12-15 minutes until golden brown. Snickerdoodles will puff up at first, then flatten out to giant size during baking. Remove from cookie sheet and cool on wire rack.

Makes 2 dozen cookies.

Source: My mom got this recipe from a Ladies Home Journal magazine about 40 years ago.


Notes: You cannot substitute butter or shortening for this recipe. You need margarine, and not just any margarine, but a good quality margarine. Some margarine brands water their formula down, so that will alter the outcome of the recipe as well. Look for a brand of margarine that specifically claims that it is "good for baking." Also, do not overmix the batter. Finally, it is imperative that you keep the dough chilled in the refrigerator right up until it is ready to be rolled into a ball and baked, otherwise the cookies will spread. They will lose their thick, light, fluffy, and cakey texture and instead be flat, chewy, and quickly become hard. If this happens, the cookies are still edible, of course, but you will want to warm them in the microwave for 7-10 seconds per cookie prior to eating to soften them up.


Saturday, December 19, 2020

Mom's Chocolate Chip Cookies


We have two amazing chocolate chip cookie recipes on this blog. One of them can be found here. The other one can be found below. We posted it nearly a decade ago, here, but my mom made a batch for us for Christmas, so I felt it deserved another post.


Chocolate Chip Cookies

Ingredients:

1 lb. butter or margarine
1 1/2 cups white sugar
2 cups brown sugar
3 eggs
6 cups flour
1 1/2 tsp. salt
1 1/2 tsp. baking soda
2 tsp. vanilla
2 bags (4 cups) chocolate chips)
Walnuts, if desired

Directions:

Cream together butter, white sugar, and brown sugar.

Then add eggs, flour, salt, baking soda, and vanilla. Once incorporated, add chocolate chips, and walnuts, if using.

Mix well. Put on ungreased cookie sheet with small ice cream scoop. Bake at 350 degrees F for 8-10 minutes.

Source: My mom found this in a ward/church cookbook about 30 years ago. She mentioned in the comments below that it was a recipe either submitted by Jo Hatch and/or Sharon Boam.


Notes: We originally added pecans to this as well, but since my son developed a tree nut allergy, we have omitted the nuts.


Friday, December 18, 2020

Choose Your Flavor


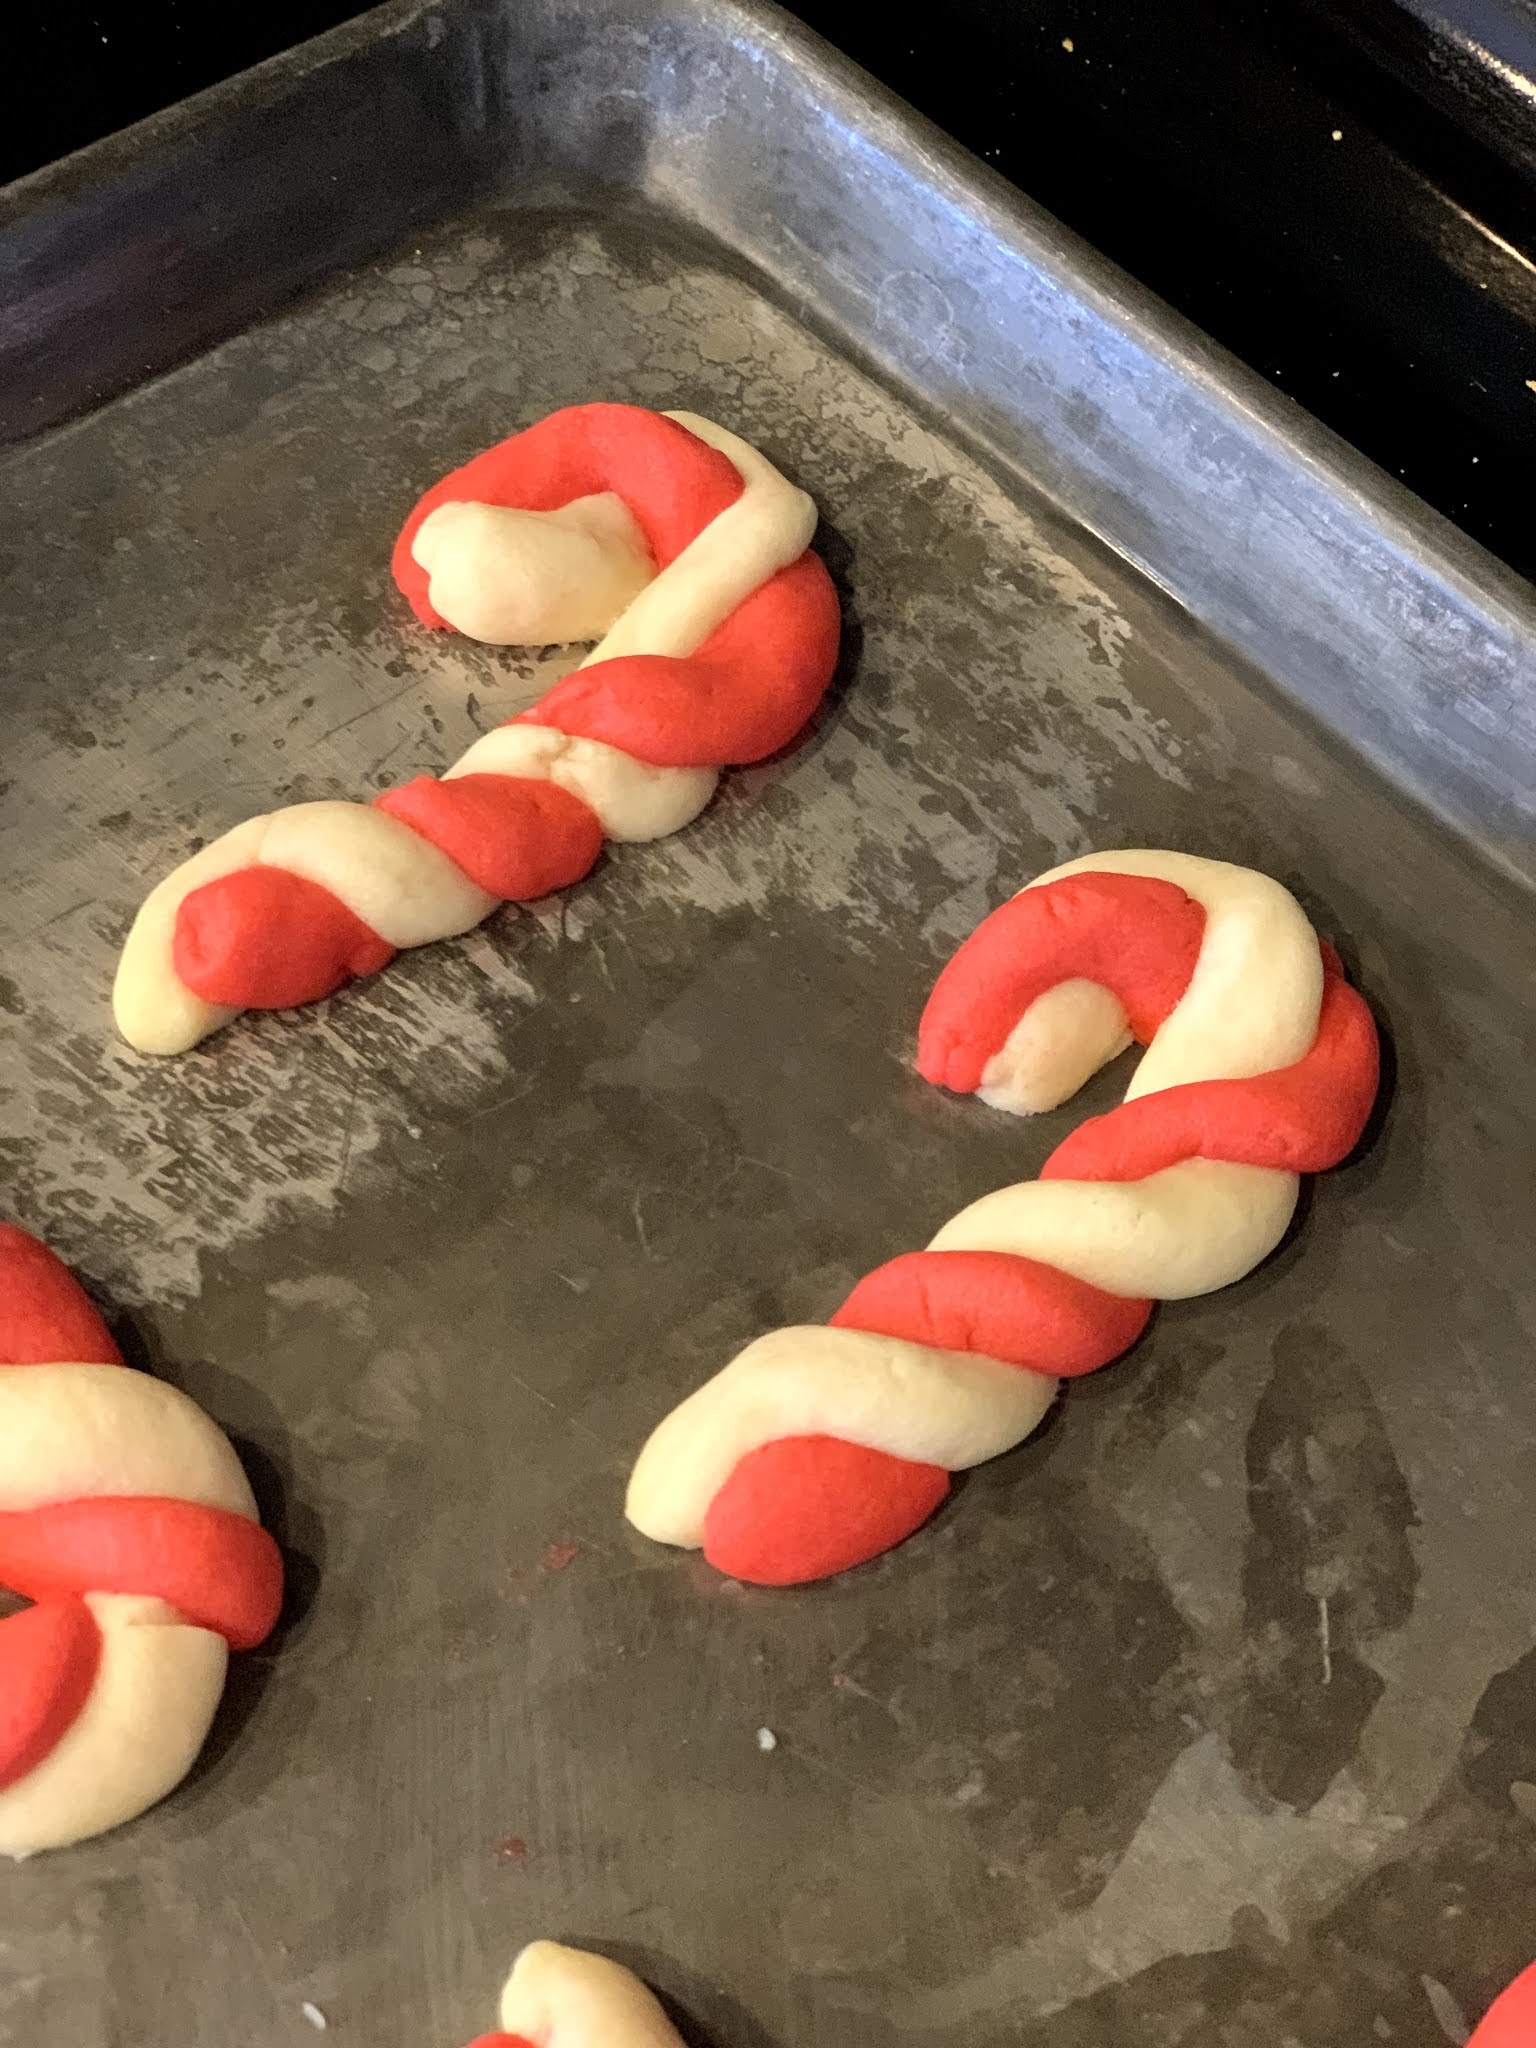
My mom has mentioned a number of times that her mom used to make candy cane cookies that had anise and almond flavoring. However, her mom never passed on a recipe to them. I decided to try my hand with the internet and see if I can find a recipe that was close to what her mom used to make. She said this one came pretty darn close and brought back a lot of memories.

Now, you can have a lot of fun with the flavorings on these cookies. I found a lot of different options online. Some recipes used 1 1/2 teaspoons almond extract for the red dough and 1 teaspoon almond extract for the white dough. Some recipes used 1 teaspoon peppermint extract for the red dough and 1 teaspoon vanilla extract for the white dough. The version my mom always had used 1 teaspoon anise extract for the red dough and 1 1/2 teaspoons almond extract for the white dough.

I made these cookies two ways. I made one batch using the anise extract for the red dough and almond extract for the white dough. Then I made another batch where I used peppermint extract for the red dough and vanilla extract for the white dough. It was fantastic both ways. These are light, soft, and chewy butter cookies. I think you will love them. Besides being delicious, they were also adorable.

Christmas Candy Cane Cookies

Ingredients:

1/2 cup shortening
1/2 cup butter, softened
1 cup confectioners' sugar
1 large egg, room temperature
2 1/2 cups all-purpose flour
1/2 teaspoon salt
1/2 teaspoon red food coloring (or more, to get your desired color)
1/2 cup peppermint candy, crushed, optional
1/2 cup sugar, optional

Flavorings:


1 1/2 teaspoons almond extract
1 teaspoon vanilla

Or:

1 teaspoon peppermint extract
1 teaspoon vanilla extract

Or:

1 teaspoon anise extract
1 1/2 teaspoons almond extract

Directions:

In a large bowl, cream the shortening, butter, and confectioners' sugar until light and fluffy, 5-7 minutes. Beat in egg. Combine flour and salt; gradually add to the creamed mixture. Divide dough in half; mix the food coloring into 1 portion. Then mix in the extracts: almond, peppermint, or anise into the red dough and vanilla or almond into the white dough.  

Cover each portion of dough separately and refrigerate for 2 hours or until easy to handle. I put each into a separate zip top bag.

Just before removing dough from the refrigerator, mix crushed peppermint candy and sugar together, if using.

Shape 1 teaspoon plain dough into a 4-inch rope. Shape 1 teaspoon red dough into a 4-inch rope. Place ropes side by side; pres together lightly and twist carefully. Be gentle to avoid breaking or cracking the dough. Place on an ungreased baking sheet; curve top of cookie down to form handle of cane. Repeat with remaining plain and red dough, placing cookies 2 inches apart on baking sheets. I kept the dough I wasn't currently working with in the refrigerator to keep it chilled.

Bake at 375 for 8-9 minutes or until set. Sprinkle the candy mixture lightly on top of the warm cookies. Remove to wire racks to cool completely.

Nutrition information: 1 cookie: 86 calories, 4 g fat, 48 mg sodium, 11 g carbohydrate (6 g sugars, 0 g fiber), 1 g protein.


Source: I found variations of this cookie recipe all over the internet. I followed this one from Taste of Home. you can find it here. However, here are some more versions of the recipe. Another Taste of Home version, here. This Taste of Home version is cinnamon flavored with crushed red hots! You can find it here. Don't feel like making dough? This version, here, uses refrigerated sugar cookie dough. This was the only one I found that used anise flavoring. You can find it here. I am not sure why it was so poorly reviewed. Probably someone who doesn't like anise flavoring. But I love it! A cute three color candy cane with red, green, and white, here. Version one from Allrecipes.com, here. Version two from Allrecipes.com, here. Version three from Allrecipes.com, here.


 Above: I could have spaced them a little more and fit nine cookies to a pan, all facing the same direction, but this is how I did mine this time.


Notes: I LOVED the anise and almond flavor combination. The anise flavoring was not overpowering. This is not eating a black jellybean cookie, I promise. It is subtle and just such a lovely flavor combination. It was so good. I also loved the peppermint flavored cookies as well. Though the almond and vanilla flavor combination might be the most kid friendly. As you can see from all the versions I found, you can experiment with what works best for you! Also, definitely check out the tricolor candy canes (red, green, and white). Those were really fun and cute too!

Saturday, December 5, 2020

Christmas Cookie Plate Exchange Part 2

As promised, here is the second half of our cookie plate exchange recipes! Enjoy!


Kisses Candy Cane Blossoms

Ingredients:

48 Hershey's Kisses brand candy cane mint candies
1/2 cup (1 stick) butter or margarine, softened
1 cup granulated sugar
1 egg
1 1/2 tsp. vanilla extract
2 cups all-purpose flour
1/4 tsp baking soda
1/4 tsp salt
2 tbsp milk
1/3 cup red and/or green sugar crystals, granulated sugar, or powdered sugar for rolling

Directions:

Heat oven to 350 degrees F. Remove wrappers from candies.

Heat butter, granulated sugar, egg, and vanilla in large bowl until well blended. Stir together flour, baking soda, and salt; add alternately with milk to butter mixture, beating until well blended.

Shape dough into 1-inch balls. Roll in red or green sugar, granulated sugar, powdered sugar, or a combination of any of the sugars. Place on ungreased cookie sheet.

Bake 8-10 minutes or until edges are lightly browned and cookie is set. Remove from oven; cool 2 to 3 minutes. Press a candy piece into center of each cookie. Remove from cookie sheet to wire rack. Cool completely. 

Makes about 48 cookies.

Source: Hershey's website. You can find it here.

Notes: These were so cute and delicious. We did put the candies on to the cookies too soon. We should have let them cool a little longer before pressing the candies into the cookies to avoid the candies from melting the way they did. Oh well!


Chewy Brown Sugar Cookies

Ingredients:

2 cups all-purpose flour
1 tsp. baking soda
1 1/2 tsp. cornstarch
1/2 tsp ground cinnamon (increase to 1 tsp. if you love cinnamon)
1/4 tsp. salt
3/4 cup unsalted butter, melted
1 1/4 cups packed dark brown sugar (light brown sugar may also be used)
1 large egg, room temperature
2 tsp. vanilla extract
1/3 cup granulated sugar, for rolling

Directions:

Stir the flour, baking soda, cornstarch, cinnamon, and salt together in a large bowl. Set aside.

In a medium size bowl, whisk the melted butter and brown sugar together until smooth. Whisk in the egg and vanilla. Pour the wet ingredients into the dry ingredients and mix together with a large spoon or rubber spatula. The dough will be very soft, yet thick. Cover the dough and chill for 2 hours, or up to 3 days.

If dough was chilled for longer than 2 hours, allow it to soften at room temperature for ten minutes.

Preheat the oven to 325 degrees F. Line two large baking sheets with parchment paper or silicone baking mats. Set aside.

Pour the granulated sugar into a bowl. Take 2 tablespoons of dough and roll into a ball, then roll into the sugar. Bake for precisely 8-9 minutes. Remove from the oven and gently press the top of the middle of each cookie down with the back of a spoon. Place back into the oven for 1-2 more minutes. Cookies will be puffy and still appear very soft in the middle. Remove from the oven and allow to cool on the baking sheet for ten minutes before transferring to a wire rack to cool completely.

Cookies stay soft and fresh for 7 days at room temperature. Cookies may be frozen up to 3 months. Frozen rolled cookie dough may be baked directly from the freezer for 13 minutes.

Source: Sally's Baking Addiction. You can find it here.

Red Velvet Chocolate Chip Cookies

Ingredients:

1 1/2 cups + 1 tbsp all-purpose flour
1/4 cup unsweetened cocoa powder
1 tsp baking soda
1/4 tsp salt
1/2 cup unsalted butter, softened to room temperature
3/4 cup packed light brown sugar (dark brown sugar may also be used)
1/4 cup granulated sugar
1 large egg, at room temperature
1 tbsp milk
2 tsp vanilla extract
1.5 tbsp red food coloring
1 cup semi-sweet chocolate chips

Directions:

whisk the flour, cocoa powder, baking soda, and salt together in a large bowl. Set aside.

Using a handheld or stand mixer with a paddle attachment, beat the butter on high speed until creamy, about 1 minute. Beat in the brown sugar and granulated sugar until combined and creamy, about 1 minute. 

Beat in the egg, milk, and vanilla extract. Once mixed, add in the food coloring and continue mixing until combined.

Continue mixing while slowly adding in the dry ingredients into the wet ingredients until fully incorporated and soft dough has formed. Add in more red food coloring, if desired. Fold in the chocolate chips with a spoon.

Cover the dough tightly with aluminum foil or plastic wrap and chill for at least 1 hour (or up to 3 days).

Preheat oven to 350 degrees F. Line two large baking sheets with parchment paper or silicone baking mats. Set aside.

Scoop 1 1/2 tbsp dough and roll into a ball. Bake for 10-11 minutes.

If the cookies are still puffy and haven't spread, lightly press down with the back of a spoon. If desired, sprinkle a few additional chocolate chips onto the tops of the warm cookies.

Allow the cookies to cool on the cookie sheet for 5 minutes before transferring to a wire rack to cool completely.

Source: Sally's Baking Addiction. You can find it here.

Notes: All of my pictures turned out blurry. I will have to make these again sometime soon and get a picture of them.

Molasses Sugar Cookies

Ingredients:

1 1/2 cups shortening
2 cups white sugar
1/2 cup molasses
2 eggs
4 cups all-purpose flour
4 teaspoons baking soda
2 tsp ground cinnamon
1 tsp ground cloves
1 tsp ground ginger
1 tsp salt

Directions:

Melt the shortening in a large pan on the stove, and cool.

Add sugar, eggs, and molasses; beat well.

In a separate bowl, sift dry ingredients together and add to the pan. Mix well and chill 3 hours or overnight.

Form into 1-inch balls. Roll in granulated sugar. Place on greased cookie sheet about 2 inches apart.

Bake at 375 degrees F for 8-10 minutes.

Store in an airtight container.

Source: Allrecipes recipe by Karin Christian. You can find it here.

Notes: Another one that I didn't get a picture of. I will have to add a picture after I make them again.


Toasted Coconut and Lime Shortbread

Ingredients:

1/2 cup shredded unsweetened coconut, baked in a 325 degree F oven until golden, about 5 minutes
1/2 lb. unsalted butter, room temperature
3/4 cup granulated sugar
2 tbsp lime zest
1 egg yolk
1/2 cup cornstarch
1/2 tsp salt

Directions:

Cream the butter and sugar in your mixer at low speed for about 30 seconds. With the mixer running, beat in the lime zest and egg yolk, followed by the flour, cornstarch, toasted coconut, and salt. Beat just until the mixture holds together.

Shape the dough into a log and refrigerate or freeze until firm, at least 30 minutes.

Preheat the oven to 275 degrees F. Slice 1/4-inch cookies and place on baking sheets. Bake until cookies are barely firm, but still very tender, about 30 minutes--do not brown. Cool for a minute on the cookie sheets before transferring cookies to a rack to cool completely.

Source: Donuts, Dresses, and Dirt from The New York Times. You can find it here.


Sweet and Salty Corn Puffs

Ingredients:

1 cup sugar
1/2 pound butter (2 sticks, or 1 cup)
3 tablespoons water
1 tablespoon corn syrup
8 ounces corn puffs

Directions:

Stir first four ingredients together in a saucepan and heat on high heat until mixture reaches 250 degrees.

Meanwhile, pour corn puffs into a large bowl. When the butter/sugar mixture reaches 250 degrees, pour mixture over corn puffs and stir to coat. Spread onto waxed paper to cool.

Source: My mom got this recipe from her friend, Karrie. I found a very similar recipe online here. We also posted about it once before. You can read the original post here.

Notes: Yes, I know these aren't cookies, but we included these little gift bags in our cookie packages. They weren't plates so much as they were cookie filled cake boxes. Ha ha.

Christmas Cookie Plate Exchange Part 1


I am very behind on blogging. We did this a few years ago, but we all made a bunch of different kinds of cookies and then put together plates for our neighbors using each others' cookies, so we had an amazing variety of cookies.

Here are the cookie recipes we used!

Biscotti

Ingredients:

1/2 cup vegetable oil
1 cup white sugar
3 1/4 cups all-purpose flour
3 eggs
1 tablespoon baking powder
1 tablespoon anise extract, or 3 drops anise oil

Directions:

Preheat the oven to 375 degrees F. Grease cookie sheets or line with parchment paper.

In a medium bowl, beat together the oil, eggs, sugar, and anise flavoring until well blended. Combine the flour and baking powder, stir into the egg mixture to form a heavy dough. Divide dough into two pieces. Form each piece into a roll as long as your cookie sheet. Place roll onto the prepared cookie sheet, and press down to 1/2 inch thickness.

Bake for 25-30 minutes in the preheated oven, until golden brown. Remove from the baking sheet to cool on a wire rack. When the cookies are cool enough to handle, slice each one crosswise into 1/2 inch slices. Place the slices cut side up back onto the baking sheet. Bake for an additional 6-10 minutes on each side. Slices should be lightly toasted.

Source: Allrecipes, recipe by JANDEE. You can find it here.

Notes: You can substitute almond flavoring for the anise extract, if you prefer. Your rectangles should be about 4" wide and about 1/2" thick. 

Watch cookies carefully, it may take less than 25 minutes to bake, depending on your oven. Remove the cookies when they are a nice golden brown color.

Do not let the cookies cool completely before slicing them. Slice them while still warm with a pizza cutter.


Peppermint Pinwheels

Ingredients:

1 cup salted butter, softened
1 1/2 cups granulated sugar
1 large egg
1 teaspoon peppermint extract
1 teaspoon vanilla extract
2 1/2 cups all-purpose flour
1 1/2 teaspoons baking powder
1/4 tsp salt
Red food coloring paste or gel

Directions:

Beat butter with a heavy-duty stand mixer on medium speed until creamy, about 2 minutes; gradually add sugar, beating well. Add egg and extracts, beating until combined.

Stir together flour, baking powder, and salt in a small bowl. Gradually add to butter mixture, beating on low speed just until blended.

Divide dough in half; add desired amount of red food coloring to 1 portion, and knead until color is distributed. Shapre dough halves into disks; wrap in plastic wrap, and chill until firm, about 1 hour.

Divide each half of dough into 2 equal portions. Roll out each portion on floured wax paper into an 8-inch square, trimming edges, if necessary.

Invert 1 white dough square onto 1 red dough square; peel wax paper from white dough. Tightly roll up dough, jelly-roll fashion, peeling wax paper from red dough as you roll. Repeat with remaining dough squares. Wrap rolls in plastic wrap, and chill 2 hours.

Preheat oven to 350 degrees F. Remove dough from refrigerator, and cut into 1/4-inch-thick slices; place slices 2 inches apart on parchment paper-lined baking sheets. (Keep unbaked dough chilled while baking cookies.)

Bake, in batches, in preheated oven until bottoms are lightly browned, 10 to 12 minutes. Remove cookies from pans to wire racks, and cool completely.

Source: Southern Living, recipe by Iain Bagwell. You can find it here.


Peppermint Shortbread Cookies

Ingredients:

2 sticks unsalted butter, softened
3/4 cup powdered sugar
1 teaspoon pure vanilla extract
1 teaspoon salt
2 1/3 cups all-purpose flour
3/4 cup Andes peppermint crunch baking chips (or crushed peppermint candies)

Directions:

In a stand mixer fitted with the paddle attachment, cream butter, powdered sugar, vanilla, and salt until smooth. Gradually add flour and mix on low until combined. Add Andes baking chips and continue mixing on low until fully combined.

On wax paper or parchment paper, form into a 12- to 14-inch log and freeze at lease 30 minutes, or until firm.

When ready to bake, preheat oven to 350 degrees F. Cut the shortbread dough into 1/4-inch slices and bake for 13-15 minutes on parchment lined baking sheets.

Note: if you freeze the dough for longer than 30 minutes, you may have to let it sit out at room temperature until it thaws slightly before you are able to slice it.

Source: Rachel Cooks. You can find it here.


Citrus Cornmeal Shortbread

Ingredients:

1 cup (2 sticks) unsalted butter, softened
3/4 cup confectioners' sugar
2 teaspoons pure vanilla extract
1 1/2 teaspoons orange zest
2 cups all-purpose flour
1/4 cup yellow cornmeal
2 tablespoons yellow cornmeal
1 teaspoon coarse salt

Directions:

Put butter and sugar in the bowl of an electric mixer fitted with the paddle attachment; mix on medium speed until creamy and smooth, about 2 minutes. Add vanilla and zest. Mix until combined, scraping down sides of bowl as needed. Reduce speed to low. Add flour, 2 tablespoons cornmeal, and salt; mix until well combined, about 3 minutes. Halve dough; shape each into log about 1 1/2 inches in diameter. Wrap each in plastic, and refrigerate until cold, at least 1 hour.

Preheat oven to 300 dwegrees. Place remaining 1/4 cup cornmeal on a sheet of parchment paper. Roll log in cornmeal to coat. Cut into 1/4-inch-thick rounds, and space them 1 inch apart on a baking sheet lined with parchment paper. Bake until pale golden, 25-30 minutes. Cool on sheet on a wire rack.

Source: Martha Stewart Living. You can find it here.

Notes: Pay no attention to the low reviews on the Martha Stewart website. I swear she has people trolling her. This is a great recipe and does not deserve the low rating it has.


Susan's Italian Cookies

Ingredients:

Cookies:

4 eggs
3/4 cup canola oil
1 1/4 cups sugar
2 tsp vanilla extract
1 tsp lemon or anise extract
4 tsp baking powder
pinch of salt
4 cups flour

Frosting:

3 tbsp butter, melted and cooled
2 tsp vanilla
1 1/4 cups powdered sugar
Milk, as needed
Colored sprinkles and or colored sugar

Directions:

Preheat oven to 350 degrees F.

Beat together the eggs, oil, sugar, vanilla, and lemon or anise extract.

Mix in the baking powder, salt, and flour until well combined.

Roll dough into 1" galls and place about 2 inches apart on parchment lined cookie sheets.

Bake 9-11 minutes (cookies should not brown).

Place on wire rack to cool.

Make frosting. Whisk together the butter and vanilla and then whisk in enough confectioners sugar to make a frosting. Add about a tablespoon of milk at a time until you get a good consistency for drizzling.

Drizzle frosting over cookies and immediately sprinkle with colored sugar or sprinkles. Leave until frosting sets.

Source: The View from Great Island. You can find it here.

Fancy Sugar Cookies


A few years ago, we made sugar cookies using edible wafer paper to add pretty pictures to the top of the cookies. It was kind of a process, but they made for the prettiest cookies. I used royal icing here, but wafer paper also works with fondant, in case you ever want to use it that way.


Karrie's Sugar Cookies

Ingredients:

2 cups sugar
2 cups butter or margarine, softened
6 eggs
2 tsp vanilla (or almond flavoring)
1 pinch salt
7 cups flour
3 tsp baking powder

Directions:

Cream sugar and butter. Add eggs and vanilla. Add flour mixed with baking powder and salt. Roll out the sugar cookie dough and cut out cookies.

Bake at 350 degrees F for 8-10 minutes. Do not overbake (in fact, you don't even want these cookies to start to brown).

Source: My Mom's friend, Karrie. When we got the recipe from her, she called them "John's Sugar Cookies." I don't know who John is, but he knows how to make a good sugar cookie.

Notes: Who doesn't love sugar cookies? These are awesome. This is the recipe I used this time.


No Fail Sugar Cookie Recipe

Ingredients:

6 cups all-purpose flour
3 tsp. baking powder
1 tsp. salt
2 cups unsalted butter
2 cups granulated sugar
2 large eggs
2 tsp. vanilla extract

Directions:

Cream sugar and butter until fluffy, about five minutes. Add eggs and vanilla. Mix dry ingredients in separate bowl and add to butter mixture. Mix well.

Put a handful of the freshly made dough between two sheets of parchment paper and roll to desired thickness. Repeat with the rest of the dough. Put the rolled dough, including the parchment paper, on a cookie sheet and refrigerate for 10 minutes or longer. Your dough will be chilled and ready to cut and bake with no wait and no added flour! Repeat with scraps after cutting cookies.

Bake at 350 degrees F for 8-10 minutes. Let cool. Recipe makes 8 dozen 3" cookies.

Source: Fancy Flours website. You can find it here.


Royal Icing

Ingredients:

3 tbsp Wilton Meringue Powder
4 cups sifted confectioners' sugar (about 1 lb.)
5 tablespoons water

Directions:

In large bowl, beat all ingredients at medium speed of stand mixer until icing forms peaks and loses its sheen, 7-10 minutes. If using a hand mixer, beat at high speed 10-12 minutes. If peaks are not forming, increase the mixer speed and continue to beat.

To prevent drying, cover the bowl with a damp cloth while working with icing.

Makes about 2 3/4 cups of icing.

Source: Wilton. You can find it here.

Notes: I prefer to use an egg white substitute meringue powder for royal icing for cookies. It's just easier, and then you also don't have to worry about consuming raw egg. If you aren't planning to eat it (like for a gingerbread house), royal icing using egg whites is great.


Fancy Wafer Paper Sugar Cookies

Ingredients:

Baked sugar cookies (using your preferred recipe, cut the cookie shapes to match the wafer paper shapes and the number needed)
Royal icing
Wafer paper pictures
Scissors
Light corn syrup or clear piping gel
Decorator brush
Wax paper
A lot of free counter space

Directions:

Frost cookies by first piping an outline around each of the cookie's edges. Once all of the cookies have an outline frosting border, pipe frosting within the border of each cookie, using a fine knife or toothpick to spread the frosting evenly over the cookie. Avoid overfilling with frosting. You don't want the frosting to spill over the border. Don't stack the cookies until after they have dried. They need to be laid out in one layer while the icing dries.

Allow iced cookies to dry completely overnight.

Cut the wafer paper that you plan to use to size using scissors.

Brush corn syrup or clear piping gel onto the back of the wafer paper (like you would glue) with your decorator brush. Carefully place the wafer paper onto the cookie to center it as desired. Press down the edges to make sure that the wafer paper completely adheres to the cookie. Use a paper towel to smooth the surface of the wafer cookie. Turn the cookie over onto a clean piece of waxed paper to allow the picture to set for about 10 minutes. Turn the cookie back over and allow to dry completely.

Once the wafer paper is completely dry, you can pipe, frost, or decorate borders onto your cookie, if desired. Or you can leave it as is.

Source: Fancy Flours website. They have step by step pictures with their instructions that are very helpful. You can find it here.

Notes: Here are a couple of links for edible wafer paper that I used. They have so many options. They even have great ones for Halloween, Valentine's Day, the 4th of July, and more. If you just search for "edible wafer paper," you will see all of their selections. 

North Pole Postage Stamp edible wafer paper.

Merry Christmas Wreath edible wafer paper.

White Chocolate Cherry Christmas Cookies


The first time I tried these cookies, it was at a cookie plate exchange over five years ago. Everyone brought some cookies and we made cookie plates to give out to others (or to keep for our own families). We also encouraged people to share their recipes as well. Some remembered to do that, and others didn't.

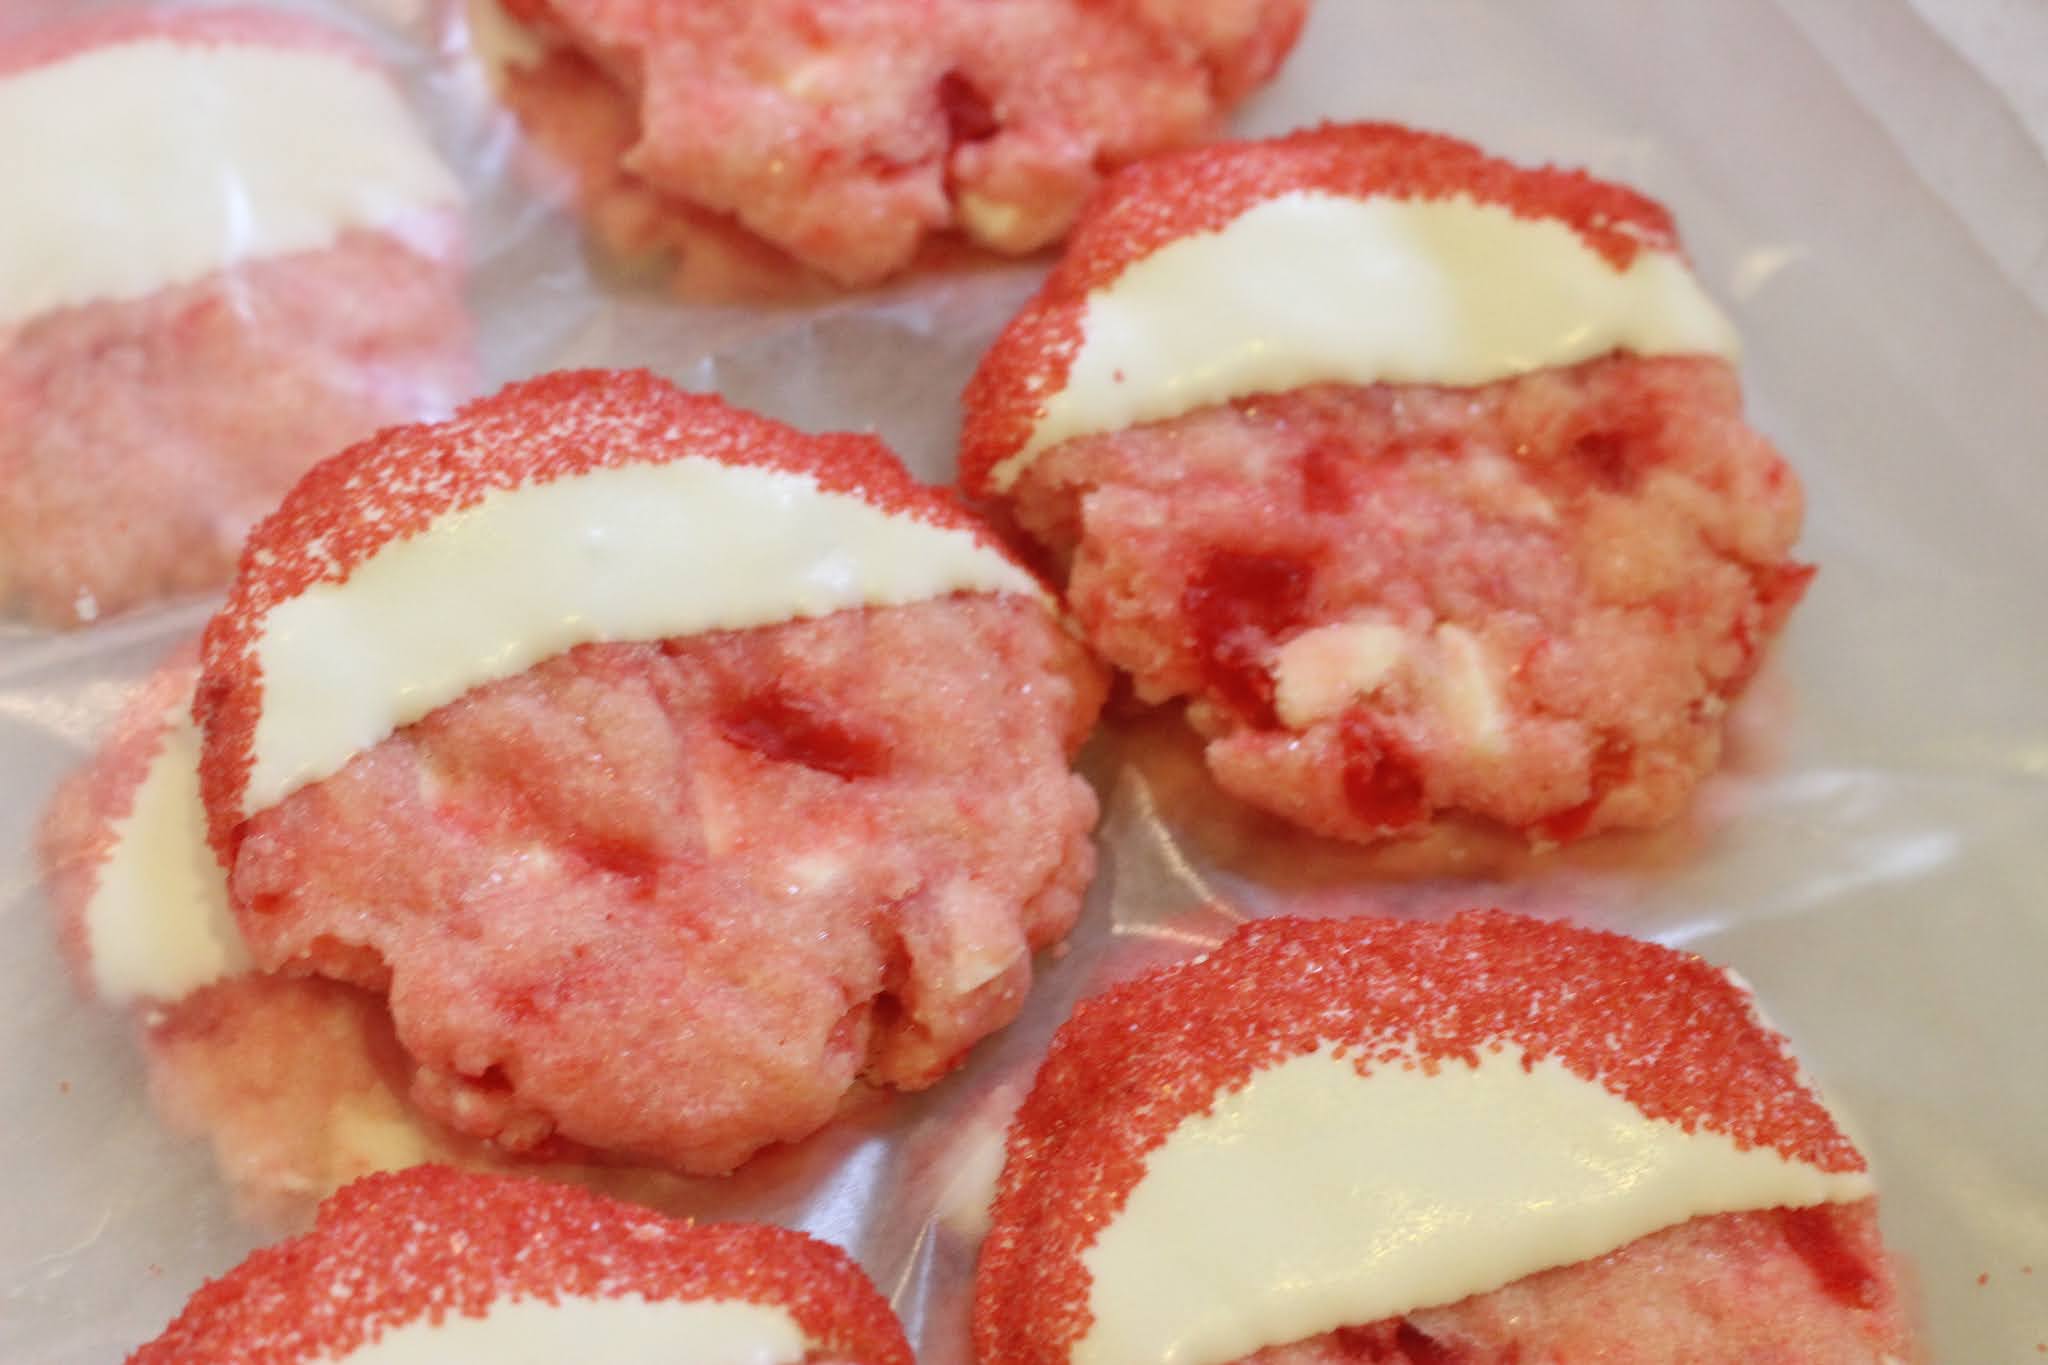
I tried these fantastic cookies and instantly fell in love...but I didn't know who brought these cookies, and they didn't share a recipe either. Cue the internet! Google to the rescue! I knew I couldn't live the rest of my life without eating these cookies again, so after a quick Google search, I found multiple instances where the recipe (almost identical in each case) was found. I will share all of the sources I found below. If you combine all of the names for this cookie, you could call it a White Chocolate Dipped Cherry Shortbread Cookies, but that is kind of a mouthful. I used the recipe from Taste of Home, which was submitted by Ruth Anne Dale of Titusville, Pennsylvania.

I hope you love them as much as I do.


Dipped Cherry Cookies

Ingredients:

2 1/2 cups all-purpose flour
3/4 cup sugar, divided
1 cup cold butter, cubed
1/2 cup finely chopped maraschino cherries, patted dry
12 ounces white baking chocolate, finely chopped, divided
1/2 teaspoon almond extract (use artificial almond extract to make it tree-nut free)
2 teaspoons shortening
Coarse red sugar, red edible glitter, red and/or white nonpareils, and/or red and/or white sprinkles (I used coarse red sugar this time)

Directions:

In a large bowl, combine flour and 1/2 cup sugar; cut in butter until crumbly. Knead in the cherries, 2/3 cup white chocolate, and extract until dough forms a ball.

Shape into 3/4-in. balls. Place 2 in. apart on ungreased baking sheets. Flatten slightly with a glass dipped in remaining sugar. Bake at 325 degrees F for 10-12 minutes or until edges are lightly browned. Remove to wire racks to cool completely.

In a microwave, melt shortening and remaining white chocolate; stir until smooth.

Dip half of each cookie into chocolate; allow excess to drip off. Place on waxed paper; sprinkle with coarse red sugar or edible glitter. Let stand until set. Store in an airtight container.

Sources: Taste of Home, you can find it here. Better Homes and Gardens, posted twice, here and here. Also found on Mel's Kitchen Cafe here. You could probably also find other sources on Pinterest.