Wednesday, June 29, 2011

Better Than Almost Anything...


My son-in-law suggested an alternate title for this blog. The cake that I am featuring is known by another name, but Blogger has a fantastic filtering system and it wouldn't let us use certain words--even if it was as a description for food. Let's just say, the original title would have rhymed with "Better Than Chex Cake." That's what Sarah used to call it anyway when she was younger (she was too embarrassed to use the other title).

The cake is known by all of the above names, but in our family we always call it Caramel Cake (christened by Sean). It's one of Sean's favorite desserts and that boy has taste. I found the recipe years ago printed in an LDS Novel called "Pray Away Pounds." It was a funny story about a sister who joined a group trying to lose weight but they all gained....mostly due to eating recipes like this one. (Thus began a short and intense period of reading tons of novels by LDS authors.) The recipe for this cake can also be found on the Betty Crocker website
Each chapter began with a recipe and this was the most tantalizing. I've seen it printed up many places and it is a staple in Mormon Ward cookbooks.
The other recipe was a bookend because Sarah likes to have two recipes posted at once. It came from one of my favorite websites (Betty Crocker) and was yummy, yummy. In fact, some (I won't say who) liked it better than the other cake.

Better Than Almost Anything Cake
Ingredients:

1 box German chocolate cake mix
Water, vegetable oil, and eggs called for on cake mix box
1 can (14 oz) sweetened condensed milk
1 jar (16-17 oz) caramel, butterscotch, or fudge topping (we recommend caramel)
1 container (8 oz) frozen whipped topping, thawed
1 bag (8 oz) toffee chips or bits (crushed English toffee or Heath bars work well too if you want more chocolate)

Directions:
Heat oven to 350 degrees (325 degrees for dark or nonstick pan). Bake cake as directed on box for 13x9 inch pan.

Poke top of warm cake every 1/2 inch with handle of wooden spoon. Drizzle milk evenly over top of cake; let stand until milk has been absorbed into cake. Drizzle with caramel topping. Run knife around sides of pan to loosen cake. Cover and refrigerate about 2 hours or until chilled.

Spread whipped topping over top of cake. Sprinkle with toffee chips. Store covered in refrigerator.

Makes 15 servings.

Tips:

The cake may stick to the wooden spoon handle while you're using it to make the holes, so occasionally wipe off the handle.

The caramel topping will be easier to drizzle if it has been kept at room temperature. If refrigerated, remove the lid and microwave on High about 15 seconds.

Nutrition information: 510 calories, 21 g fat, 60 mg cholesterol, 480 mg sodium, 75 g carbohydrate, 1 g fiber, 6 g protein.

Banana Tres Leches Dessert

Ingredients:

1 box white cake mix
1 1/4 cups water
2 tablespoons vegetable oil
3 eggs
1 cup mashed bananas (2 medium)
1 can (14 oz) sweetened condensed milk (not evaporated)
1/2 cup (from 14-oz can) coconut milk (not cream of coconut)
1/2 cup whipping cream
1 container Whipped fluffy white frosting
Banana slices and/or toasted coconut, if desired

Directions:

Heat oven to 350 degrees (325 gor dark or nonstick pan). Grease bottom only of 13x9 inch pan with shortening or cooking spray.

In large bowl, beat cake mix, water, oil, eggs, and mashed bananas with electric mixer on low speed 30 seconds; beat on medium speed 2 minutes, scraping bowl occasionally. Pour into pan.

Bake 30-35 minutes or until toothpick inserted in center comes out clean. Cool completely, about 1 hour.

Poke top of cake every 1/2 inch with long-tined fork, wiping fork occasionally to reduce sticking. In large bowl, stir together condensed milk, coconut milk, and whipping cream.

Carefully pour evenly over top of cake. Cover; refrigerate at least 2 hours or overnight until mixture is absorbed into cake.

Spread frosting over cake. Garnish each serving with banana slices and/or toasted coconut, if desired. Store covered in refrigerator.

Makes 16 servings.

Nutrition information: 430 calories, 20 g fat, 55 mg cholesterol, 290 mg sodium, 56 g carbohydrate, 5 g protein.

Tuesday, June 28, 2011

Slow Cooker--Mexican Style


I remember going to a Mexican restaurant once a long time before I had much experience in the kitchen and as I took a bite of my enchilada, I thought "How in the world do they get their meat to be so tender and juicy? I will never be able to make something like this at home."

Well, that was in the days before I got my own slow cooker. Now, I'm not sure how Mexican restaurants attain such tender meat (they probably have some authentic slow roasting techniques), but I can tell you that you can do it at home with a slow cooker.

First, I am sharing a recipe for slow cooker fajitas. After that, I will share with you the most basic Mexican shredded chicken in the world. You can use that to make taco salads, tostadas, enchiladas, quesadillas, tacos, burritos, etc. You name it, this chicken can do it. Besides, isn't that one of the fun things about Tex-Mex? Almost every dish has the same basic ingredients...they're just packaged differently. So, the cool thing about this dinner is that you can make it one night and reinvent it into something completely different another night during the week. It makes great leftovers, so make you can make a big batch. You could even freeze some of the chicken for a rainy day...

Oh, and if you don't know how to make your own taco shell bowls or tostadas, I'll tell you how to do that too!


Slow Cooker Fajitas

Ingredients:

1 1/2 pounds flank steak, cut into 6 pieces (see notes)
1 cup frozen chopped onion (see notes)
1 green bell pepper, sliced
1 jalapeno pepper, seeded and sliced
1 tablespoon bottled minced garlic
2 teaspoons salt-free Mexican seasoning (see notes)
1 (10 ounce) can diced tomatoes and green chiles, drained
6 (8-inch) flour tortillas
6 tablespoons low-fat sour cream
Salsa (optional)

Directions:

Place flank steak in bottom of a 5-quart electric slow cooker; top with chopped onion and next 5 ingredients.

Cover with lid; cook on high-heat setting for 1 hour. Reduce heat setting to low; cook 6-7 hours or until meat is tender. Or cook on high-heat setting 4-5 hours. Remove meat, and shred with a fork. Return meat to slow cooker, and stir.

Serve shredded meat mixture with flour tortillas, low-fat sour cream, and, if desired, salsa. Yield: 6 servings (serving size: 1 tortilla, 2/3 cup meat mixture, and 1 tablespoon sour cream.)

Nutrition information: 379 calories, 13.9 g fat, 29.7 g protein, 32.6 g carbs, 1.2 g fiber, 66 mg cholesterol, 3.7 mg iron, 534 mg sodium, 145 mg calcium.

Source: Cooking Light Superfast Suppers: Speedy Solutions for Dinner Dilemmas cookbook.

Notes: The first time I made this, I made it with flank steak. I doubled it because I was making it for people who would have fought over the meager 1 1/2 pounds of flank steak. Even with two flank steaks, they gobbled up the meat quickly (too quickly!). The second time I made this, I used a beef roast. It worked just as well (and it will save you some money since roasts are often less expensive than flank steak).

Also, the first time I made this, I used up the very last of my Mexican seasoning. So, when I went to the store in search of more Mexican seasoning, I couldn't find any. I'm not sure if my grocery store stopped carrying it or if it is no longer sold, period. I ended up using Mrs. Dash salt-free Fiesta Lime. I also supplemented that with a dash of cumin, and a dash of ground red pepper. It worked just fine.

Finally, I don't feel like it takes that much longer to slice or dice an onion so I rarely buy frozen diced onions. I also sliced my onions to be more in line with authentic fajitas which have sliced onions and bell peppers.


Slow Cooker Mexican Chicken

Ingredients:

2.5 lbs. boneless, skinless chicken breasts
1 packet taco seasoning
1/2 cup water
Tortillas
Favorite toppings (sour cream, shredded cheese, guacamole, salsa, pico de gallo, pickled jalapenos, black olives, diced tomatoes, chopped lettuce, ranch/cilantro ranch/jalapeno ranch salad dressing, black beans, pinto beans, refried beans, rice, etc.)

Directions:

Place chicken and water in a slow cooker. Sprinkle taco seasoning over chicken. Cook on low for 6-8 hours. Shred chicken with a fork.

Use chicken as a base for your favorite Mexican or Tex-Mex dinner favorites such as tacos, taco salads, tostadas, quesadillas, enchiladas, burritos, etc.

Source: My mom has been using this basic recipe for years. I'm not sure where she got the idea from.

Notes: You really can do basically anything with this chicken. This is a dinner that is easy to recycle throughout the week without actually having the same thing over and over again. Start with chicken taco salads, then have quesadillas another day, and finish the chicken off with some fancy chicken nachos.

 
8/2/2014 Update: I found a slightly different version of this slow cooker Mexican chicken and wanted to share it here. It was so good!

Slow Cooker Cilantro Lime Chicken

Ingreidents:

1 (16 ounce) jar salsa (or 2 cups)
1 (1.25 ounce) package dry taco seasoning mix
1 lime, juiced
3 tablespoons chopped fresh cilantro
3 pounds skinless, boneless chicken breast halves

Directions:

Place the salsa, taco seasoning, lime juice, and cilantro into a slow cooker, and stir to combine. Add the chicken breasts, and stir to coat with the salsa mixture. Cover the cooker, set to High, and cook until the chicken is very tender, about 4 hours. If desired, set cooker to Low and cook 6 to 8 hours. Shred chicken with 2 forks and serve with additional chopped cilantro.

Source: Allrecipes.com, submitted by ltlmsmfft. You can find it here.

Notes: Just a few more additions than the very basic Mexican chicken recipe above, but it packed in a lot of flavor.
Tortilla Tips

(Note: notice that most of these can bake anywhere from 5-20 minutes. This is because the oven gets hotter as you go and the first batch usually takes longer than the subsequent batches. Just keep an eye on your baking tortillas so they don't burn and you'll be fine!)

Tostadas: Use corn tortillas. Spray each side with cooking spray. Place on a foil-lined jelly roll pan or cookie sheet (it is alright if they overlap slightly). Bake in a 400 degree oven until crispy. About 5-20 minutes. Watch carefully to avoid burning. Place desired toppings onto your tortilla and enjoy!

Taco Bowl Shells: White or wheat tortillas work best for this. Create a loose ball of foil for each taco shell you plan to make. Place balls of foil on a jelly roll pan or cookie sheet. Spray each tortilla with cooking spray. Drape one tortilla over each ball of foil (so that it will be in the form of a bowl when you turn the tortilla right side up again). Bake in a 400 degree oven until lightly browned and crispy. About 5-20 minutes. Again, watch carefully to avoid burning. Fill with favorite taco salad ingredients.

 
Quesadillas: These are the easiest thing to make in the whole world. You can make it in a microwave, on the stove-top in a pan, or in a sandwich press. If you are microwaving them, place one tortilla on a plate and place your fillings on top of it (cheese, chicken, beans, rice, etc.). Place the second tortilla on top of the fillings and the first tortilla. Microwave at 30 second intervals until the cheese is melted and the other fillings are heated through. If you are making them on the stove-top, spray a pan with cooking spray (or you can use butter if you can afford the extra calories). Over medium to medium-high heat, place the first tortilla in the pan and top it with cheese and any other desired fillings. Place the second tortilla on top of that. Spray the second tortilla with cooking spray. Once the bottom tortilla is nicely browned, flip the quesadilla over to cook the other side. Remove from heat once the second tortilla is nicely browned, the cheese is melted and the fillings are heated through. If you have a sandwich press or sandwich maker, use one tortilla. Place fillings on one half of the tortilla and fold the other half over. Place in sandwich maker and cook according to manufacturer's instructions.

Tortilla Chips: This works best with corn tortillas (smaller size). Use a pizza cutter or kitchen shears and cut the tortillas into wedges (whatever size of wedges you prefer...it's your chip! Make it the way you like it!). Spray the tortillas with cooking spray. Place in a single layer on a foil-lined jelly roll pan or cookie sheet. Bake in a 400 degree oven for 5-20 minutes or until lightly browned and crispy. This is a great way to save calories on your tortilla chips (most store-bought tortilla chips are fried and therefore have more fat). You can then use these chips to make some lovely chicken nachos by topping the chips with chicken, cheese, etc. and microwaving until cheese is melted.

Burritos: Place desired fillings in the middle of a tortilla (flour tortillas roll best). Fold bottom ends in and then fold sides in to enclose the fillings.

Enchiladas: Use chicken as a filling to follow your favorite enchilada recipe. Or, you can mix the chicken with a little salsa and sour cream to make a very basic enchilada filling. Roll up and place in baking dish. Repeat with additional tortillas until the baking dish is full. Top enchiladas with sour cream and cheese or your favorite enchilada sauce. Bake in a 400 degree oven for 30-45 minutes (or until fillings are heated and cheese is melted and bubbly).

Bonus Dessert:

Cinnamon Sugar Tortilla Chips

Ingredients:

Flour tortillas
Olive oil, vegetable oil, or cooking spray
Cinnamon/sugar combination

Directions:

Use kitchen shears or a pizza cutter to cut flour tortillas into wedges (the number of tortillas is up to you). Place in a zip-top bag. Drizzle with a small amount of oil (enough to lightly coat tortillas) or spray tortillas with cooking spray. Work the contents of the bag by lightly kneading it to coat all of the tortillas with oil/cooking spray. Sprinkle with cinnamon sugar and knead the bag again so that each tortilla gets coated with cinnamon sugar.

Spread tortillas onto a foil-lined jelly roll pan or cookie sheet. Sprinkle with more cinnamon sugar, if desired and bake in a 400 degree oven for 5-20 minutes or until crispy.

Source: This is something I came up with to mimic the cinnamon sugar tortilla chips you can find at fast food Mexican restaurants.

Notes: You can serve this with a sweet (not savory) fruit salsa for an even more substantial dessert, if you wish. You can find a similar recipe on Allrecipes.com submitted by CRISSYF here. Her tortilla chips are not a low-fat version (they are fried in oil). She includes a fruit salsa recipe that would complete the dessert nicely.

I have included some suggestions/combinations below that you can use to create your own fruit salsa. Just mix and match your favorite fruits and flavorings and create your own fruit salsa masterpiece!

Fruit Salsa

Diced Fruit Suggestions:

Strawberries
Mango
Pineapple
Kiwi fruit
Bananas
Oranges
Star fruit
Papaya
Raspberries
Blackberries
Blueberries
Peaches/Nectarines/Apricots
Pears
Plums

Seasoning/Flavor Suggestions (use one or more favorite ingredients below to flavor your salsa):

Lime juice
Sugar
Cinnamon
Honey
Fruit juice
Jelly or jam (for instance, apple jelly would be a good way to bind the flavors together)
Vanilla extract (or other favorite extract such as almond or coconut)

Directions:

Mix desired ingredients together and refrigerate until ready to serve. Serve with cinnamon sugar tortilla chips.

Sunday, June 26, 2011

Imitation Is the Sincerest Form of Flattery


One of the things I like to do is try to recreate restaurant favorites at home. Once you know a lot of the basics of cooking, you can make pretty good guesses as to the methods of food preparation that a certain dish followed. Plus, you can get a lot of handy information from the restaurant's menu! I mean, they have to describe the food to you and what ingredients are in it to tantalize you as well as warn you in case certain ingredients aren't to your liking. The menu also gives you clues as to the method of food preparation as well.

One really fun place that I like to eat at is Wingers. Their wings are to die for (and no, I don't have a recipe for those). I have no idea how to recreate their wings, so Wingers can rest assured that I will continue to visit their establishment. I'm pretty sure they have some tricky preparation techniques up their sleeve (probably a combination of baking and frying the chicken wings--which I don't even want to try to attempt).

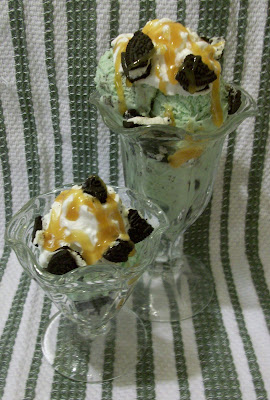
However, there are a few of my favorite menu items that are pretty easy to recreate at home. The first is for their Loaded Chicken. The menu says is all: grilled chicken, jack and cheddar cheese, sauteed mushrooms and onions, bacon, and Teriyaki sauce. Delicious. Serve it with a side of mashed potatoes, steamed veggies, and coleslaw and you're set. Then, of course, there is their crave-able Asphalt Pie. However, I never take the time to make it in pie form. Mine is more of an Asphalt Sundae. I would never have thought to put together the flavors of mint, chocolate, and caramel...but it works. It really works.

Pretty yummy stuff. So, if you can't get out to dinner, stay in and enjoy some restaurant favorites. But if you want to enjoy their wings at home, you'd better get take-out!


Loaded Chicken

Ingredients:

6 boneless, skinless chicken breasts
Teriyaki marinade (the sweeter, the better)
2 containers sliced mushrooms
1 sweet onion (such as Vidalia or Texas Sweet), quartered and sliced
Bacon (at least one slice per chicken breast, or two slices per chicken breast if you're not feeling health conscious)
Shredded Cheddar and Monterey Jack cheese blend (about 1-2 tbsp per chicken breast--depending on how cheesy you want it)

Directions:

Marinate chicken breasts in Teriyaki marinade (at least one hour or up to 12 hours).

Cook bacon. Make it a little less crispy than you usually prefer it because it will cook a little longer under the broiler with the chicken while the cheese melts. (Make the bacon however you like to cook it: the microwave, in a pan on the stove top or in the oven. I prefer to cook the bacon in the oven. I place it on a foil lined jelly roll pan and bake it at 425 degrees for 15-20 minutes...or until desired doneness. In this case, until it is a little less than my desired doneness.)

Place marinated chicken breasts on a foil lined jelly roll pan and broil on high for 6-10 minutes per side (amount of time will depend on how thick the chicken breasts are. Check after 6 minutes and adjust time accordingly).

While chicken is cooking, heat 1 tbsp olive oil in a pan and saute mushrooms and onions.

When chicken is no longer pink in the middle and the juices run clear, remove the pan from the oven. Pile an equal amount of mushrooms and onions on each chicken breast. Place 1-2 bacon slices on each piece of chicken. Finally, sprinkle cheese over the chicken, mushrooms, onions, and bacon. Put the chicken back in the oven and broil for another 1-2 minutes--just until the cheese is nicely melted.

Serve with your favorite sides.

Source: Inspired by Wingers restaurant. But this is my personal version.

Notes: The Wingers menu says that they grill their chicken breasts. You can do that instead, if you prefer. But I think broiling, for me at least, is a lot more hassle free, so I prefer to do it that way.


Asphalt Sundae

Ingredients:

Mint Chocolate Chip or Mint Chocolate Cookie ice cream
Canned/Spray Whipped Cream
Oreo cookies, crushed (1-2 cookies per sundae)
Caramel ice cream topping

Directions:

Sprinkle some crushed Oreo cookies in your serving cup or bowl. Add 1-2 scoops of mint chocolate chip ice cream. Sprinkle with more Oreo cookies. Add whipped cream and caramel ice cream topping.

Serve.

Source: Inspired by Wingers restaurant.

Notes: If you prefer to have this in pie form, you can use a pre-made Oreo pie crust, place the mint chocolate chip ice cream (piled high) in the crust, add crushed Oreo cookies on top. Slice into wedges and add whipped cream and caramel just prior to serving.

Monday, June 20, 2011

Cooking When You Have Young Kids, Part 4: Shortcut Sandwiches


I just shared a few pizza shortcut recipes the other day. So, now I thought I would share some sandwich shortcuts. Sometimes you want a filling meal that takes the same amount of time as throwing in a store-bought frozen dinner into the oven...but you want it to taste better than a frozen dinner.

That's where shortcuts come in to play. These sandwiches take so little preparation, it's ridiculous. If you want to go all out on preparation, go to town on the side dishes, but take it easy on the main dish with these recipes.

The first sandwich is a French dip/Arby's style sandwich. Now, I know that some TV shows (particularly Family Guy and Simpson's) make fun of Arby's. But I love Arby's. I don't know why they get a bad rap sometimes. I like their roast beef!

The second sandwich is a more casual take on Chicken Cordon Bleu.

Take it easy and have a sandwich!


Shortcut French Dip Sandwiches (Arby's Style Sandwiches)

Ingredients:

14-16 oz thinly sliced roast beef
1 can French onion soup (condensed, from a 10.5 oz can)
1 can beef consomme (10.5 oz can)
1 cup water
6 hoagie rolls or hamburger buns

Directions:

Place beef in a slow cooker (separate each slice of beef, don't just place the beef in the slow cooker if it is still stacked together). Pour French onion soup, beef consomme, and water over top.

Cook on high for 1 hour.

Toast hoagie rolls or hamburger buns. Place drained deli roast beef slices on top of rolls or buns. Dip in slow cooker dripping/au jus, if desired.

Source: This recipe was inspired by a recipe I found on Allrecipes.com (though I didn't follow their recipe exactly). You can find that recipe here.

Notes: Basically, the changes I made were to add a can of French onion soup and omit the Provolone cheese. I felt like I didn't need the extra calories from the cheese.

Also, if you would like, you can do a big batch of this and use a slow cooker instead of heating it on the stove top. Though if you use the stove top, it is ready in only a few minutes.

You don't need to use fancy deli roast beef for this recipe. I've made it twice now. The first time, I used freshly shaved roast beef from the deli counter. The second time, I used 2 containers of Kroger - Deli Thin Sliced Roast Beef 96% Fat Free. I actually preferred the pre-packaged roast beef for this recipe. It will save you a lot of money too.


Above: Here are the sandwiches served on a hamburger bun to more closely resemble an Arby's style sandwich as opposed to a traditional French dip sandwich.


Shortcut Chicken Cordon Bleu Sandwiches

Ingredients:

6 frozen breaded chicken patties
6 slices of ham
6 slices of Swiss cheese
Honey mustard dressing
6 rolls/buns
Sliced tomatoes
Green leaf lettuce
Additional toppings, if desired (see notes below)

Directions:

Cook chicken patties according to package directions. During last 5 minutes of cooking time, add a slice of ham and a slice of Swiss cheese to each patty. Cook until the chicken patties are done, the ham is warmed through, and the cheese is nicely melted. Serve on top of roll/bun.

Source: This recipe was inspired by Betty Crocker. You can find their original recipe here.

Notes: The first time I made this, I slightly changed their recipe. They spread their rolls with honey mustard and placed lettuce on the sandwich as well. I didn't do it that way originally because I don't associate honey mustard with chicken cordon bleu. It was a delicious, easy, satisfying sandwich the way I made it, but I tried it following the recipe and it was really yummy their way too. Make it to suit your own tastes.


Above: This is the honey mustard dressing I used and it worked beautifully. Tasty stuff!


Above: This is the kid friendly version. Stripped down and simplified. Just croissants, chicken, ham, and cheese.


Above: This was fantastic with the added toppings. The croissants were quite large compared to the chicken patties this time around, so I used two patties on my husband's sandwich. Just build this sandwich to suit your own tastes!


Saturday, June 18, 2011

Cooking When You Have Young Kids, Part 3: Pizza Shortcuts


Now there's nothing better than going all out and making homemade pizza dough and pizza sauce and making pizza from scratch. But it also takes all day! For me, that kind of a meal is only a special occasion type of thing these days.

But kids love pizza and I love meal shortcuts with my little ones. So, I thought I would share some easy pizza recipes with you today.


French Bread Pizza

Ingredients:

French bread (the number of loaves depends on how many people you need to feed)
Pizza sauce
Mozzarella cheese
Favorite pizza toppings (pepperoni, olives, mushrooms, pineapple, Canadian bacon, etc.)

Directions:

Slice French bread in half lengthwise. Place bread on a foil-lined jelly roll pan or cookie sheet. Spoon and spread pizza sauce evenly over bread halves. Sprinkle desired amount of mozzarella cheese over bread and pizza sauce. Add favorite toppings.

Place French bread pizza in the oven and broil on high for 2-3 minutes (just until the bread is warm and toasty and the cheese is melted). Be very watchful because the broiler can burn things quickly.

Source: I just put this recipe together out of experience. Basically, it's a case of trying a food and then recreating it myself.


Easy Homemade Pizza

Ingredients:

15-20 frozen Rhodes Dough rolls
1 jar of pizza sauce
Mozzarella cheese
Favorite pizza toppings

Directions:

Place Rhodes Dough rolls in a zip top bag and allow them thaw and rise. You want them to rise long enough so that the rolls fuse together into one large mass of dough. Depending on how warm your house is, this can take anywhere from 5-12 hours. Sometimes, I let the dough rise overnight.

Once the dough has risen and you are ready to start making your pizza, cover a pizza pan or jelly roll pan with aluminum foil. Lightly flour the pan. Remove the dough from the zip top bag and stretch it to your desired pizza shape (round for a pizza pan--15 rolls, rectangular for a jelly roll pan--18 rolls). Flour your hands, if necessary, to keep the dough from sticking.

Spoon and spread desired amount of pizza sauce onto the dough. You don't want to do too much, otherwise the pizza will be super messy when you're eating it. I would recommend about 1 cup of pizza sauce spread over your dough.

Top pizza sauce and dough with desired amount of mozzarella cheese and the toppings of your choice.

Place pizza in a 425 degree oven for 25-30 minutes or until dough is browned and cheese is melted.

Source: This recipe is basically a combination of a number of Rhodes Dough pizza recipes that can be found on their website. Rhodes Dough's website always uses a pizza pan for their pizza recipes, but you can also use a jelly roll pan. It works great either way!


Above: My boys love pizza with pepperoni and olives...or just olives!


Above: This is a BBQ pork pizza. I used BBQ sauce in place of the pizza sauce, topped it with shredded mozzarella, and then put some leftover pulled pork (that had been warmed) on top. Yum!

Below: Here is a Hawaiian pizza (Canadian bacon and pineapple tidbits) made in a jelly roll pan.


Tuesday, June 14, 2011

Slow Cooker--Asian Style


Well, it's the same old story. As a mother of young children with a husband who is frequently gone for church callings and night school (etc.), I am always in search of quick and easy meals.

My mother and sister and I were talking about how handy slow cookers are--but that they have a drawback. Many slow cooker meals taste the same! How many times have you seen a slow cooker recipe that calls for chicken and some type of creamy soup? It seems to be the basis for many slow cooker meals. Don't get me wrong, chicken and creamy soup in a slow cooker is a winning combination. There's a reason that there are so many recipes that utilize this combination--it tastes great! It is yummy comfort food. But you can't have that same type of meal all the time...it gets old fast.

That's why I'm always on the lookout for unique slow cooker dinners. Slow cookers are fantastic for making soup (but, for me at least, it isn't soup season and I won't be in the mood for soup again until at least September). Slow cookers are also great for making tender shredded meat (for pulled sandwiches or Mexican dinners such as taco salads). Many slow cooker meals are paired with some type of carbohydrate (such as rice or pasta). As a result, slow cookers work quite well with Asian cuisine.

So, today, I'm sharing three Asian inspired recipes that are lovely when served over rice. I hope they come in handy for you!


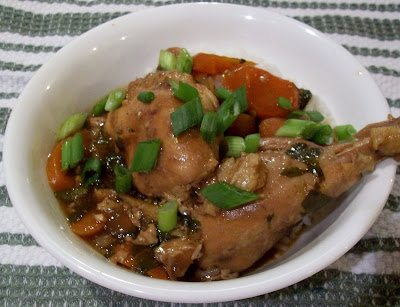
Soy Ginger Chicken

Serves 4

Ingredients:

1/3 cup soy sauce
2 tablespoons dark-brown sugar
5 garlic cloves, thinly sliced
2/3 cup fresh cilantro, chopped, plus sprigs for garnish
1 piece fresh ginger (about 2 inches long), peeled and cut into thin strips
5 scallions, thinly sliced on the diagonal (1 cup packed)
1 tablespoon balsamic vinegar
1 teaspoon ground coriander
1/2 teaspoon ground pepper
4 chicken drumsticks and thighs (about 2 1/2 pounds total), skin removed
2 medium carrots, thinly sliced crosswise
1 tablespoon cornstarch
Cooked white rice, for serving

Directions:

In a 5-6 quart slow cooker, stir together soy sauce, sugar, garlic, cilantro, ginger, 1/2 cup scallions, vinegar, coriander, and pepper. Add chicken and carrots, toss to coat.

Cover, and cook on low until chicken is tender, about 6 hours. Using a large spoon, skim off and discard any fat from surface of cooking liquid.

In a 2 cup glass measuring cup, whisk cornstarch with 1 tablespoon water. Ladle 1 cup cooking liquid into measuring cup; whisk to combine. Pour into a small saucepan, and bring to a boil; cook until thickened, about 1 minute. With slow cooker turned off, stir in cornstarch mixture. Serve chicken with white rice, and garnish with cilantro sprigs and remaining 1/2 cup scallions.

Source: Martha Stewart.

Notes: I used more carrots (because I wanted to increase the veggies and make the meal go a little farther). Also, while the drumsticks were pretty and added variety to the appearance of the meal, I don't really love drumsticks and I will probably skip them and increase the chicken thighs. Finally, rather than thickening the cornstarch mixture in a separate saucepan, I simply added it to the slow cooker about an hour prior to serving.

Above: Thai-Style Pork Stew as it was meant to be served. Honestly, it tastes good without the toppings...but with the toppings, it looks and tastes fantastic. The peanuts, splash of lime, and green onions add so much (both aesthetically and flavor-wise). You want your food to look as good as it tastes. In the first picture, Thai-Style Pork Stew looks pretty boring...but in the next picture, it looks really yummy. The crunch added by the peanuts was to-die-for.


Thai-Style Pork Stew

Peanut butter melds with classic Asian flavors to lend this one-dish meal a Thai flair. Lime makes a perfect accent.

8 servings (1/3 cup stew, 3/4 cup white rice, 1 tablespoon green onions, 1/2 tsp peanuts, and 1 lime wedge)

Ingredients:

Stew:

2 pounds boned pork loin, cut into 4 pieces
2 cups julienne-cut red bell pepper
1/4 cup teriyaki sauce
2 tablespoons rice or white wine vinegar
1 teaspoon crushed red pepper
2 garlic cloves, minced
1/4 cup creamy peanut butter

Remaining ingredients:

6 cups hot cooked basmati rice
1/2 cup chopped green onions
2 tablespoons chopped dry-roasted peanuts
8 lime wedges

Directions:

To prepare stew, trim fat from pork. Place pork and next 5 ingredients (pork through garlic) in an electric slow cooker. Cover with lid, and cook on low-heat setting for 8 hours. remove pork from slow cooker, and coarsely chop. Add peanut butter to liquid in slow cooker; stir well. Stir in pork.

Combine stew and rice in a large bowl. Top each serving with onions and peanuts. Serve with lime wedges.

Nutrition information: 412 calories, 13.6 g fat, 28.9 g protein, 42.3 g carbohydrate, 2.1 g fiber, 64 mg cholesterol, 2.9 mg iron, 425 mg sodium, 37 mg calcium.

Source: Cooking Light, September 1999


Notes: I also have a cookbook that has this recipe in it. It lists the serving size differently, but the nutrition information is the same. Here's how they listed the serving size: 1/3 cup stew, 3/4 cup rice, about 1/2 teaspoon peanuts, and 1 lime wedge. Also, if you don't have teriyaki sauce on hand, you can use soy sauce and sweeten it with a little sugar, to your taste.

Slow Cooker Char Siu Pork Roast

In this recipe for Char Siu, the Chinese version of barbecue, the pork is cooked in a slow cooker for an extra tender, juice, and stress-free meal. Serve with sticky or long-grain rice and a steamed or stir-fried medly of bell peppers, carrots, snow peas, sliced baby corn, and water chestnuts.

8 servings (3 ounces pork and 1/4 cup sauce)

Ingredients:

1/4 cup low-sodium soy sauce
1/4 cup hoisin sauce
3 tablespoons ketchup
3 tablespoons honey
2 teaspoons bottled minced garlic
2 teaspoons grated peeled fresh ginger
1 teaspoon dark sesame oil
1/2 teaspoon five-spice powder
2 pounds boneless Boston butt pork roast, trimmed
1/2 cup fat-free, less-sodium chicken broth

Directions:

Combine first 8 ingredients in a small bowl, stirring well with a whisk. Place in a large zip-top plastic bag. Add pork to bag; seal. marinate in refrigerator at least 2 hours, turning occasionally.

Place pork and marinade in an electric slow cooker. Cover and cook on low for 8 hours.

Remove pork from slow cooker using a slotted spoon; place on a cutting board or work surface. Cover with aluminum foil; keep warm.

Add broth to sauce in slow cooker. Cover and cook on low for 30 minutes or until sauce thickens. Shred pork with two forks; serve with sauce.

Nutrition information: 227 calories, 9.5 g fat, 21.6 g protein, 12.7 g carbohydrate, 0.4 g fiber, 73 mg cholesterol, 1.7 mg iron, 561 mg sodium, 30 mg calcium.

Source: Cooking Light, March 2006

Notes: I didn't remove the pork. I simply shredded it in the slow cooker and added the broth at that time. Also, don't use more five-spice powder than the recipe calls for. It is potent stuff!

Monday, June 13, 2011

Back to Basics

Sometimes you just don't want to eat something that is really fancy. There's a conversation in
"My Best Friend's Wedding" when the despicable Julia Roberts character says to the sweet Cameron Diaz character that sometimes you don't want Creme Brulee; sometimes you just want Jello. Well, neither of these recipes are Jello. But you won't mistake either of them for Creme Brulee either!

Spicy Chicken Tenders

Ingredients:

1 c. original Bisquick Mix
1 teaspoon onion powder
1/2 teaspoon red pepper (more if you want them really spicy, omit if desired)
1 teaspoon chili powder
2 teaspoons paprika
1 teaspoon celery salt
2 teaspoons sugar
1 egg
1/4 c. milk
14 - 16 oz. chicken tenders
2 to 3 tablespoons butter, melted
Ranch dressing for dipping, if desired
Barbecue sauce for dipping, if desired

Directions:

Heat oven to 450 degrees F. Line cookie sheet with parchment paper.

In a pie plate, combine the Bisquick, onion powder, red pepper, chili powder, paprika, and celery salt. Stir together until well blended.

In medium bowl, mix egg and milk with whisk until well blended. Spoon 1 to 2 tablespoons egg mixture into the Bisquick mixture; stir until little clumps form.

Dip the chicken breast tenders into the egg mixture into the Bisquick mixture, then back into the egg mixture and finally back into the Bisquick mixture Place on cookie sheet. Repeat with remaining chicken. Drizzle butter over chicken.

Bake 12 to 14 minutes, turning halfway through baking time, until no longer pink in the center. Serve tenders with ranch dressing if desired.

This recipe was from Bettycrocker.com

It reheated really well.

Well, what could go better with chicken tenders than Banana Cream Pie. So here's an easy version with no rolling out pesky pastry!


Banana Cream Pie-in-a-Bowl

Ingredients:

1 cup all-purpose flour
1/4 c. packed brown sugar
1/2 c. firm butter or margarine
1/2 c. peanuts
1 box (4 serving size) banana instant pudding and pie filling mix
2 c. cold milk
3 bananas, sliced
1 8 oz. container frozen whipped topping

Directions:

Heat oven to 400 degrees F. In medium bowl, mix flour and brown sugar. Cut in butter, using pastry blender, until mixture is crumbly. Stir in peanuts. Press evenly on bottom of ungreased 9-inch square pan. Bake about 15 minutes or until light brown. Stir to break up. Cook completely, about 1 hour.

In large bowl, make pudding mix as directed on box, using 2 cups milk. In a 2 qt serving bowl, layer half of the crumb mixture, pudding, bananas and whipped topping; repeat layers. Cover and refrigerate at least 4 hours. Top with additional peanuts if desired. Store in refrigerator.

Notes: This may be made with almonds instead of bananas, but I think you would lose some of the uniqueness of the recipe. The peanuts gave it kind of a sweet/salty thing. This may be made in parfait glasses for a fancier touch.

This recipe was also from Bettycrocker.com Gotta love them!

Monday, June 6, 2011

Luau!


Aloha! Last summer, we decided to have a little family luau. It was a great success and a lot of fun.


The problem was that the pictures I took of the food made the food look grotesque...to the point of appearing inedible and unappetizing. I figured that I could either post the recipes without the pictures or try to fix the pictures so that they were presentable. The pictures turned out to be beyond repair. They were that bad. Time passed and before I knew it, it was nearly a year after we had originally had our luau. (The cropped pictures of fruit represent the only presentable pictures I took last year. I just couldn't get the pork to look as good as it tasted!)

My mom chose a few recipes that I didn't find for her and thus, I don't remember what they are. But she made a very nice pulled chicken teriyaki (made in the slow cooker) and a refreshing, fruity punch. I'll have to see if I can get those recipes from her and add them to this post.

The recipes that I found and contributed are for Hawaiian macaroni salad and slow cooker Kalua pig (pulled pork).

The Hawaiian macaroni salad tasted just like the macaroni salad you can find at Hawaiian restaurants (such as Moki's and Mo' Bettah Steaks). I must stress the importance of following the macaroni salad recipe exactly. You might think that you can combine or skip steps, but trust me, it's much better if you follow it exactly as written. When I made it again, I didn't have time (and didn't want to use the dishes) to follow the step where you let the apple cider vinegar soak into the warm macaroni before adding the other elements of the dressing. I didn't think it would make a difference, but it did. It was much better the last time I made it! But it was still a super yummy macaroni salad and it is pretty kid friendly. I would also suggest that you refrigerate the macaroni salad for at least two hours prior to serving in order to allow the flavors to meld.

The slow cooker pork also tastes just as good as what you can get at a restaurant--salty and smoky. Mmmm. Just note that it takes a lot longer than your usual slow cooker recipe. The recipe recommends slow cooking the pork for 16-20 hours! But trust me, it makes a huge difference in the texture of the pork. It is so tender, it will melt in your mouth.

And I made a discovery in re-making these recipes this year. I discovered that while Hawaiian food is super tasty, it really isn't pretty. My pictures this time around were way better than last year's pictures, but they still aren't great pictures. Hawaiian food is all nearly the same color! Oh well!


Serve some brown rice and tropical fruit along with your macaroni salad and pork and you'll have a very satisfying meal--even if it isn't the most colorful meal you'll ever serve! Trust me, you'll want to add the fruit for two reasons: first, Hawaiian food is really salty and it's nice to have refreshing, juicy fruit to balance the salt and second, because it adds a much needed splash of color to your plate!


Hawaiian Macaroni Salad

Notes and Explanations from the original recipe:

  • Hawaiians cook their macaroni until it's "fat," or very soft. It turns out they know what they're doing. Here's what the Test Kitchen discovered:
  • While overcooking the pasta seemed like a bad idea, it actually enabled the macaroni to absorb more dressing.
  • The dressing had to be thin enough to soak into the pasta. we used an equal amount of mayonnaise and milk, and we used a lot--a full 2 cups each--to get the right texture.
  • to prevent the cider vinegar from curdling the milk, we poured the vinegar directly over the hot macaroni.
  • After the vinegar soaked in, we poured on about half the dressing, gave the mixture a stir, and let it cool. We then stirred in the remaining dressing and added grated carrot, chopped celery (for crunch), scallion, a bit of brown sugar, and some vigorous shakes of salt and black pepper.
  • Don't use low-fat milk or mayonnaise because it will make the dressing too thin.
  • Serves 8-10 (in my opinion, it serves a lot more than that--especially if you have a lot of other side dishes).
Ingredients:

2 cups whole milk
2 cups mayonnaise
1 tablespoon brown sugar
Salt and pepper, to taste (you're going to want a lot--especially pepper--since it is the only seasoning for this salad)
1 pound elbow macaroni
1/2 cup cider vinegar
4 scallions (green onions), sliced thin
1 large carrot, peeled and grated
1 celery rib, chopped fine

Directions:

Make dressing: Whisk 1 1/2 cups milk, 1 cup mayonnaise, sugar, 1/2 teaspoon salt, and 2 teaspoons pepper in bowl.

Cook pasta: Bring 4 quarts water to a boil in a large pot. Add 1 tablespoon salt and pasta and cook until very soft, about 15 minutes. Drain pasta and return to pot. Add vinegar and toss until absorbed. Transfer to bowl. Cool pasta 10 minutes, then stir in dressing until pasta is well coated. Cool completely.

Make salad: Add scallions, carrot, celery, remaining milk, and remaining mayonnaise to pot with pasta mixture and stir to combine. Season with salt and pepper. Transfer to serving bowl and refrigerate, covered, for at least 1 hour or up to 2 days. Serve.


Source: This recipe comes from Cook's Country Magazine. I found it on another recipe blog by doing a Google search for it.

Notes: Follow this recipe exactly. Don't change a thing and it will taste exactly like the macaroni salad you can get at Hawaiian restaurants. Be generous with the pepper.

Kalua Pig in a Slow Cooker

Ingredients:

1 (6 lb) pork butt roast
1 1/2 tbsp Hawaiian sea salt
1 tbsp liquid smoke flavoring

Directions:

Pierce pork all over with a carving fork. Rub salt, then liquid smoke all over meat. Place roast in a slow cooker.

Cover and cook on low for 16-20 hours, turning once during cooking time.

Remove meat from slow cooker, and shred, adding drippings as needed to moisten.

Source: Allrecipes.com submitted by KIKUCHAN.

Notes: I couldn't find Hawaiian sea salt, so I just used plain sea salt. Also, I didn't pierce the pork. I simply sprinkled the salt and liquid smoke over the roast. Finally, when I shredded it, I shredded it directly in the slow cooker and decided that I would drain it if it was too juicy. However, the drippings that the roast rendered were the perfect amount to keep the meat moist and the meat absorbed all the juices after it was shredded, so it was perfect just the way it was.