Sunday, March 31, 2013

Should Cake Ever Really Be a Snack?


I don't know what I think of the term "snack cake." My problem with it is that shouldn't a snack be something like a handful of pretzels or a piece of fruit? If I think of cake as a snack, I have a hard time stopping at just one piece. Nevertheless, if you do like snack cake, here is a nice little recipe for you to try.


Carrot Snack Cake

Ingredients:

1/4 cup margarine or butter, softened
1/2 cup sugar
1 egg
1/4 cup skim milk
1/2 teaspoon vanilla
1/2 cup finely shredded carrot
1 cup all-purpose flour
1 1/4 teaspoons baking powder
1/4 teaspoon ground cinnamon
1/8 teaspoon salt
Dash ground nutmeg
Nonstick spray coating
Powdered sugar, optional

Directions:

In a small mixing bowl, beat margarine or butter and sugar until blended. Beat in egg, milk, and vanilla. Stir in carrot.

In another bowl, combine flour, baking powder, cinnamon, salt, and nutmeg. Add to carrot mixture, and stir until blended.

Spray an 8x8x2-inch baking pan with nonstick spray coating. Pour batter evenly into pan.

Bake in a 350 degree oven for 20 to 25 minutes or until a tootpcik inserted near the center of the cake comes out clean. Cool on wire rack. (If desired, remove from pan after coling 10 minutes. Then, cool completely.)

Lightly sift some powdered sugar evenly over the cake, if using. Makes 9 servings.

Nutrition information per serving: 156 calories, 2 g protein, 23g carbohydrate, 6 g fat, 31 mg cholesterol, 145 mg sodium, 55 mg potassium.

Source: This comes from a cookbook called Better Homes and Gardens New Dieter's Cook Book,  ISBN: 0-696-01974-4, published in 1992.

Notes: This was just an easy, simple, slightly sweet little snack cake. A good snack option...if you can stick to just one serving!

Do You Remember What My Favorite Kind of Comfort Food Is?

If you guessed pasta, you are right! Ding, ding, ding! You have won a prize...two new pasta recipes!


Above: Italian Spaghetti and Meatballs 


Above: Pasta with Tomato Sauce and Lemony Beans


Italian Spaghetti and Meatballs

Ingredients:

2 cans (28 ounces each) diced tomatoes, undrained
1 can (12 ounces) tomato paste
1 1/2 cups water, divided
3 tablespoons grated onion
1 tablespoon sugar
1 1/2 teaspoons dried oregano
1 bay leaf
1 1/4 teaspoons salt, divided
1 teaspoon minced garlic, divided
3/4 teaspoon pepper, divided
6 slices day-old bread, torn into pieces
2 eggs, lightly beaten
1/2 cup grated Parmesan cheese
2 tablespoons minced fresh parsley
1 pound ground beef
Hot cooked spaghetti
Additional Parmesan cheese, optional

Directions:

In a Dutch oven, combine the tomatoes, tomato paste, 1 cup water, onion, sugar, oregano, bay leaf, and 1/2 teaspoon each of salt, garlic, and pepper. Bring to a boil. Reduce heat and simmer, uncovered, for 1 1/4 hours.

Meanwhile, soak bread in remaining water. Squeeze out excess moisture. In a large bowl, combine the bread, eggs, Parmesan cheese, parsley, and remaining salt, garlic, and pepper. Crumble beef over mixture and mix well. Shape into thirty-six 1 1/2 inch meatballs.

Place meatballs on a rack in a shallow baking pan. Bake, uncovered, at 400 degrees F. for 20 minutes or until no longer pink; drain. Transfer to spaghetti sauce. Simmer, uncovered, until heated through, stirring occasionally. Discard bay leaf. Serve with spaghetti with additional Parmesan if desired.

Yield: 6 servings.


Nutrition information: 1 2/3 cups (calculated without spaghetti and additional cheese) equals 373 calories, 13 g fat, 123 mg cholesterol, 1,201 mg sodium, 39 g carbohydrate, 7 g fiber, 26 g protein.

Source: Taste of Home recipe, found here.


Notes: At first, I thought, "This is good...but is it good enough to blog? Or should I keep looking for another recipe?" Then I had some leftovers the next day, and the next...let me tell you, this is good stuff! Definitely worth it!


Pasta with Tomato Sauce and Lemony Beans

Ingredients:

Salt and pepper, to taste
1/2 pound medium shell pasta
3 tablespoons olive oil, divided
1 small yellow onion, minced
2 cloves garlic, thinly sliced, divided
1 can (28 ounces) diced tomatoes
1/4 teaspoon red pepper flakes
1 bay leaf
1 can (15.5 ounces) cannellini beans, rinsed and drained
1 teaspoon zest, plus 2 teaspoons juice from 1 lemon
1/4 cup rough chopped fresh parsley
1/4 cup grated Parmesan

Directions:

In a large pot of salted water, cook pasta according to package instructions. Reserve 1 cup pasta water. Drain and return to pasta pot. Meanwhile, in a medium saucepot, heat 1 tablespoon olive oil over medium. Add onion and half the garlic and saute. Add pepper flakes and bay leaf and cook until fragrant, 1 minute. Add tomato and juices, 3/4 cup pasta water, and salt and pepper. Bring to a rapid simmer and cook until tomato pieces begin to break down and liquid thickens, about 15 minutes. Discard bay leaf, and, using a hand blender or a food processor, blend tomato mixture until coarsely pureed. Toss with pasta to coat.

In a small skillet, heat remaining 2 tablespoons oil over medium. Add remaining garlic and cook until soft and fragrant, 1 minute. Add beans and remaining 1/4 cup pasta water and cook until beans are heated through. Stir in lemon zest and juice, and parsley. Season with salt and pepper. Divide pasta among bowls, top with warm bean mixture, and sprinkle with Parmesan.

Source: Martha Stewart Everyday Food blog recipe. Found here.

Notes: Holy cow. This was so good. So easy to make! The lemony bean mixture adds such an amazing pop of flavor and it complements the pasta with tomato sauce quite well. Delicious! More please!


Above: Yum! Don't mind if I do!

Kind of a 1950's Vibe


According to Wikipedia, cabbage rolls have been around for a long time. You can read about that here.

However, when I think of cabbage rolls, there is just something about it that has a 1950's kind of feel. When my husband asked me what was for dinner and I told him I made cabbage rolls, he actually teased me quite a bit. He said, "Really? So, I can tell the guys at work that I had cabbage rolls for dinner last night?"

Well, the joke was on him, because they were awesome. They were really flavorful. Maybe if you're in a 1950's housewife kind of mood, you can make some too!

(Heads up though, they do take awhile to cook, so you won't be able to make these on a busy weeknight)


Classic Cabbage Rolls

Ingredients:

1 medium head cabbage (see notes)
1 1/2 cups chopped onion, divided
1 tablespoon butter
2 cans (14.5 oz each) Italian stewed tomatoes (see notes)
4 garlic cloves, minced
2 tablespoons brown sugar
1 1/2 tsps salt, divided
1 cup cooked rice
1/4 cup ketchup
2 tablespoons Worcestershire sauce
1/4 teaspoon pepper
1 pound lean ground beef (90% lean)
1/4 pound bulk Italian sausage
1/2 cup V8 juice, optional

Directions:

In a Dutch oven, cook cabbage in boiling water for 10 minutes, or until outer leaves are tender; drain. Rinse in cold water; drain. Remove eight large outer leaves (refrigerate remaining cabbage for another use), set aside.

In a large saucepan, saute 1 cup onion in butter until tender. Add the tomatoes, garlic, brown sugar, and 1/2 teaspoon salt. Simmer for 15 minutes, stirring occasionally.

Meanwhile, in a large bowl, combine the rice, ketchup, Worcestershire sauce, pepper, and remaining onion, and salt. Crumble beef and sausage over mixture and mix well.

Remove thick vein from cabbage leaves for easier rolling, if necessary. Place about 1/2 cup meat mixture on each leaf; fold in sides. Starting at an unfolded edge, roll up leaf to completely enclose filling. Place seam side down in a skillet. Top with the sauce.

Cover and cook over medium-low heat for 1 hour. Add V8 juice, if desired. Reduce heat to low; cook 20 minutes longer or until rolls are heated through and a thermometer inserted in the filling reads 160 degrees F.

Yield: 4 servings (2 rolls per serving).

Nutrition information: 1 serving (2 rolls) equal 499 calories, 21 g fat, 85 mg cholesterol, 1,845 mg sodium, 49 g carbohydrate, 8 g fiber, 32 g protein.

Source: Taste of Home recipe, found here. Rated 5 stars!

Notes: I originally wanted to make this recipe because I thought it was done in the slow cooker. Having made it, I think it could definitely be done in the slow cooker as well. I'll have to try it one of these days and let you know for sure!

I didn't cook the whole head of cabbage. If I was going to have a ton of leftover cabbage, I wanted it to be fresh rather than already cooked. So, I removed 10 cabbage leaves (just to be on the safe side) and boiled those until they were tender.

I would also suggest using 1 or even 2 extra cans of Italian stewed tomatoes. I felt like there wasn't quite enough sauce for my taste...plus, the sauce is used to braise or cook the beef, so you want plenty to cover the cabbage rolls.

These were really flavorful, and very delicious. Kind of like an American version of the Greek Dolmathes. Good stuff!

By the way, if you want some tips on how to pronounce "Worcestershire," click here. It will be worth your while, I promise (at least if you like Phineas and Ferb).

A New Kind of Chicken--Roasted


When we were little, we would always ask my Mom what was for dinner. Quite often, the answer would be, "A new kind of chicken." Well, I found a lovely new kind of chicken. It is very easy to make...just leave yourself plenty of roasting time because this meal won't be done in 30 minutes.


Lemon-Herb Roast Chicken with Pan Gravy

Ingredients:

1 lemon
1 can (10 3/4 ox) Campbell's Condensed Cream of Chicken Soup (Regular or 98% fat free)
1 tablespoon chopped fresh rosemary leaves, or 1 teaspoon dried rosemary leaves, crushed
1 tablespoon chopped fresh thyme leaves, or 1 teaspoon dried thyme leaves, crushed
3 cloves garlic, minced
1 roasting chicken (5-7 pounds)
1/4 cup dry white wine or chicken broth
1/4 cup water

Directions:

Heat the oven to 375 degrees F. Grate 1 1/2 teaspoons zest and squeeze 1 tablespoon juice from the lemon.

Stir the lemon zest, lemon juice, soup, rosemary, thyme, and garlic in a medium bowl. Reserve 1 cup soup mixture for the gravy. Place the chicken into a shallow roasting pan.

Roast the chicken for 20 minutes. Brush the chicken with 1/4 cup soup mixture.

Roast for 1 hour and 15 minutes, or until the chicken is cooked through (use a meat thermometer to check for doneness). Remove the chicken to a serving platter and keep warm.

Spoon off any fat from the pan juices. Stir the wine or chicken broth in the roasting pan and heat over medium-high heat to a boil, scraping up the browned bits from the bottom of the pan. Stir in the reserved soup mixture and water, and cook until the mixture is hot and bubbling. Serve the gravy with the chicken.

Makes 6 servings.

Source: Campbell's recipe, found here.

Notes: My chicken took longer than an hour and 15 minutes to cook...and I had hungry kids on my hands. So, I carved the chicken and microwaved it for a couple of minutes until it wasn't pink anymore.

I also didn't make the pan gravy as stated in the recipe. My roast chicken had a some interesting drippings--mostly it just looked fatty. Rather than use the roast dripping, I mixed the remaining soup mix with about 1 cup of chicken broth. I heated that and served it with the chicken. The sauce was FANTASTIC! It was so flavorful. We ended up with extra sauce. I saved it, froze it, and used it a few weeks later on some simple sauteed chicken. Still very delicious. Plus, my boys ate it, so that made me happy!

A Few Random Side Dishes

Here are a couple of side dishes that don't really go together, but what they hey! Well...maybe there is a little bit of a theme...two sweet potato recipes...and one recipe that I served alongside sweet potatoes!


Whipped Sweet Potato Bake

Ingredients:

3 cans (15 oz each) sweet potatoes, drained
1/4 cup butter or margarine, melted
1 tsp. ground cinnamon
1 tsp. ground ginger
1/4 tsp. ground nutmeg
3 cups miniature marshmallows

Directions:  Heat oven to 350 degrees F.

Beat potatoes, butter, and spices with mixer until blended.

Spoon into a 1 1/2 quart casserole sprayed with cooking spray; top with marshmallows.

Bake 15-20 minutes, or until mixture is heated through and marshmallows are lightly browned.

Recipe Tip: To make in the microwave, mix all ingredients; spoon into microwaveable 1 1/2 quart dish sprayed with cooking spray. Do not top with marshmallows. Microwave on high for 8-10 minutes, or until heated through, stirring after 5 minutes. Top with marshmallows; let stand 2-3 minutes, or until marshmallows begin to melt.

You can also substitute 2 tsp. pumpkin pie spice for the cinnamon, ginger, and nutmeg.

Yield: 10 servings, 1/2 cup each.

Nutrition information: 170 calories, 5 g fat, 10 mg cholesterol, 85 mg sodium, 32 g carbohydrate, 3 g dietary fiber, 17 g sugar, 1 g protein.

Source: Kraftrecipes.com, found here.

Notes: I was going to make this for Thanksgiving not last year, but the year before (2011), but my whole family came down with the stomach flu so we all stayed home. I was going to make and bring this because I was asked to bring a sweet potato casserole. I've been curious to try it ever since. I missed my window of opportunity this last Thanksgiving (2012). Rather than waiting for Thanksgiving 2013, I thought that I would just make it as a random side dish for one of our meals a few weeks ago. This was beyond easy and so tasty. I highly recommend them!


Sweet Potato Casserole with Pecan Topping

Ingredients:

2 (29 oz) cans sweet potatoes in syrup, drained and mashed (about 4 cups mashed)
1/3 cup butter, melted
1/2 cup granulated sugar
3 tablespoons light brown sugar
2 large eggs, lightly beaten
1 teaspoon vanilla extract
1/2 teaspoon ground cinnamon
1/4 teaspoon ground nutmeg
1/3 cup heavy whipping cream
3/4 cup chopped pecans
3/4 cup firmly packed light brown sugar
1/4 cup all-purpose flour
2 tablespoons butter, melted

Directions:

Combine first 8 ingredients in a large bowl; beat at medium speed with an electric mixer until smooth. Add whipping cream; stir well. Pour into a lightly greased 3-quart slow cooker.

Combine pecans and remaining 3 ingredients in a small bowl. Sprinkle over sweet potatoes.

Cover and cook on high 3 to 4 hours.

Recipe tips: This is a great alternative to the oven. This is a great holiday side that cooks on the countertop while your turkey and dressing fill your oven.


Source: Southern Living recipe from the Southern Living Slow-Cooker cookbook, Oxmoor House, 2006. Recipe found online here.


Quinoa and Pepper Pilaf

Ingredients:

1 tablespoon olive oil
1 shallot, minced
2 cloves garlic, minced
1 medium red pepper, diced (about 1 cup)
1 medium yellow pepper, diced (about 1 cup)
1 cup uncooked quinoa, rinsed
2 cups vegetable broth
2 tablespoons chopped fresh parsley

Directions:

Heat the oil in a 2 quart saucepan over medium-high heat. Add the shallot and garlic and cook for 2 minutes, stirring occasionally. Add the peppers and quinoa and cook for 2 minutes, stirring occasionally.

Stir in the broth and heat to a boil. Reduce the heat to low. Cover and cook for 20 minutes or until the quinoa is tender and the liquid is absorbed. Stir in the parsley. Season with salt and pepper, if desired.

Source: This was a recipe I got in my Swanson email newsletter from www.campbellskitchen.com. You can find the recipe here.

Notes: This was a great and easy way to use some of the quinoa in my cupboard. It was delicious. In fact, I think the leftovers were just as good, if not better!


Above: Notice that I served these with salad, chicken, and just plain and simple baked sweet potatoes (with a little butter, salt, and pepper.) You can bake or microwave a sweet potato the same way you would a regular potato. Delicious stuff!

Soup Season


Well, soup season is almost over. Once the weather starts to warm up, soup just sounds too...hot to eat until fall comes again.

I was able to slip in a couple more soup recipes before it got to warm. If spring surprises us with a crazy cold day, you should make some soup to warm yourself up!

The first recipe is one I found on Pinterest. I made a few changes to the original recipe, so I will print both versions here. The second one is a soup recipe that my mom made for one of our family dinners. It is from one of her favorite recipe blogs.

Our Version of Cafe Rio's Chicken Tortilla Soup (Original Recipe found on www.favfamilyrecipes.com)

Ingredients:

1 onion, diced
1 tbsp. vegetable oil
1/2 tsp. cumin
a dash (or two) of cayenne
1/2 tsp. chili powder
5 cups chicken broth
3 tbsp. fresh cilantro, finely chopped
Juice of 1/2 lime
Pepper, to taste
1 can pinto beans, drained and rinsed
2-3 boneless, skinless chicken breasts
2 tbsp. taco seasoning
1 tbsp. paprika
Vegetable oil (to taste)
Pico de gallo
2-3 avocados, diced
2 cups pepper jack cheese
tortilla strips
cilantro, for garnish
lime wedges, for garnish

Directions:

In a small skillet, saute onion in 1 tbsp. oil until onions become slightly soft. Stif in cumin, cayenne, and chili powder, and saute an additional minute or two.

Transfer seasoned onions to a small crock pot (or medium-sized saucepan). Add chicken broth, cilantro, lime juice, pepper, and pinto beans to onions and simmer on low-heat for at least 2-3 hours.

In the meantime (when you are close to serving), combine taco seasoning and paprika. Brush chicken with oil, and rub with taco seasoning/paprika mixture. Grill chicken over medium-heat until cooked through (try to turn only once during the grilling process). Remove from grill and shred.

In individual bowls, layer chicken, about 1/3 cup pico de gallo, 1/3 cup diced avocado, and 1/3 cup pepper jack cheese. Ladle about 1 cup of chicken broth directly over the layers. Top with tortilla strips and garnish with cilantro and lime wedges.

Source: Favorite Family Recipes, found here. You should definitely check out this blog. It's great. Plus, there are some scrumptious looking pictures of this recipe! Her pictures are waaaaay better than mine. I was in a hurry to get this soup served up, so it didn't look the prettiest.


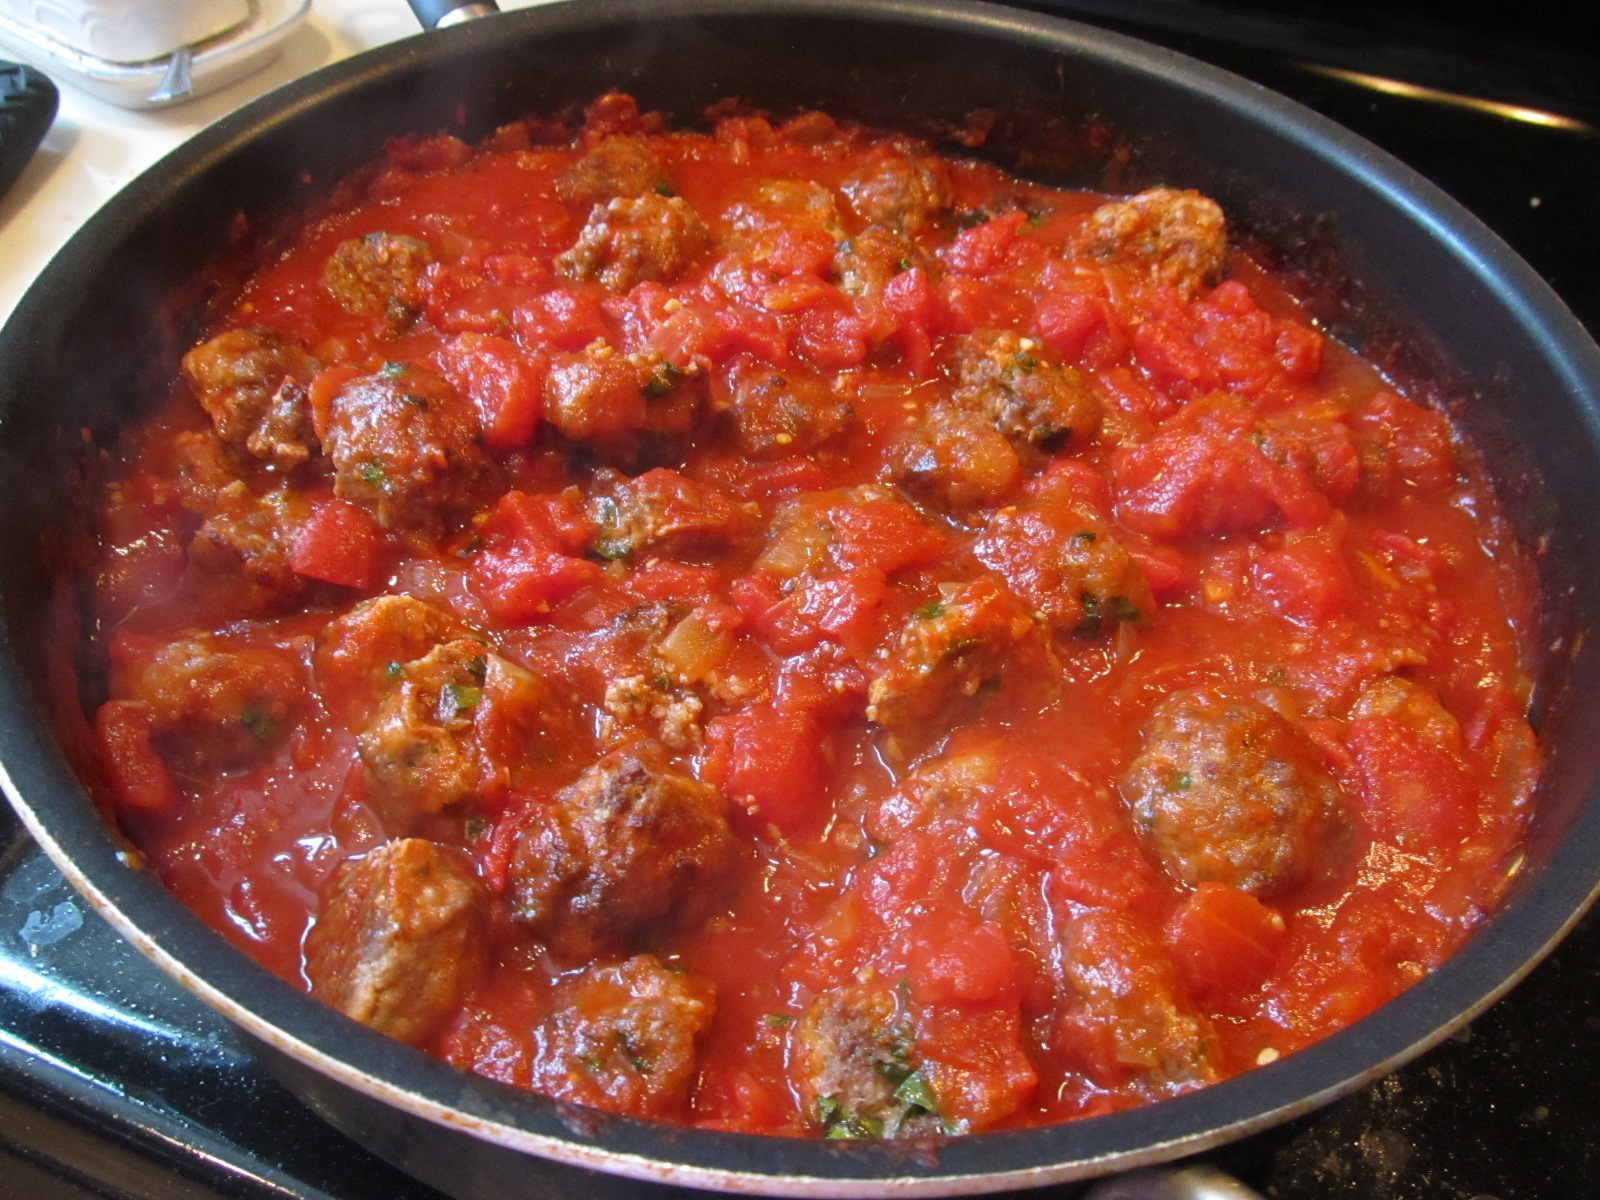
Cafe Rio's Chicken Tortilla Soup aka Build Your Own Chicken Tortilla Soup (My version)

Ingredients:

1 onion, diced
1 tbsp. vegetable oil
1 tsp. cumin
1/2 tsp. ground cayenne
1/2 tsp. chili powder
1 packet taco seasoning (about 3 tbsp.)
1 tbsp. paprika
4 (14 oz) cans of chicken broth
2 (14.5 oz) cans pinto beans
3 boneless, skinless chicken breasts
2 tbsp. lime juice (fresh or bottled)
1/4 cup fresh cilantro, finely chopped

Favorite Toppings/Add-ins:

Pico de gallo or salsa (store bought or favorite homemade recipe)
Diced avocados, or guacamole
Shredded cheese, such as pepper jack, cheddar, Monterey Jack, or Mexican cheese blend
Tortilla strips (store bought or homemade)
Chopped or torn silantro
Lime wedges
Corn (white shoepeg corn is really good in this soup)
Sour cream
Thinly sliced radishes
Sliced green onions

Directions:

In a small skillet, heat oil over medium high heat. Add diced onion and saute until soft, about 5 minutes. Stir in cumin, cayenne, chili powder, taco seasoning, and paprika. Add chicken broth and pinto beans and bring to a simmer.

Meanwhile, poach chicken. Once chicken is cooked, shred with two forks. Add shredded chicken to the broth mixture. Simmer soup on low for an hour.

Prepare your choice of toppings and mix-ins for people to choose from.

Add lime juice and 1/4 cup chopped cilantro to the soup just before serving.

Ladle about 1 1/2 cups soup into each bowl. Let everyone add in their desired toppings and mix-ins so that they can build their own soup.

Be sure to serve the soup piping hot because the toppings and mix-ins will lower the temperature of the soup considerably.

Source: This soup was inspired by the soup recipe above from Family Favorite Recipes. I only changed some of the amounts of the spices used, and I changed the method of preparation slightly.

Notes: I changed some of the preparation because I felt like poached chicken would be more moist and tender than grilled. I also thought that putting the chicken directly in the soup would distribute it more evenly throughout. I also liked the idea of a sort of tortilla soup bar (instead of a salad bar). You know, to give people the basics and let them build on it by adding their own choice of toppings.

I ate this a few different times and tried a few different variations. I ate it with diced avocado, tortilla strips, pepper jack, and pico de gallo. I tried it with cheddar instead of pepper jack. I added corn one of the times. I ate it without any toppings another time. This soup is just fantastic anyway you serve it!


 Slow Cooker Nacho Chicken Soup

Ingredients:

1 1/2 pounds boneless chicken breasts or thighs (or a mixture of the two)
2 (14 oz) cans chicken broth
2 (7 oz) cans diced green chiles (or substitute 1 can with jalapenos)
1 package taco seasoning
1 can condensed cream of chicken soup
1 can black beans, drained and rinsed
1 can corn, drained
1 cup sour cream
1 cup shredded cheddar cheese
1/2 cup chopped fresh cilantro, divided
2 cups crushed nacho-flavored chips (like Doritos), or baked tortilla chips

Topping Options:

Chopped cilantro
Sliced olives
Chopped tomatoes
Salsa
Chopped red or green bell peppers
Diced avocado
Guacamole
Tortilla chips
Grated cheese
Shredded lettuce
Hot sauce

Directions:

Place about 1 1/2 pounds of boneless chicken breasts or thighs in the slow cooker.

Add broth, chiles, a package of taco seasoning, and cream of chicken soup. Cook on high for 3 to 4 hours, or on low for 6 to 8 hours.

About a half hour before serving, use a large slotted spoon to remove the chicken from the pot and place in a medium-size bowl to cool slightly.

While the chicken is cooling, stir sour cream, cilantro, crushed tortilla chips, shredded cheddar cheese, beans, and corn into the soup.

With two large forks, shred the chicken. Return the chicken into the pot, and stir well before serving.

Let each guest customize their bowl with topping options such as chopped cilantro, sliced olives, chopped tomatoes, salsa, chopped red or green peppers, diced avocados, or guacamole, tortilla chips, grated cheese, shredded lettuce, and hot sauce.

Source: Recipe from a book called "Soup's On!" by Valerie Phillips, and found on the blog Chew and Chat. You can find the recipe here.

As Easy As It Gets


This snack cake or breakfast cake has only two ingredients. I don't think it gets any easier than this.


Pineapple Angel Food Cake

Ingredients:

1 box angel food cake mix
1 can crushed pineapple, do not drain

Directions:

Preheat oven to 350 degrees F.

Mix cake mix and pineapple in a large bowl by hand. Pour into an ungreased 13x9 inch pan.

Bake for 28-30 minutes.

Cool on wire rack. Cut into squares and serve.

Source: I found this recipe as well as many variations on this same idea on Pinterest.

Variations:

Angel food cake lemon bars: use 1 to 2 cans lemon pie filling in place of the pineapple (1 can for a more cake-like consistency, 2 cans for a denser texture). Bake at 350 degrees for 25-30 minutes.

Cinnamon apple cake: use 1 can of apple pie filling in place of the pineapple. Bake at 350 degrees for 35-40 minutes.

Fruit pie cake: use 1 can of your favorite fruit pie filling (blueberry, cherry, raspberry, peach, etc.) in place of the pineapple. Bake at 350 degrees for 30-40 minutes.

Notes: Holy cow. It doesn't get any easier than this. The only thing I would watch is the baking time. The many recipes I found had sometimes similar and sometimes dissimilar bake times. You want to bake it until the top is golden brown and a toothpick tested in the center of the cake comes out clean.

Saturday, March 30, 2013

Mastering the Basics


Has anyone out there read Eight Cousins by Louisa May Alcott? I loved that book as a kid. In the book, Rose's father dies and she goes to live with her uncle. She has a slew of aunts and, as you might have guessed, eight cousins--all boys.

Her uncle wants her to learn some good skills and one of the skills is bread baking. Ever since reading that book, I have wanted to master the art of bread baking...and yet, I have been a little afraid to do so. Bread making just seems so intimidating! But do you know what? It just takes some practice. Besides, the payout is so great. Is there really anything better than freshly baked bread? No way!

I found this recipe on Allrecipes.com. I love that website. I love that there are some great cooks out there that are sharing some of their best recipes. I also love that other great cooks out there share their experiences making these recipes and any variations they might have made. This recipe currently has 5 stars and almost 550 reviews. I can only imagine this will continue to increase in the number of reviews and that the stars will stay the same. This recipe is fantastic.

It makes three loaves of bread, however. The bread doesn't keep very long. So, here are my two suggestions: either make this bread when it will get eaten quickly (either you have a hungry family or you will be having guests), or freeze the loaf (or loaves) that you won't be able to eat quickly. This bread freezes really well, so you can make three loaves, eat one right away, freeze two, or give one away and freeze the other. Good stuff!


Grandma VanDoren's White Bread

Ingredients:

3 cups warm water
3 tablespoons active dry yeast
3 teaspoons salt
4 tablespoons vegetable oil
1/2 cup white sugar
8 cups bread flour

Directions:

In a large bowl, combine warm water, yeast, salt, oil, sugar, and 4 cups flour. Mix thoroughly, and let sponge rise until doubled in size.

Gradually add about 4 cups flour, kneading until smooth. Place dough in a greased bowl, and turn several times to coat. Cover with a damp cloth. Allow to rise until doubled.

Punch down the dough, let it rest a few minutes. Divide dough into three equal parts. Shape into loaves, and place in three 8 1/2 x 4 1/2 inch greased bread pans. Let rise until almost doubled.

Bake at 350 degrees F for 35-45 minutes. The loaves may need to be covered for the last few minutes with foil to prevent excess browning.

Source:  Allrecipes.com submitted by Marilyn VanDoren Sim, found here.

Notes: The baking time is pretty wide. I would suggest baking it for 30-35 minutes, or until nicely browned, and then covering it with foil and baking until you have reached a total time of 40-45 minutes.


Easy Weeknight Dinner: Tex-Mex Style


I saw this recipe in one of my email newsletters and it just sounded good. I knew that fajitas would be in my near-dinner-future. The mix of spices for the chicken was delicious. Maybe they are for you too!

Chicken Fajitas

Ingredients:

4 tablespoons canola oil, divided
2 tablespoons lemon juice
1 1/2 teaspoons seasoned salt
1 1/2 teaspoons dried oregano
1 1/2 teaspoons ground cumin
1 teaspoon garlic powder
1/2 teaspoon chili powder
1/2 teaspoon paprika
1/2 teaspoon crushed red pepper flakes, optional
1 1/2 pounds boneless skinless chicken breast, cut into thin strips
1/2 medium sweet red pepper, julienned
1/2 medium green pepper, julienned
4 green onions, thinly sliced
1/2 cup chopped onion
6 flour tortillas (8 inches), warmed
Shredded cheddar cheese, taco sauce, salsa, guacamole, and sour cream

Directions:

In a large resealable plastic bag, combine 2 tablespoons oil, lemon juice, and seasonings; add the chicken. Seal and turn to coat; refrigerate for 1-4 hours.

In a large skillet, saute peppers and onions in remaining oil until crisp-tender. Remove and keep warm.

Discard marinade. In the same skillet, cook chicken over medium-high heat for 5-6 minutes or until no longer pink. Return pepper mixture to pan; heat through.

Spoon filling down the center of tortillas; fold in half. Serve with cheese, taco sauce, salsa, guacamole, and sour cream. yield: 6 servings.

Nutrition facts: 1 serving (1 each) equals 369 calories, 15 g fat, 63 mg cholesterol, 689 mg sodium, 30 g carbohydrate, 1 g fiber, 28 g protein.

Source: Taste of Home recipe, found here.

Notes: This was really delicious. Very flavorful, but not overwhelming (aka not too spicy for the kids). My only regret is that I should have cut the chicken into smaller pieces. Other than that, it was great!

One of My Favorite Desserts


Does it really get any better than a warm brownie topped with vanilla ice cream and chocolate sauce? I didn't think so. In the past, I have always just used a brownie mix (Ghirardelli has some pretty awesome brownie mixes). However, recently I have been finding some brownie recipes to keep on hand when I don't have a brownie mix handy.

The following recipe is kind of a combination of the past (using a mix) and the future (using a recipe). It is a brownie recipe that is made from a cake mix...with a very short ingredient list. I always love having new options for cake mixes!

These brownies were delicious. Super easy to make, and very yummy.


Above: These make a big pan. The recipe says it yields 48 brownies (or 4 dozen). However, I would say that I got about 5 rows by 4 rows, or a total of 20 brownies.


Above: If you like your brownies plain.


Above: If you like a light dusting of powdered sugar.

Triple Fudge Brownies

Ingredients:

1 package (3.9 ounces) instant chocolate pudding mix (and ingredients called for on the box)
1 package chocolate cake mix (regular size)
2 cups (12 ounces) semisweet chocolate chips
Confectioners' sugar, optional
Vanilla ice cream, optional

Ingredients:

Prepare pudding according to package directions. Whisk in dry cake mix. Stir in chocolate chips. Pour into a greased 15-in. x 10-in. x 1-in. baking pan. Bake at 350 degrees for 30-35 minutes or until the top springs back when lightly touched.

Dust with confectioners' sugar, if using. Serve with ice cream, if desired.

Yield: 4 dozen.

Source: This is a Taste of Home recipe found here.

Notes: These weren't easy to spread in the pan. You can't simply "pour" it in as stated in the recipe. I had to spray a spatula with cooking spray and spread the batter into the pan. However, these were so easy, and the chocolate chips made them really decadent and made them taste homemade, rather than from a mix.


Above: I, myself, prefer a scoop of ice cream and some chocolate syrup. Yummy!

Holiday Catch Up: St. Patrick's Day


Our family favorites for St. Patrick's Day have already been posted. We didn't really try anything new this year for the main course. If you would like to try our favorite Irish dinner, check here.

We didn't really make a traditional Irish dessert, however, in the spirit of the Emerald Isle, we made a green dessert that was incredibly delicious, and impossibly easy to make.


Impossibly Easy Grasshopper Cheesecake

Ingredients:

3/4 Original Bisquick mix
3/4 cup sugar
1/4 cup green creme de menthe or 1 to 2 teaspoons peppermint extract
3 eggs
2 packages (8 oz. each) cream cheese, softened
1/4 cup miniature semisweet chocolate chips

Chocolate Ganache:

1/2 cup whipping cream
1 cup miniature semisweet chocolate chips

Directions:

Heat oven to 350 degrees F. Spray 9-inch glass pie plate with cooking spray.

In large bowl, beat all cheesecake ingredients except chocolate chips with electric mixer on high speed 2 minutes, scraping bowl frequently. Stir in chocolate chips. Pour into pie plate.

Bake about 35 minutes or until center is firm and puffed. Cool 45 minutes (cheesecake top will be cracked).

In 1-quart saucepan, heat ganache ingredients over medium heat, stirring constantly, until smooth; remove from heat. Carefully spread over cheesecake. Refrigerate at least 3 hours until chilled. Store covered in refrigerator.

Recipe Tips: For a crowd-size Impossibly Easy Grasshopper Cheesecake, double all ingredients and use a 13x9-inch glass baking dish. Bake 30 to 37 minutes.

Nutrition information: 430 calories, 29 g fat, 125 mg cholesterol, 270 mg sodium, 36 g carbohydrate, 1 g fiber, 7g protein.

Source: Betty Crocker, original recipe found here.

Notes: This was really good, but verrrrry rich! We used the recipe tip and doubled the recipe and baked it in a 13x9-inch pan. We also topped these with some mint chocolate bits (I believe they were Andes? Mom would have to confirm this).

Half-Hearted Attempt


I didn't really have time to try any new recipes for Valentine's Day. I kept it simple. I pretty much just made things in the shape of a heart. Seriously. My boys got some Valentine's candy, we made Valentine's for the grandparents (my boys aren't in school yet, so no need to make any for classmates yet), they got heart-shaped toast, and a heart-shaped pizza for dinner. The end! Happy Valentine's Day!


 Above: This picture should be horizontal, but I guess Blogger feels differently.


Above: Johnny spilled a little water on me, and when I looked at my sleeve, it was in the shape of a heart. The irony was not missed, so I had to take a picture. Seriously, I didn't do this on purpose.


Above: Dinner is served.


Above: Calm down...this heart isn't broken, it was just cut into slices.

Saturday, March 23, 2013

Birthday Cakes

We have a lot of birthdays in January and February in my family. It kind of wreaks havoc on your after Christmas dieting plans to have a couple of months full of birthday cakes right after turkey dinners, festive Christmas goodies, and New Year's appetizers.

However, I have found some good frosting and fondant recipes as a result! Let me share them with you.


Above: One of Peter's 4th birthday cakes. Transformers on the moon (front view).


Above: One of Peter's 4th birthday cakes. Transformers on the moon (this is the back view).

Smooth Buttercream Frosting

Ingredients:

1/2 cup vegetable shortening
1/2 cup butter
1 1/2 teaspoons vanilla extract
5 cups confectioners' sugar
3 tablespoons milk

Directions:

Beat shortening and butter in a large bowl with an electric mixer until smooth, about 3 minutes; stir in vanilla extract. Beat sugar, one cup at a time, into butter mixture on medium speed. Add milk and beat on high speed until light and fluffy.

Keep icing covered with a damp cloth until ready to decorate. For best results, keep icing refrigerated when not in use.

Source: Allrecipes.com, submitted by morabam2011. Found here.

Above: Peter's other 4th birthday cake. A hamburger cake. The cheese, tomatoes, and pickles were made out of fondant (I found an awesome fondant recipe, which I will share in this post. It was much better than the fondant recipe I used the year before for Peter's 3rd birthday cakes. The lettuce, and the ketchup (spread on top of the chocolate cake layer are both the Smooth Buttercream Frosting recipe).


Above: I should have made a side of fries with ketchup to go with this (slices of pound cake, like Sara Lee's, with a dollop of red frosting. Oh well...some other time).

Marshmallow Fondant

Ingredients:

1/4 cup butter
1 (16 ounce) package miniature marshmallows
4 tablespoons water (1/4 cup)
1 teaspoon vanilla extract
2 pounds confectioners' sugar, divided

Directions:

Place the butter in a shallow bowl, and set aside.

Place the marshmallows in a large microwave-safe bowl, and microwave on High for 30 seconds to 1 minute to start melting the marshmallows. Carefully stir the water and vanilla extract into the hot marshmallows, and stir until the mixture is smooth. Slowly beat in the confectioners' sugar, a cup at a time, until you have a sticky dough. Reserve 1 cup of powdered sugar for kneading. The dough will be very stiff.

Rub your hands thoroughly with butter, and begin kneading the sticky dough. As you knead, the dough will become workable and pliable. Turn the dough out onto a working surface dusted with confectioners' sugar and continue kneading until the fondant is smooth and no longer sticky to the touch, 5 to 10 minutes.

Form the fondant into a ball, wrap it tightly in plastic wrap, and refrigerate overnight. To use, allow the fondant to come to room temperature, and roll it out onto a flat surface dusted with confectioners' sugar.

Source: Allrecipes.com submitted by Kiele Briscoe. Found here.

Notes: I was only able to beat in a very small amount of the powdered sugar...it just wasn't working with my handheld mixer. So, I ended up beating in what I could, and then I needed in the rest. I didn't use quite 2 lbs of the confectioners' sugar...but close.


Above: One of Jonathan's 2nd birthday cakes. I got this little train with the tracks in one of the boys' fast food kids' meals. They got two of them, and Peter didn't really love this toy, so I hid this away because I thought it was cute, and because I thought it would work as a cake topper.


Above: I added a "2" since it was his second birthday...besides, the more candy letters and numbers, the merrier.


Above: Yummy!

Buttercream Frosting

Note: This recipe makes 2 1/2 cups frosting. It is enough for a good dollop of frosting on each cupcake. However, if you want to blanket the cupcake with frosting, prepare 1 1/2-2 recipes.

Ingredients:

8 tablespoons (1 stick) butter
3 cups confectioners' sugar, sifted
3-4 tablespoons milk
1 teaspoon pure vanilla extract

Directions:

Place the butter in a large mixing bowl. Blend with an electric mixer on low speed until fluffy, 30 seconds. Stop the machine and add the confectioners' sugar, 3 tablespoons of the milk, and the vanilla. Blend with the mixer on low speed until the sugar is incorporated, 1 minute. Increase the speed to medium and beat until light and fluffy, 1 minute more. Add up to 1 tablespoon more milk if the frosting seems too stiff.

Use this frosting to frost the cupcakes of your choice.

For different flavors of buttercream...

Add 1 teaspoon pure almond extract instead of the vanilla, or...
1-2 teaspoons coconut flavoring instead of vanilla.

For lower fat, use 4 tablespoons butter and increase the milk by 1-2 tablespoons.

Source: Cupcake Doctor cookbook.


Above: This one didn't turn out as cute as the one I found on Pinterest (my excavator was too big for things to look proportionate). Oh well. It was delicious!


Above: I like to incorporate one of my boys' birthday presents with their cake topper. It makes the cake look cute, it is less work decorating-wise for me, and it is a fun surprise, and something to look forward to for my boys.

Fluffy Chocolate Frosting

Ingredients:

8 tablespoons (1 stick) butter, at room temperature
2/3 cup unsweetened cocoa powder
3 cups confectioners' sugar, sifted, plus additional, if needed
1/3 cup whole milk, plus additional, if needed
2 teaspoons pure vanilla extract
1/4 teaspoon salt

Directions:

Place the butter and cocoa powder in a large mixing bowl. Blend with an electric mixer on low speed until the mixture is soft and well combined, 30 seconds. Stop the machine. Place the confectioners' sugar, 1/3 cup milk, vanilla, and salt in the bowl, and beat with the mixer on low speed until the frosting lightens and is fluffy, 2 to 3 minutes. Add more milk if the frosting is too thick or confectioners' sugar, 1 tablespoon at a time, if the frosting is too thing.

Use the frosting to frost the cake or cupcakes of your choice.

Source: The Cake Mix Doctor cookbook, ISBN-10: 0-7611-1719-9


Above: Here is a cake my sister made for her son for his 2nd birthday this year. So cute! I like hers way better than mine!


Above: Here is a cute cake that my sister-in-law made for my niece (using the fondant recipe shared in this post).


Above: This is what the cake originally looked like, and then my niece decided she wanted polka dots on the dress.


Above: This is one of the cakes I made for Peter's 3rd birthday. It was huge! It contained a whole yellow cake, and a whole chocolate cake (the chocolate cake also made part of the volcano).


Above: I got these cool dinosaurs from my local Dollar Tree dollar store.


Above: I used melted seedless raspberry jam for the lava. This was the very first time I made fondant. I was not very skilled at it (plus, the recipe I used wasn't that great...too sticky...and it took forever for me to get it to a less sticky state that I could work with). So, I used a grass tip to cover all of the lumps and inconsistencies with grass frosting. :) (I won't include this marshmallow fondant recipe since the one I am including is much better. I used the buttercream frosting recipe found above).

Above: The other cake I made for Peter's 3rd birthday. The Spider-man was another kids' meal toy that I saved just for this purpose. My second round with fondant was more successful due to more practice. (Again, I won't share this fondant recipe. I used the buttercream recipe used above.)

Above: For Peter's 2nd birthday, I went with a pirate theme. I made two pirate treasure chest cakes (to celebrate with both sides of the family). This is the one we shared with my in-laws. It was a strawberry cake with white buttercream frosting (from a mix and a can) which was sprinkled with crushed vanilla wafers (to look like sand). I got the supplies (the chest, coins, and beads) from Zurchers.

Above: This is the other pirate treasure chest cake I made. You can find all of the instructions for that here.

Above: I made these cute bears at the beach cupcakes for Peter's 1st birthday. I made a delicious marshmallow frosting to go on top of them.


Above: I made this teddy bear's beach picnic to celebrate Peter's 1st birthday with my in-laws.

Marshmallow Creme Frosting

Ingredients:

1/4 cup (1/2 stick) margarine or butter, softened
1 jar (7 oz) marshmallow creme
1 tsp vanilla
1 pkg (16 oz) powdered sugar
1 to 2 tbsp milk, divided

Directions:

Place margarine, marshmallow creme and vanilla in a small bowl; beat on medium speed until well blended. Gradually add sugar, beating after each addition until well blended.

Blend in 1 tbsp. of the milk. Add remaining 1 tbsp milk, if necessary, for desired spreading consistency.

Makes enough to fill and frost a 2 layer cake.

Source: I found this on Kraftrecipes.com. You can find it here.


Above: Poor Johnny. His 1st birthday cake was a bust. I had planned to make two. The first one was actually going to be the train cake that I made for his second birthday. However, when I was frosting it, it crumbled to pieces! Damage beyond repair. I ended up having to buy him a cake from a bakery at the last minute since I didn't have the time or supplies to make another one. It was a delicious white cake with whipped cream frosting and strawberry filling from Schmidt's Pastry Cottage. My hero. :)


Above: Boo hoo! Again, another bust for Jonathan's first birthday. Above is Jonathan's other cake for his 1st birthday. We celebrated with my family, and my sister was in town, so we celebrated her son's birthday at the same time. We decided to make individual cakes baked in 28 oz size cans (that once held whole peeled tomatoes). However, they took FOREVER to make. We did them as blue ombre cakes, so we made four different shades of blue (and thus, four different 28 oz cans). This took quite a few cakes (2, if not 3, if I recall), and a ton of food coloring. They were deep, so they took over an hour to bake. We made them at my Mom's house, and they took so long that I wasn't able to stay to frost/decorate them. So, I don't know how easy that portion of the task was. However, I can't imagine it was that painless to do. They were frosted white and topped with blue sprinkles. They weren't easy to slice to serve (they made for awkward looking portion sizes). Besides that, no way did two little 1 year old boys need that much cake (they each got their own--probably the equivalent of one regular sized cake--so half a cake for each of them). This was a concept that seemed a lot cuter and more fun before you actually got into it. It was overrated. A lot of time, work, and extra supplies. Even a giant cupcake would have been more practical to give each of them! It was a hectic night, so I didn't really get a picture of the cakes either. This is blown up from a picture just before they blew out the candles. The cakes were itty bitty in the picture, thus the grainy picture quality.