My mom had some cookbooks that she was going to throw out when we moved out of the house we all grew up in (nearly ten years ago). She gave away a lot of the books, but before she did, I sifted through them and kept some for myself.
One of the books I kept is so old that it is missing the cover. I kept three that were pretty similar, so after comparing the books and a little online research, I am pretty sure that these recipes came out of The Culinary Arts Institute's "The Italian Cookbook" published in 1955.
My Dad served his mission in Italy in the 70's. According to him, the tomato meat sauce that I am sharing here tastes the closest to what he ate while he was in Italy on his mission. As a result, this sauce was always one of his favorites. From this same cookbook, you will find a fantastic recipe for chicken cacciatore that became one of my Mom's favorites.
I can't wait to explore this cookbook more. I don't know why I haven't tried sooner. The recipes really are fantastic and very authentic. They take a little more time (oh wait, that's why I haven't delved into this book more), but believe me, these recipes are worth a little more time and effort.
Oh, and don't leave too soon because I included some bonus recipes below the two recipes pictured in this post. Buon Italia!
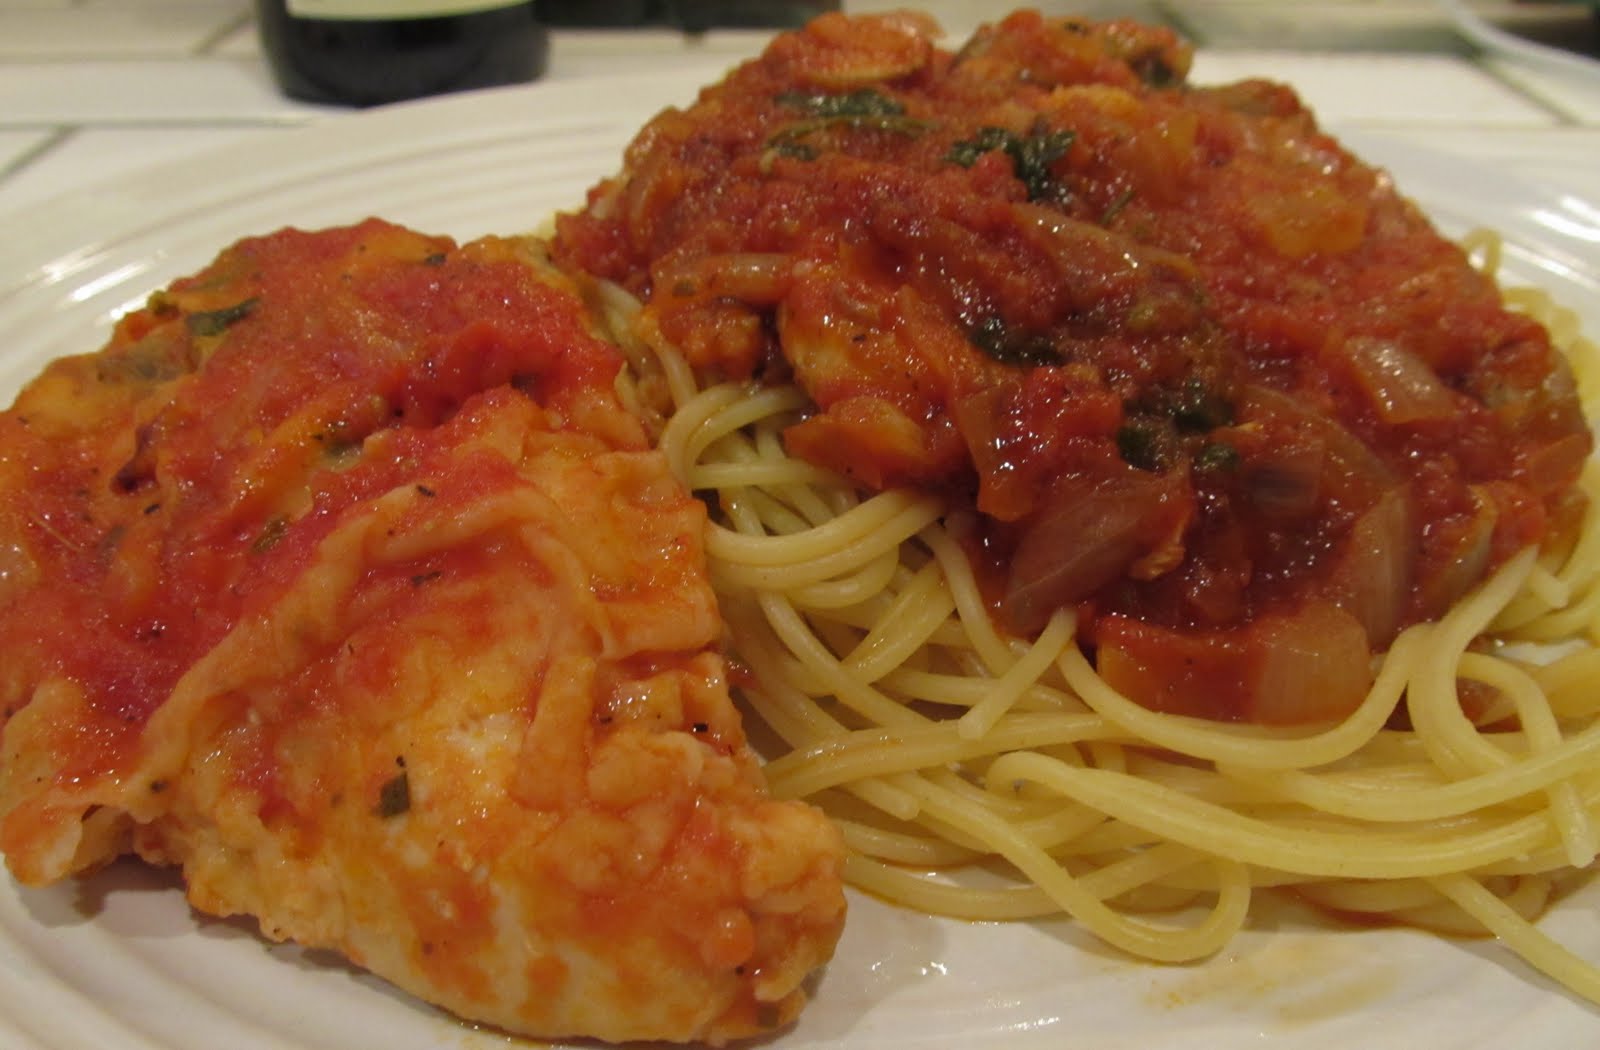
 Dad's Favorite Spaghetti Sauce aka Tomato Meat Sauce (Salsa di Carne al Pomodoro)
Ingredients:
1/4 cup olive oil
1/2 cup (about 1 medium-size) chopped onion
1/2 lb. beef chuck
1/2 lb. pork shoulder
7 cups canned tomatoes, sieved (basically, two 28 oz cans of whole peeled tomatoes mixed in a blender until smooth)
1 Tbsp. salt
1 bay leaf
1 (6 oz.) can tomato paste
1 (6 oz.) can Italian seasoned tomato paste
1/2 cup water, if necessary
Directions:
In a large saucepan, heat the olive oil. Add the onion and cook until softened and lightly browned. Add the beef chuck and pork shoulder to the skillet and cook, turning occasionally until browned. Add the canned tomatoes, salt, and bay leaf. Cover the saucepan and simmer over very low heat for about 2 1/2 hours. After the mixture has simmered for 2 1/2 hours, add the two cans of tomato paste. Simmer uncovered over very low heat, stirring occasionally, about two hours or until thickened. If sauce becomes too thick, add 1/2 cup of water. Remove the meat and bay leaf from the sauce. Serve over cooked spaghetti.
Makes about 4 cups of sauce.
Source: As mentioned above, I believe this came from the Culinary Arts Institute's "The Italian Cookbook" published in 1955.
Notes: The pork and beef that you will be removing from the sauce adds a wonderful flavor. But, it is actually delicious on its own too. My Dad loved to eat it on the side of his pasta. You could even cut up or shred the meat and keep it in the sauce if you like.
My burner doesn't have the capacity to "simmer over very low heat" as the recipe mentions. My burner burns hotter than the surface of the sun even when it's on low heat. There's a very low heat option that does this annoying flick on and flick off of the burner flame that is quite noisy. But for some reason, it wasn't working the night I made this and when I tried to put it on the lowest heat setting, the burner just turned off completely. As a result, my "simmering" was pretty much a low boil...so a lot of the liquid in my sauce evaporated. I added an additional 28 oz can of tomatoes to the sauce to make up for it.

Sauce variations listed in the cookbook:
Tomato Sauce with Ground Meat (Salsa di pomodoro e Carne Macinata)Follow the base recipe. Brown 1/2 lb. ground beef in 3 tablespoons olive oil, breaking beef into small pieces with fork or spoon. After removing meat from sauce, add ground meat and simmer 10 minutes longer.
Tomato Sauce with Mushrooms (Salsa di Pomodoro e Funghi)Follow the base recipe. Clean and slice 1/2 lb. mushrooms. Cook slowly in 3 tablespoons melted butter until lightly browned. After removing meat from sauce, add mushrooms and cook 10 minutes longer.
Tomato Sauce with Sausage (Salsa di Pomodoro e Salsiccia)Follow the base recipe. Brown about 1/2 lb. Italian sausage (cut into 2 inch pieces, or crumbled, if you prefer) in 1 tablespoon olive oil. After removing meat from sauce, add sausage and simmer 10 minutes longer.
 Mom's Favorite Chicken Cacciatore (Pollo alla Cacciatora)
Ingredients:
1/2 cup olive oil
2 cloves garlic, sliced thin
1 frying chicken, 2-3 lbs.
1/2 cup all-purpose flour
1 1/2 teaspoons salt
1/4 teaspoon black pepper
2 eggs, well beaten
1/4 cup milk
1 tablespoon chopped parsley
1/2 cup grated Parmesan cheese
3 1/2 cups tomatoes, sieved (or one 28 oz can whole peeled tomatoes mixed in a blender until smooth)
1 1/4 teaspoons salt
1 teaspoon oregano
1/2 teaspoon pepper
1 teaspoon chopped parsley
1 small onion, optional
1/2 lb. mushrooms (whole or sliced), optional
3 Tbsp. butter or margarine, optional
1 green bell pepper, sliced, optional
Directions:
Prepare and coat chicken as follows:
Disjoint and cut chicken into serving-size pieces. Rinse and pat dry with paper towel (called "absorbent paper" in the recipe! I guess they hadn't coined the phrase "paper towel" yet.). To coat chicken evenly, shake 2 or 3 pieces at a time in a plastic bag containing a mixture of the flour, salt, and black pepper. Combine the beaten eggs, milk, and chopped parsley.
Heat olive oil and garlic in a heavy skillet until garlic is lightly browned.
When oil is ready, dip each piece of coated chicken into the egg mixture. Then, roll the chicken pieces in the grated Parmesan cheese.
Starting with meaty pieces of chicken, place them skin-side down in the skillet containing oil and garlic. Add less meaty pieces of chicken as others brown. To brown all sides, turn as necessary with tongs or two spoons.
While chicken is browning, combine tomatoes, salt, oregano, and pepper. Slowly add tomato mixture to browned chicken with the chopped parsley.
Clean and thinly slice 1 small onion, 1/2 lb. mushrooms, and green pepper, if using. (Note: if you are using the green pepper, you can omit the onion, if you like) Cook in 3 tablespoons butter or margarine in a skillet until onion and mushrooms are lightly browned. Add to browned chicken with tomato mixture.
Cook slowly 25-30 minutes, or until thickest pieces of chicken are tender when pierced with a fork. If mixture tends to become too thick, add a small amount of water.
Source: Again, as mentioned, I'm pretty positive that this is from The Culinary Arts Institute's "The Italian Cookbook" published in 1955.
Notes: Serve the sauce over your favorite pasta (that would be spaghetti for me!). I used boneless, skinless chicken breasts rather than cutting up a fryer chicken. I think it would have been crispier chicken if it still had the skin on it, but I saved a few calories this way and it was a lot faster and easier too. I also included a little more chopped parsley in the flour mixture I used for coating because the parsley in the egg mixture wasn't really staying on the chicken.
Also, my garlic cloves were small, so I decided to use four cloves instead of two. It was soooo yummy, but I'll be honest with you, I had garlic dragon breath for the rest of the night (despite brushing my teeth and using mouthwash). But it was so delicious, it was worth it. So, increase the garlic at your own risk!
For Chicken Cacciatore, Naples Style (the most basic version of cacciatore), you omit the mushrooms, onions, and green peppers. My Mom used to add the mushrooms, but not the green peppers, so it wasn't until years later that I realized that most chicken cacciatore recipes called for green peppers. So, I don't really associate green peppers with cacciatore and as a result, I did not make mine with green peppers this time around either.
Oh, and as always, I doubled the flour mixture to coat my chicken.
Also, let me tell you about my oops moment. The recipes in this cookbook are set out a lot differently than how we write out our recipes today. They have directions, followed by a few ingredients, then more directions, and more ingredients, etc.. For the section about frying the chicken, it referred me to a completely separate recipe. So, I missed the part where you coat the chicken in flour and THEN dip it in the egg mixture, and I missed the dipping in Parmesan cheese section altogether. I instinctively followed the current traditional breading procedures in use today--namely, I dipped the chicken in the egg mixture and then coated it in the flour mixture before placing it in the oil to brown. I think the chicken would have been a little crispier had I followed the original instructions, but it still tasted great.

Now, drum roll please...
Bonus recipe!

Ingredients:
1/2 cup olive oil
2 medium-size cloves garlic, sliced
3 1/2 cups canned tomatoes, sieved (one 28 oz can whole peeled tomatoes mixed in a blender until smooth)
1 1/4 teaspoons salt
1 teaspoon oregano
1/4 teaspoon chopped parsley
1/8 teaspoon pepper
Directions:
Heat olive oil in a large skillet and cook sliced garlic until browned. Mix tomatoes, salt, oregano, chopped parsley, and pepper. Add tomato mixture slowly, stirring constantly.
Cook rapidly uncovered for about 15 minutes or until thickened. Stir occasionally.
If sauce becomes too thick, add 1/4 to 1/2 cup water. Serve hot over cooked spaghetti or linguine.
Source: Same as the others!
Notes: I decided to share this lovely recipe because it is just as yummy and authentic, but you'll notice that it's about ten times quicker and easier than the others! You could add sauteed mushrooms, browned beef or sausage, or your favorite meatballs to this sauce too, if you wanted!
You could easily reduce the olive oil to 1/4 cup to save yourself some calories without skimping on flavor.
Wait? There's more? Another drum roll please!...
Bonus dessert recipe!
Enjoy it for me! I love Spumoni, but sadly, due to my son's tree nut allergy, I won't be making recipes that call for tree nuts for a long, long time. I'll have to wait until he goes off to camp for boy scouts to indulge myself! Considering the fact that he's currently only 2 1/2 years old, I have a long time to wait. I'll just have to take care of my nut cravings when I'm out on dates with my husband (oh wait, with two little ones, we don't get out often...so when am I going to have nuts? Boo hoo!).
This is a tried and true recipe, however. My grandma used to make it and according to my Mom, it is fantastic. However, the recipe states that it is "surprisingly easy" to make. After reading through this recipe, I would say this is anything but surprisingly easy to make. Not many people (if any) had access to ice cream makers back in the 50's, so making ice cream was much more labor intensive.
So, I'm going to share an updated version of the recipe that I created that works more for us today. Additionally, according to my grandma's notes, she always tripled the recipe, so for the original recipe, I will keep the original amounts and for the updated recipe, I will triple it.
Also, the historical note from the recipe is interesting...if not quite idyllic. It's sad to think of rich Romans sending their slaves up the mountain for snow so that they could have their frozen treats. I guess we can thank the service of countless unnamed individuals for the legacy they left us. Because of them, we can enjoy all of our frozen favorites that we snack on today. I hope they at least got to sneak some in the kitchen before serving it to their masters!
 Spumone
Frozen desserts date back to the days of ancient Rome when they were frozen with snow and ice brought down from the mountains by slaves. For centuries, Italians have been masters of the art of making frozen desserts--including ices, frozen custards, and fancy, molded ice creams, all said to have originated in Italy.
Multi-colored and multi-flavored Spumoni is one of the most popular Italian ice creams. Usually prepared commercially, here is a surprisingly easy Spumone to delight your family and entice your friends.
Ingredients:
1 cup milk
1/2 cup sugar
1/8 teaspoon salt
3 egg yolks, slightly beaten
1/2 sq. (1/2 oz.) chocolate
1 cup heavy whipping cream
2 teaspoons rum extract
1/2 cup chilled whipping cream
1 tablespoon sugar
1/8 teaspoon pistachio extract
Green food coloring
1 maraschino cherry, drained and chilled
1/2 cup chilled whipping cream
1 tablespoon sugar
6 unblanched almonds, finely chopped
1/4 teaspoon almond extract
Directions:
Chill a bowl, beaters, and mold in the freezer.
On low heat (or in double boiler), scald milk and then stir in 1/2 cup sugar and salt.
Vigorously stir about 3 Tbsp. of hot mixture into the 3 slightly beaten egg yolks. Immediately blend into milk mixture. Cook over low heat (or over simmering water in double boiler), stirring constantly, about 5 minutes, or until mixture coats a silver spoon. Remove from heat and cool.
Meanwhile, melt chocolate and set aside.
Stir heavy whipping cream into egg mixture. Divide mixture equally into two bowls.
Chocolate Layer (first step):
Add melted chocolate to mixture in one bowl, mixing thoroughly. Place in the refrigerator (this will be used again towards the end).
Rum Layer:
Add rum extract to milk mixture in remaining bowl, mixing well. Freeze until just mushy.
Once the milk/rum mixture is mushy, pour it into the chilled bowl and beat with chilled beater until mixture is smooth and creamy. Spoon into chilled mold and freeze until firm.
Pistachio Layer:
Beat 1/2 cup chilled whipping cream in a chilled bowl with a chilled beater until cream stands in peaks when beater is slowly lifted upright. Fold or beat sugar and pistachio extract into whipped cream with final few strokes until well blended. To tint whipped cream desired color, fold in green food coloring, a drop at a time (about 2 drops total). Spoon whipped cream mixture over FIRM rum ice cream. Return mold to freezer. When pistachio cream becomes firm, place the maraschino cherry on top of the cream in the center. Return to the freezer.
Almond Layer:
Beat 1/2 cup chilled whipping cream in a chilled bowl with a chilled beater until cream stands in peaks when beater is slowly lifted upright. Fold or beat the sugar, finely chopped almonds, and almond extract into the whipped cream.
Spoon whipped cream mixture over FIRM pistachio cream. Return mold to freezer.
Chocolate Layer (second and final step):
When almond cream is firm, place the chocolate ice cream mixture into the freezer. Freeze until mushy. Turn into a chilled bowl and beat with a chilled beater until mixture is smooth and creamy. Spoon mixture over FIRM almond whipped cream. Cover mold with waxed paper.
Return to freezer and freeze for 6-8 hours, or until Spumone is very firm.
to remove the mold, quickly dip the mold into warm water.
Makes 6-8 wedge-shaped servings.
Source: Same as the others!
Notes: Holy cannoli! I can't believe my grandma used to go to the trouble to make this! And wouldn't it super stink at the end if the ice cream didn't come out of the mold right?
It's fun to read this recipe though because a lot of terms have changed (I edited it to make it easier to follow in today's world). The recipe talks about setting your refrigerator control for a colder operating temperature in order to chill your bowl and beaters. It also calls the freezer the "freezing compartment" among other things.
Can you imagine what a pain this recipe would have been to make in 1955? Let alone 55 A.D.? Why did anyone go to the trouble? And did anyone have time to make dinner after spending the whole day making spumoni ice cream?
Thank goodness for ice cream makers!
Also, what's up with the single maraschino cherry smack dab in the middle of the whole thing? According to the picture in the cookbook, if you slice it just right when you serve it, you will daintily cut into the maraschino cherry and each diner will get a lovely sliver of cherry in their ice cream. But more likely, one lucky chap got the whole cherry in his piece because what are the chances that you'll cut the ice cream mold
just right so everyone gets a piece of cherry?

Above: I wonder how many spumoni molds they had to cut through to get this picture.
If you want the cherries in your ice cream, you can chop up some maraschino cherries and incorporate them into either the rum or the pistachio layers of ice cream.
Below, you will find my updated version of this recipe. Forget the mold and the chilled bowl and beaters. However, even with the updated version of the recipe, it's pretty time-consuming because you are basically making four different flavors of ice cream that you are going to put together in the end. So, unless you have four ice cream makers, you're going to have to make the ice cream in batches. But at least it's much less labor-intensive than the original recipe!
You could even combine the chocolate and rum flavors into one chocolate rum flavor and have three kinds of ice cream instead of four. That would work pretty well flavor-wise. Or, you could choose your favorites and only make three flavors of ice cream. So, if rum isn't your thing...skip it. Or, if you're not in the mood for almonds, don't make that layer. Many versions of spumoni use strawberries. You could use strawberries in place of the maraschino cherries or as a replacement for the rum or almond layers. It's up to you! Have fun with it and get creative.
Or, you could make it over the course of a few days. You could make one or two layers/flavors a day rather than doing it all in one day. But you can see more for yourself in the updated recipe below.
Spumoni Ice Cream--Updated VersionIngredients:
Base Ice Cream Recipe (used for the chocolate and rum layers/flavors):
3 cups milk
1 1/2 cups sugar
1/2 tsp salt
9 egg yolks, slightly beaten
3 cups heavy whipping cream
Chocolate Ice Cream:
1 1/2 oz. chocolate
Rum Ice Cream:
5 tsp. rum extract (or to taste--1 to 2 tsp. is probably plenty)
1/2 cup Maraschino cherries, drained and chopped, optional
Red food coloring, optional
Pistachio Ice Cream:
1 1/2 cups chilled whipping cream
3 Tbsp. sugar
1/2 tsp. pistachio extract
Green food coloring
Almond Ice Cream:
1 1/2 cups whipping cream
3 Tbsp. sugar
6 unblanched almonds, finely chopped
1/2 to 1 tsp. almond extract (1/2 tsp or 1 tsp. depending on your taste)
Directions:
Scald milk over low heat or in a double boiler. Stir in 1 1/2 cups sugar and salt.
Vigorously stir about 1/2 cup of the hot mixture into the 9 slightly beaten egg yolks. Immediately blend the egg mixture into the milk mixture in the pan or double boiler. Cook over low heat (or simmering water, if using double boiler), stirring constantly, about 5 minutes, or until mixture coats a silver spoon. Remove from heat and cool.
Meanwhile, melt chocolate and set aside.
Once the milk/egg mixture is cooled, stir in 3 cups heavy whipping cream. Divide this mixture evenly between two bowls.
Chocolate Ice Cream:
Add the melted chocolate to the mixture in one of the bowls and mix thoroughly. Freeze in an ice cream maker according to the manufacturer's instructions. Once finished, place ice cream in a freezer safe container and put in the freezer to set up. Wash the ice cream maker's canister to get it ready for the next round!
Rum/Maraschino Ice Cream:
While the chocolate ice cream is in the ice cream maker, mix the rum extract into the milk/egg mixture in the other bowl. Place in the refrigerator until your chocolate ice cream is finished. Once the chocolate ice cream is setting up in the freezer, stir the maraschino cherries into the rum/milk mixture, if you are using them (Note: if you prefer, you can mix the maraschino cherries into the pistachio ice cream mixture instead of the rum mixture). Add the red food coloring at this time, if you are using it. It is completely optional.
Freeze in an ice cream maker according to the manufacturer's instructions. Once finished, place ice cream in a freezer safe container and put in the freezer to set up. (Note: if you want to do your Spumoni in layers and the chocolate layer is already firm enough, you could spoon the rum layer directly over the chocolate layer and put it back in the freezer to set up.) Wash the ice cream maker's canister to get it ready for round three!
Pistachio Ice Cream:
While the Rum/Maraschino ice cream is in the ice cream maker, stir 1 1/2 cups whipping cream, 3 Tbsp. sugar, pistachio extract, and desired amount of green food coloring together in a bowl until well-blended. Place in the refrigerator until your rum/Maraschino ice cream is finished. Once the rum ice cream is setting up in the freezer, freeze the pistachio ice cream in an ice cream maker according to the manufacturer's instructions. Once finished, place ice cream in a freezer safe container and put in the freezer to set up. (Note: Again, if you want to do your Spumoni in layers and the rum layer is already firm enough, you could spoon the pistachio layer directly over the rum layer and put it back in the freezer to set up.) Wash the ice cream maker's canister to get it ready for the fourth and final round!
Almond Ice Cream:
While the pistachio ice cream is in the ice cream maker, stir 1 1/2 cups whipping cream, 3 Tbsp. sugar, finely chopped almonds, and almond extract together in a bowl until well-blended. Place in the refrigerator until your pistachio ice cream is finished. Once the pistachio ice cream is setting up in the freezer, freeze the almond ice cream in an ice cream maker according to the manufacturer's instructions. Once finished, place ice cream in a freezer safe container and put in the freezer to set up. (Note: Yet again, if you want to do your Spumoni in layers and the pistachio layer is already firm enough, you could spoon the almond layer directly over the pistachio layer and put it back in the freezer to set up.)
Get your husband to wash the ice cream maker's canister because you've already done it a ton of times!
Options for putting it together:
- Layered: As noted in the recipe, if the previously made layer of ice cream is already firm enough, you can spoon and freeze the next layer of ice cream directly on top of it. This would work great if you made each batch of ice cream over the course of a few days. For instance, you could make the chocolate layer on Tuesday. Then, you could make the rum layer on Wednesday. The chocolate layer would be frozen firm, so you could spoon the rum layer right on top of it and put it back in the freezer. Then, you could make the pistachio layer on Thursday and spoon it right on top of the rum layer and freeze it again. Finally, you could finish with the almond layer on Friday. you could spoon the almond layer right over the pistachio layer and pop it back in the freezer. Then you could enjoy your beautifully layered spumoni ice cream on Saturday or Sunday!
- Layered: If you are making this all in one day, once each flavor of ice cream is somewhat set up (but not frozen too hard because you will need to spoon it out of one container into another. To do so, it will need to be soft enough to be spreadable), you can alternately layer each flavor of ice cream in a freezer safe container and freeze until completely set and ready to serve. Then, when you scoop the ice cream out, you will have nice chocolate, rum, pistachio, and almond layers.
- Swirled: Once each flavor of ice cream is somewhat set up (but not frozen too hard as explained in the option above), you can gently swirl the different flavors of ice cream together with a spoon in a freezer safe container and freeze until completely set and ready to serve. The ice cream will be a swirl of brown, white, green, and pink (if you decide to use red food coloring). Then, when you scoop the ice cream out, each spoonful will be a surprise. You never know what flavors each spoonful will hold.
- Separated: Simply, you can keep all four flavors of ice cream frozen separately in separate containers. When you are ready to serve your spumoni, you can offer each person one small scoop of each kind of ice cream in their bowls.
Notes: So, yeah, maybe there's really no easy way to make this kind of ice cream! Go and buy yourself some or enjoy some after your meal at The Old Spaghetti Factory! Maybe someday when my son is off to college or if they ever come up with a cure for tree nut allergies, I'll make this decadent and delicious ice cream! Oh! I miss nuts!

Above: This picture of spumoni ice cream from The Old Spaghetti Factory was found on a blog that featured a review of the restaurant. You can read the full review here. But it looks like The Old Spaghetti Factory layers their spumoni ice cream so that when it is scooped, the different layers are visible.