Wednesday, May 30, 2012

Speaking of Names...


My last post contained two recipes that have names in the title.  This post also contains two recipes with the same name in the title...a place name.  Monte Cristo.

When I hear "Monte Cristo" it always makes me think of two things: 1) The Count of Monte Cristo (book and movie) and 2) The Blue Bayou restaurant at Disneyland.

As for The Count of Monte Cristo, in most cases a movie has a hard time beating the book.  And while I LOVE the book, there's a little too much revenge going on.  Yes, Edmond Dantes was horribly wronged.  But to wreak revenge on the second generation of his wrongdoers?  Children of his perpetrators who never did anything wrong...except be born to a parent who was a jerk and a traitor.  And that wasn't really their fault, was it?  I really think the movie tied things up perfectly.  It pinpointed the major bad guys and meted out their justice and Dantes' revenge fantastically.  But then the good guy got to end up with his love and a son to boot (not how it happens in the book...he doesn't end up with Mercedes and her son isn't his).

As for The Blue Bayou restaurant at Disneyland, I have only eaten there once.  I went with my friend, Krissy, during one of our college summer breaks.  She's from California, so I flew out to see her and we spent one of our days at Disneyland.  After riding on The Pirates of the Caribbean ride, we ate at The Blue Bayou.  I got a bronzed chicken dish that was really good and Krissy got a Monte Cristo sandwich.  It was the first time I had ever seen or heard of such a sandwich.  I remember being very intrigued by the combination of sweet and salty.  A traditional Monte Cristo sandwich is kind of like French toast with sweet and savory sandwich fillings.  Egg battered and pan-fried bread with sliced ham, turkey, raspberry or strawberry jam and sprinkled with powdered sugar.  And do you know what?  I love it.  It's great!  There are variations, of course.  Some versions only use ham, not ham and turkey.  Some versions use maple syrup instead of the jam.  Some versions skip the sweet syrup and jam in place of Dijon mustard.  It really can be tailored to suit your tastes.

So if the sweet and salty bit isn't your thing, you can skip the jam and replace it with Dijon mustard and omit the powdered sugar.  But as for me, I'll eat it the traditional way!

I'm going to share two versions today.  Neither are the traditional version...but you can find a pretty faithful version of the recipe here.  Here's another traditional version.  I wanted to try one or more of these versions, but then I discovered that my younger son is allergic to eggs (unless they've been baked at 350 degrees F for 20 minutes)...so there went that idea!  Hopefully he grows out of that allergy!

The first variation I'm sharing uses puff pastry and there's nothing wrong with that!  Yum.  The second version is a little more homey and it uses Bisquick and it's more like a casserole than a sandwich.  But it still works!

Oh, and here's your fun-fact for the day.  Monte Cristo sandwiches originated in California in the mid-1900's.  So, without further ado...


Monte Cristo Sandwiches

Ingredients:

1 egg
1 tbsp water
all-purpose flour
1/2 of a 17.3 ounce package Pepperidge Farm Puff Pastry Sheets (1 sheet), thawed
8 thin slices deli Black Forest ham
4 slices deli Swiss cheese
Confectioners' sugar
Pure maple syrup

Directions:

Heat the oven to 400 degrees F.  Beat the egg and water in a small bowl with a fork.

Sprinkle the flour on the work surface.  Unfold the pastry sheet on the work surface.  Roll the pastry sheet into a 12-inch square.  Cut into 4 (6-inch) squares.  Brush the edges of the pastries with the egg mixture.

With a corner of 1 pastry facing you, place 2 slices ham and 1 slice cheese on the bottom half of the pastry.  Fold the pastry over the filling to form a triangle and press the edges to seal.  Crimp the edges with a fork.  Repeat with the remaining pastries.  Brush the pastries with the egg mixture.  Place the pastries onto a baking sheet.

Bake for 20 minutes or until the pastries are golden brown.  Sprinkle the pastries with the confectioners' sugar.  Serve with the maple syrup.

Easy Substitution: For a savory twist, serve with Dijon-style mustard instead of the maple syrup.

Makes 4 servings.


Source: Puff Pastry website.  Found here.

Notes: I used thick slices of ham (pretty much because I made this recipe at the time to use up some of my leftover ham).  I used turkey as well.  I cut my Puff Pastry into smaller squares to make smaller portions, but I wouldn't do that in the future.  I would stick with one pastry sheet equaling four servings because otherwise, it's too small.  Yes, Puff Pastry is pretty high in calories, but you'll want to splurge this time because otherwise you'll feel like you're eating an appetizer for your entire dinner and you will still be hungry.

I skipped the egg since my younger son is allergic to egg.  Instead, I sprayed the finished sandwich pockets with cooking spray to help it brown.

And instead of the maple syrup, I used strawberry jam.  My husband opted for the Dijon mustard.

The roasted ham worked just as well as the deli ham would have in this recipe.  So, you can go either way!


Monte Cristo Delights

Ingredients:

2 cups Bisquick Heart Smart mix
3/4 cup fat-free (skim) milk
1 egg or 1/4 cup fat-free egg product
5 oz reduced-fat Swiss cheese, thinly sliced
6 oz deli-style lean or fat-free ham or turkey ham, very thinly sliced
6 oz deli-style lean or fat-free turkey, very thinly sliced
1/3 cup strawberry or raspberry spreadable fruit
Powdered sugar

Directions:

Heat oven to 400 degrees F.  Lightly grease 8-inch square (2-quart) glass baking dish, or spray with cooking spray.  In medium bowl, stir Bisquick mix, milk, and egg until blended.

Spread half of the dough in bottom of baking dish.  Top with half each of the cheese, ham, and turkey.  Spread spreadable fruit over turkey to within 1/2 inch sides of dish.  Top with remaining ham, turkey, and cheese.  Spread remaining dough over cheese to sides of dish.

Bake uncovered about 30 minutes or until golden brown.  Let stand 5 minutes before serving.  Sprinkle generously with powdered sugar.  Serve warm.

Makes 6 servings.

Nutrition information: 1 serving is 320 calories, 7 g fat, 75 mg cholesterol, 1290 mg sodium, 43 g carbohydrate, 1 g dietary fiber, 16 g sugars, 22 g protein.

Source: Betty Crocker.  Here's a version if you just want to make this for two people instead of six.

Notes: I would test it with a knife before serving because sometimes the top is nice and browned, but the inside of the Bisquick is still a little doughy.

Also, I have made this a handful of times and the deli ham works much better than the thick-sliced ham.  I wouldn't substitute your roast ham leftovers in this dish.

One final note, from time to time, I have accidentally misjudged how much Bisquick to put on the bottom layer so that there is still enough to spread over the top.  If you do this, just whip up a smaller batch of the top Bisquick layer (1 cup Bisquick, 1/3 cup skim milk, and one egg).  Spread enough (or all) of the extra Bisquick mixture to evenly cover the top layer.

Tuesday, May 29, 2012

What's in a Name?


I think everyone who cooks for their family is familiar with the question "What's for dinner?"  Well, my husband asks this question a lot.  Mostly because he tends to forget the answer quite frequently.

Recently, my husband kept asking what was for dinner and for some reason (and this wasn't planned), the dishes we were having were named after people and places.  Chicken Diane, Quiche Lorraine, and Potatoes Anna.  My husband then asked me "What's with all of these foods with women's names?  I can't keep them straight!"

Then it got me thinking about foods that were named after people and places and why.  I found this handy (and quite extensive) list: List of Foods Named After People.  It's kind of fun to browse through.  It has some fun facts as well.  Many people are aware that sandwiches are named after The Earl of Sandwich.  However, they were around a long time before he was.  However, he made them popular because he liked to eat them while he played card games.  He could eat and play at the same time and thus his games weren't interrupted.

Some fantastic foods are named after people.  Beef Wellington, Napoleons, Eggs Benedict, just to name a few.

I'll have to revisit this blog subject many additional times in the future with other recipes inspired by names.  But today, I'll just do the ones that my husband was teasing me about.  I had already posted the recipe for Chicken Diane (which you can find here).  So, I'll share the recipes for Quiche Lorraine and Potatoes Anna tonight.

Quiche Lorraine is not named after a woman, but after the Lorraine region in France.

Potatoes Anna or Pommes Anna is a dish of sliced potatoes that was created and named by French chef Adolphe Duglere for the 19th-century courtesan/actress Anna Deslions.  Both of these dishes are great no matter who or what they are named after!


Quiche Lorraine

Ingredients:

Pastry:

1 cup Gold Medal all-purpose flour
1/4 teaspoon salt
1/3 cup plus 1 tablespoon shortening
2-3 tablespoons cold water

Filling:

8 slices bacon, crisply cooked, crumbled (1/2 cup)
1 cup shredded Swiss cheese (4 oz)
1/3 cup finely chopped onion
4 large eggs
2 cups whipping cream or half-and-half
1/4 teaspoon salt
1/4 teaspoon pepper
1/8 teaspoon ground red pepper (cayenne)

Directions:

In medium bowl, mix flour and salt.  Cut in shortening, using pastry blender (or pulling 2 table knives through ingredients in opposite directions), until particles are size of small peas.  Sprinkle with cold water, 1 tablespoon at a time, tossing with fork until all flour is moistened and pastry almost cleans side of bowl (1-2 teaspoons more water can be added if necessary).

Gather pastry into a ball.  Shape into flattened round on lightly floured surface.  Wrap in plastic wrap; refrigerate about 45 minutes or until dough is firm and cold, yet pliable.  This allows the shortening to become slightly firm, which helps make the baked pastry more flaky.  If refrigerated longer, let pastry soften slightly before rolling.

Heat oven to 425 degrees F.  With floured rolling pin, roll pastry into round 2 inches larger than upside-down 9-inch quiche dish or glass pie plate.  Fold pastry into fourths; place in quiche dish.  Unfold and ease into dish, pressing firmly against bottom and side.  Trim overhanging edge of pastry 1 inch from rim of pie plate.  Fold and roll pastry under, even with plate; flute as desired.

Carefully line pastry with a double thickness of foil, gently pressing foil to bottom and side of pastry.  Let foil extend over edge to prevent excessive browning.  Bake 10 minutes.  Carefully remove foil and bake 2-4 minutes longer or until pastry just begins to brown and has become set.  If crust bubbles, gently push bubbles down with back of spoon.

Reduce oven temperature to 325 degrees F.  Sprinkle bacon, cheese, and onion in pie crust.  In medium bowl, beat eggs slightly; beat in remaining filling ingredients.  Pour into quiche dish.

Bake 45-50 minutes or until knife inserted in center comes out clean.  Let stand 10 minutes before serving.

Source: Betty Crocker recipe found here.

Notes: The recipe mentions that if you don't have time to make your own crust, you can use a ready-to-go refrigerated or frozen pie crust.  And that's just what I did!  I got a Marie Callendar pie crust and followed the package's instructions for baking a quiche.  And do you know what?  It saves something like 200 calories per serving.  So, it saves you time and calories.  Win/win!


Potatoes Anna

Ingredients:

6 medium russet potatoes (2 3/4 pounds total), peeled
6 tablespoons butter, melted
Coarse salt and ground pepper

Directions:

Preheat oven to 450 degrees.  Using a food processor with a slicing blade or a sharp knife, slice potatoes as thinly as possible, 1/4 inch thick or thinner.  (Do not place sliced potatoes in water; the starch is needed to bind the layers.)

Brush bottom of a 10-inch cast-iron skillet with 1 1/2 tablespoons butter.  Starting in center of pan, arrange potato slices, slightly overlapping, in circular pattern, covering surface.  Brush with another 1 1/2 tablespoons butter; season well with salt and pepper.  Repeat for two more layers.

Place over high heat until butter in pan sizzles, 2-4 minutes.

Transfer to oven; bake until potatoes are fork-tender, about 1 hour.  Remove from oven.  Run a small spatula around edges of potatoes; slide large spatula underneath potatoes to loosen.  Carefully invert onto a plate, and cut into wedges.

Recipe Note: Brushing each layer with butter and seasoning with salt and pepper creates a delicious buttery flavor throughout.

Source: Martha Stewart recipe found here.

Notes: I used my mandolin to slice the potatoes.  My potatoes only took 45 minutes to cook, so watch them carefully!

I'm Stuffed!


Well, there's nothing quite like Thanksgiving dinner.  It's rich and delicious.  But it's also a lot of work.  A few months after Thanksgiving has passed, the turkey/gravy/stuffing combination starts to sound really good again.  But I'm not about to put in that kind of work for dinner very many times a year.

That's when shortcuts come in handy.  And believe me, the following two recipes are easy shortcut recipes for sure.

Both recipes combine the flavors of Thanksgiving dinner, but they are both far easier to put together.  You can even add more of the festive spirit by slaving away and rolling up your sleeves to prepare some instant mashed potatoes to go with them!

So, if you're craving Thanksgiving dinner comfort food, but without the work, look no further.


Chicken & Stuffing Skillet

Ingredients:

1 tablespoon butter
4 skinless, boneless chicken breast halves (about 1 pound)
1 box (6 ounces) Pepperidge Farm One Step Stuffing Chicken Mix
1 can (10 3/4 ounces) Campbell's Condensed Cream of Chicken Soup (Regular or 98% Fat Free)
1/2 cup milk
1/2 cup shredded Cheddar cheese

Directions:

Heat the butter in a 10-inch skillet over medium-high heat.  Add the chicken and cook for 15 minutes or until it's well browned on both sides and cooked through.  Remove the chicken from the skillet.

Prepare the stuffing in the skillet according to the package directions except let stand for 2 minutes.

Place the chicken on the stuffing.  Stir the soup and milk in a small bowl.  Pour the soup mixture over the chicken.  Top with the cheese.  Cover and cook until the cheese is melted.


Recipe Notes: You can also substitute Cream of Celery or Cream of Mushroom Soup for the Cream of Chicken Soup.

Source: Campbell's Kitchen http://www.campbellskitchen.com/RecipeDetail.aspx?recipeId=25783&ref=%2fSearchRecipesResult.aspx%3fq%3dchicken%2b%2526%2bstuffing%2bskillet%26filter%3d

Notes: I made this with Cream of Mushroom soup.  But otherwise, I followed the recipe as written.

Crockpot Creamy Herbed Chicken and Stuffing

Ingredients:

6 boneless, skinless chicken breasts

6 slices Swiss cheese
1 can (10.75 ounce) low sodium cream of mushroom soup
¼ cup 2% milk
2 cups herbed stuffing mix
½ cup low sodium chicken broth

Directions:

Coat crockpot with cooking spray.  Arrange chicken breasts.  Top with Swiss cheese layering if necessary.  Combine soup and milk.  Spoon over cheese layer.  Top with stuffing mix.  Drizzle broth onto stuffing.  Cook on low heat for 8-10 hours or on high for 4-6 hours. 

6 servings.

370 calories, 15 grams of fat, 2 grams of fiber.

Source: I'm not sure where this one comes from.  It is one that my Mom has been making for awhile now.

A Little Change of Pace--Sandwich-Style


When it comes to sandwiches, I usually make them of the deli variety, the pulled meat variety, or the chicken breast variety.  However, when I saw this recipe, I knew I needed to try it.  First of all, my husband adores arugula.  So, I knew he would like this a lot.  Second, I had some pork chops in my freezer that I wanted to use up.

The only drawback?  It's not exactly kid-friendly.  For some reason, this didn't really occur to me until I was in the middle of making them.  So, I had to cut it into little bits for my boys.  My younger boy (who eats everything) gobbled it up and my older boy (the pickiest eater alive) only ate the ciabbata bread dipped in marinara.  But it's a rare thing for him to eat most of the things I make!  Oh, and I had to slightly change the preparation of the pork since my younger son is allergic to eggs (I will include my changes in the notes of the recipe below).  So, there you have it.  You do what you can as a mom!


Italian Pork Sandwiches

Ingredients:

1/4 cup all-purpose flour
1 large egg, lightly beaten
1/2 cup dried breadcrumbs
Coarse salt and ground pepper
4 pork cutlets (3/4 pound total)
1/4 cup vegetable oil
4 ounces fresh mozzarella, sliced
4 ciabatta or Portuguese rolls
1 cup marinara, warmed
2 cups arugula

Directions:

Place flour, egg, and breadcrumbs in separate shallow dishes.  Season flour and breadcrumbs with salt and pepper.  Coat pork in flour, shaking off excess, dip in egg, then coat with breadcrumbs, pressing to adhere.  Place pork on a wire rack set in a rimmed baking sheet.

Heat broiler.  In a large skillet, heat oil over medium-high.  In 2 batches, cook pork until deep golden brown, about 3 minutes, flipping halfway through.  Line rack with paper towels.  Transfer pork to towels and let drain 1 minute.  Top pork with cheese, place on sheet, and broil until cheese is melted, 1 minute.  Divide among rolls and top with marinara and arugula.

Recipe notes: This breading method relies on layers: The flour helps the egg adhere to the meat and the breadcrumbs cling to the egg.  It's ideal for pan-frying thin cuts of pork or chicken--a flavorful crust forms as the meat cooks through.

Source: Martha Stewart Everyday Food recipe. http://www.marthastewart.com/897478/italian-pork-sandwiches

Notes: As mentioned in my explanation above, I couldn't use the egg because of my son's egg allergy.  So, I skipped the egg and flour entirely and just coated the pork in bread crumbs by placing the bread crumbs in a bowl and patting the pork into the crumbs.  It adhered just fine.

I used thick pork chops which I sliced in half lengthwise to make my own pork cutlets.  It worked great.  I also used Italian-style breadcrumbs for a little more flavor to make up for the lack of egg and flour in the crust.  It tasted delicious and I didn't miss a thing taste-wise.

I also didn't use fresh mozzarella.  That would have been delicious--but I used what I already had on hand.  Shredded mozzarella cheese.  And it still tasted great.

Finally, my grocery bakery didn't have ciabbata rolls--only ciabbata loaves.  So, we just placed all of the toppings onto the loaf and cut the loaf into our desired sandwich size with a bread knife.  Delicious!

Something Old and Something New


So, recently I decided to try something new...or something old...

Let me explain.  I had seen a ton of recipes calling for herbes de Provence.  It was a spice blend I had never tried before.  Even though it had been around forever.  So, it was both old (since it wasn't a new thing) and new (since it was new to me).

And do you know what?  It's good to try new things!  Even when it's really an old thing!  Or especially when it's a good thing!  Because for the most part, it's the really good things that stick around for ages and the things that aren't worth it tend to just fade away.  And there's a reason that herbes de Provence has been around for a long time!  It's really tasty!

I tried a very easy, pantry-friendly chicken recipe.  You can easily keep all of the ingredients on-hand.  It was so flavorful and so good.  I think you'll like it...scratch that...I think you'll love it!


Chicken with Provencal Sauce

Ingredients:

4 (6-ounce) skinless, boneless chicken breast halves
1/4 teaspoon salt
1/4 teaspoon freshly ground black pepper
1 1/2 tablespoons olive oil
1 garlic clove, minced
1 cup fat-free, less-sodium chicken broth
1 1/2 teaspoons dried herbes de Provence
1 teaspoon butter
1 teaspoon fresh lemon juice
Fresh thyme sprigs (optional)

Directions:

Place each chicken breast half between 2 sheets of heavy-duty plastic wrap; pound to 1/2-inch thickness using a meat mallet or rolling pin.  Sprinkle chicken evenly with salt and pepper.

Heat oil in a large nonstick skillet over medium heat.  Add chicken; cook 6 minutes on each side or until done.  Remove chicken from pan; keep warm.

Add garlic to pan; cook 1 minute, stirring constantly.  Add broth and herbes de Provence; bring to a boil, scraping pan to loosen browned bits.  Cook until broth mixture is reduced to 1/2 cup (about 3 minutes).  Remove from heat; add butter and lemon juice, stirring until butter melts.  Serve sauce over chicken.  Garnish with thyme springs, if desired.

Recipe Note: a heady combination of dried basil, thyme, marjoram, rosemary, lavendar, and sage, herbed de Provence is a classic French seasoning.  Try it in other Mediterranean dishes, such as pasta sauce or baked black olives.

Source: Cooking Light, January 2005, Cheryl Alters Jamison and Bill Jamison. You can find it here.

Notes: I mixed all sauce ingredients together and added it all at once directly to the pan (without removing the chicken).  It would work fine as the recipe states.  But I tend to have bad luck with pan sauces for some reason and this is the method that works best for me!  We served the sauce in little dipping cups and dipped our chicken in it as we ate it.  It was really delicious!

Easy Come, Easy Go


Now, when I say "easy come, easy go," I mean that these recipes will be so easy to make and they will disappear just as easily.

Recently I found two recipes that I was tempted to try simply because they had so few ingredients and they were so easy to make.

As a mom, I'm always looking for easy recipes.  Some easy recipes sound too good to be true.  Some of them don't measure up once you're done...they really were too good to be true.  But every now and then, you'll find a recipe that is good and true to its word!

This time around, I found two of those recipes!

Cheesy Bean Enchiladas and Famous Queso.  My husband and oldest son love queso and tortilla chips.  And I figured that the enchiladas sounded pretty kid-friendly, so I gave it a try.  Basically, easiest recipes ever and a very pleasant outcome.  Both are Kraft recipes.  I hope you like them!


Cheesy Bean Enchiladas (original recipe)

Ingredients:

1 can (16 oz) Taco Bell Home Originals Refried Beans
1 jar (16 oz) Taco Bell Home Originals Thick 'N Chunky Salsa, divided
1 pkg. (8 oz) Kraft Shredded Sharp Cheddar Cheese, Divided
1/4 cup chopped onion
8 flour tortillas (6 inch)

Directions:

Preheat oven to 350 degrees F.  Mix beans, 1/2 cup of the salsa, 1 cup of the cheese, and the onion until well-blended.

Spread remaining 1 cup salsa onto bottom of 13x9 inch baking dish.  Spoon 1/4 cup of the bean mixture down center of each tortilla; roll up.  Place, seam sides down, over salsa in baking dish.  Top with the remaining salsa and cheese.

Bake 20 minutes or until heated through.

Recipe Notes: Prepare as directed, except for baking.  Cover and refrigerate up to 12 hours.  When ready to serve, bake, uncovered at 350 degrees F for 30 minutes or until heated through.  You may also substitute green onion slices for the chopped onion.

Nutrition information (2 enchiladas per serving): 580 calories, 25 g fat, 13 g saturated fat, 55 mg cholesterol, 2130 mg sodium, 53 g carbohydrate, 8 g dietary fiber, 6 g sugar, 24 g protein.

Source: Kraftrecipes.com http://www.kraftrecipes.com/recipes/cheesy-bean-enchiladas-57263.aspx

Cheesy Bean Enchiladas (my version)

Ingredients:

2 cans Rosarita No Fat Refried Beans
4 cups salsa, divided
1 1/2 cups sharp cheddar cheese, shredded
12 uncooked flour tortillas (I used Tortilla Land brand)

Directions:

Lightly brown flour tortillas according to package instructions.

Preheat oven to 350 degrees F.

Mix beans, 1 cup of salsa, and 1/2 cup cheese until well blended.

Spread 1 cup salsa evenly onto bottom of 13x9-inch baking dish.  Spoon 1/3 cup of the bean mixture down center of each tortilla; roll up.  Place, seam sides down, over salsa in baking dish.  Top with the remaining salsa and cheese.

Bake 20 minutes or until heated through.

Nutrition information: 307 calories per enchilada.

Source: Kraftrecipes.com http://www.kraftrecipes.com/recipes/cheesy-bean-enchiladas-57263.aspx

Notes: I didn't know if just one can of refried beans would be substantial enough for my whole family, so I doubled it and I increased the salsa.  I omitted the onion because the salsa already had onions in it and I felt like it was unecessary--especially for only 1/4 cup.  I decreased the cheese.  In the future, I would probably use a Colby-Monterey Jack blend instead because I felt like the sharp cheddar cheese didn't melt as well.  But these had a great flavor and they were really kid-friendly.  But they are universal enough that adults will like them too.  You can top them with some sour cream, cilantro, additional salsa, and hot sauce, if you like.


Famous Queso Dip

Ingredients:

1 lb. (16 oz) Velveeta, cut into 1/2 inch cubes
1 can (10 oz) Ro*Tel Diced Tomatoes and Green Chilies, undrained

Directions:

Mix ingredients in a 2-qt. microwaveable bowl.

Microwave on high 5 min. or until Velveeta is completely melted, stirring after 3 min.

Makes 24 servings (2 tbsp. per serving).

Nutrition information: 60 calories, 4 g fat, 15 mg cholesterol, 330 mg sodium, 2 g carbohydrate, 0 g dietary fiber, 2 g sugar, 3 g protein,

Source: Kraftrecipes.com http://www.kraftrecipes.com/recipes/famous-queso-dip-51301.aspx

Notes: Seriously, it's as easy as that.  And it will be pretty much the best traditional queso you've ever had.  You can also use Queso Blanco Velveeta Cheese (which is what I used) or Mild Mexican Velveeta with Jalapeno Peppers in place of the regular Velveeta.

Thursday, May 10, 2012

Cinco de Mayo Celebrations!


I've mentioned this before, but I'll say it again.  My two favorite ethnic foods to make at home are Mexican and Italian dishes.  They are the easiest to recreate authentically.  Sure, it's still possible to recreate Chinese, Thai, and Indian food, but they are often very ingredient heavy (thus, the many layers of flavor that are evident)...and how often do you happen to have fresh lemon grass on hand?  Besides that, now that my oldest son is also allergic to coconuts, that pretty much cuts out most homemade Thai food for me.  I'll have to get my coconut and nut fix on date nights (when there's actually time for that...ha!).

So, in anticipation of Cinco de Mayo, I planned many Mexican dinners.  I will tell you this, there is nothing better than a dinner that you have high hopes for that turns out even better than expected.  And there's nothing worse than dinner that is bland when you thought it was going to be bursting with flavor.  I tried a chicken tortilla soup recipe that I have literally been meaning to try for at least three years now.  For one reason or another, it just kept being pushed onto the back burner.  This time around, I was going to make sure that it happened no matter what.  For how simple the recipe sounded, it was surprisingly time-consuming.  It was a Martha Stewart recipe.

Martha Stewart has rarely failed me, but there have been 3 or 4 instances where I have been less than impressed.  It was a recipe that was light on the spices, but often, I have been surprised by how simple recipes and ingredients allow the basic flavors of the dish to shine through.  I thought it was going to be like that.  But it was bland.  Bland, bland, bland, bland, bland.  So, I was disappointed with that one because I was hoping for more.  But the idea is a good one.  It was a basic broth with chicken.  That was it...but to that, you added whatever soup toppings you wanted.  I mean, it was the soup version of a potato bar or salad bar.  Take a crowd pleaser and allow your diners to dress it up to please their individual tastes.  Perfect idea for a dinner party!  Well, I'm glad I tried it before presenting it to guests at a dinner party--because it wasn't guest-worthy.  But I still like the idea.  So, I'm going to have to tinker with the idea and dress up the broth so that it is more flavorful.  If you have a good base, the toppings will shine through even better.  So, that's my chicken tortilla soup assignment.  I'm going to create a great broth/base so that I can realize my dream of a successful and delicious tortilla soup bar.  :)  Coming soon to a blog near you.  (Also coming soon, some Mexican-style bread recipes that work wonderfully as sides for your favorite Mexican foods--expect that blog in the next few days).

Luckily though, the soup was the only true dud--though I did have one other partial dud.  Though I intended to, I will not be including any Mexican dessert recipes this time.  I made some flan.  It tasted fantastic...but I screwed up on the caramelized sugar, so it didn't come out of the ramekin very smoothly, and as a result, it turned out ugly.  I don't think it was an error in the recipe--rather, it was an operator error (yes, I make mistakes).  So, I'm going to have to try to perfect my flan-making skills and see if that's the best recipe or if there's one that works a little better before I commit it to our blog.  I don't want to share mediocre recipes here or pretend that something was fantastic and flawless when it was not!

But let's move past my failures!  I made a number of other delicious and delightful Mexican dinners and accompaniments which I am going to share with you today.  Oh, and not to toot my own horn or anything, but I created my very own recipe for chicken enchiladas and I'm not going to lie...it was GOOD.  I was so proud of myself!  I kept trying to find a recipe that would match what I wanted to accomplish, and I really couldn't find it...so I combined some ideas and made up my own recipe.  I used a green enchilada sauce recipe from Our Best Bites, but the rest was all my idea.  It was sooo delicious!  I will be making that one for years to come.  So, enjoy some lovely enchiladas among many other yummy Mexican selections below!


Green Chile Chicken Enchiladas

Ingredients:

12 tortillas (8-10 inch tortillas--I used the uncooked tortillas that you cook yourself over the stovetop)
1 can cream of chicken soup
1 cup sour cream (I used light sour cream)
1 1/2-2 lbs. shredded or cubed cooked chicken breasts
2 cups salsa verde
2 teaspoons ground cumin
1 1/2-2 cups shredded Monterey Jack cheese
3-4 cups green enchilada sauce, canned or homemade (recipe below)

Directions:

Poach chicken and shred or cube it. 

Mix together cream of chicken soup, sour cream, chicken, salsa verde, ground cumin, and 3/4-1 cup of Monterey Jack cheese.

If using uncooked tortillas, cook them in a pan over the stovetop.  Otherwise, wrap the tortillas in a slightly damp paper towel and microwave them for 30 seconds to a minute (or until they are warm and pliable).

Preheat oven to 350 degrees.

Spread about 1 cup of green enchilada sauce on the bottom of a 9x13 inch baking dish. 

Fill each tortilla with 3-4 tbsp of the chicken mixture.  Roll up and place in the baking dish.

If you have any of the chicken mixture left over after filling the tortillas (I did), spread it evenly over the top of all of the enchiladas.  Then spread 2-3 cups of green enchilada sauce evenly over the top of your enchiladas.

Sprinkle with remaining Monterey Jack cheese and bake for 45-60 minutes or until the cheese is nicely melted and the enchiladas are warm and bubbly.

Makes 12 servings.

Source: Again, this one came from my own mind.

Notes: As mentioned above, I used a homemade recipe for the green enchilada sauce which I found on Our Best Bites (an awesome food blog).  This enchilada sauce recipe makes a TON!  Probably double what you will need for my recipe.  But it freezes well and can be used as a dip for tortilla chips, or a sauce for tacos, burritos, or tostadas in addition to enchiladas.


Green Enchilada Sauce (Kate's Knockoff Cafe Rio Recipe)

Ingredients:

2-3 tbsp extra-virgin olive oil
1 large onion, minced
5-6 cloves garlic, minced or pressed
2 green peppers, chopped
1-2 jalapenos, seeded and membranes removed for less heat, if desired
1 1/2 lb. tomatillos, husked and quartered or halved
1/2 bunch cilantro, coarsely chopped
1 1/2 tsp salt
1/4 tsp black pepper
1 1/2 tsp cumin
4 cups chicken broth
2-3 tbsp sugar (optional and to taste)

Directions:

in a large saucepan or stock pot, heat olive oil over medium heat.  Saute onions and garlic until tender and fragrant.

While onions are sauteeing, combine tomatillos, green peppers, jalapeno peppers, and cilantro in your blender.  Process until smooth; you may have to do it in batches and/or add some chicken broth to make things blendable.

Pour the tomatillo mixture over the onions and garlic and add chicken broth, salt, pepper, and cumin.  Simmer 15 minutes-1 hour, depending on the consistency you want.  You can increase the heat to high and boil it uncovered to speed up the process.  Or, you can simmer the sauce in a slow cooker all day, if you prefer that method.

Source: Our Best Bites

Notes: This was fantastic.  It makes a ton, so be prepared to freeze some of it.  It is super easy to make because you pretty much just throw everything in a blender and then let it cook on the stove.  You can also decide how chunky or smooth you want your sauce to be and blend it accordingly.  I kept mine a little chunkier.


Above: I made these again in 2013, but I used canned green enchilada sauce. While I prefer the homemade sauce, these still tasted great. If you use the canned enchilada sauce, you can add a little sugar, to taste so that it is more similar to the homemade green enchilada sauce. If not, it will be saltier and spicier. Just do whatever is your preference!


Mexican-Style Shredded Beef

Ingredients:

1 boneless beef chuck shoulder roast (about 3 pounds)
1 tablespoon ground cumin
1 tablespoon ground coriander
1 tablespoon chili powder
1 teaspoon salt
1/2 teaspoon ground red pepper
1 cup salsa or picante sauce
2 tablespoons water
1 tablespoon cornstarch
Taco shells

Directions:

Place roast in slow cooker.  Combine cumin, coriander, chili powder, salt, and red pepper in a small bowl.  Place beef in slow cooker.  Pour spices over beef and top with salsa.

Cover; cook on low 8-10 hours or until meat is tender.

Remove beef from slow cooker.  Trim and discard excess fat from beef.  Shred meat with two forks.

Let cooking liquid stand 5 minutes to allow fat to rise.  Skim off fat.  Blend water and cornstarch until smooth.  whisk into liquid in slow cooker.  Cook, uncovered, 15 minutes on High until thickened.  Return beef to slow cooker.  Cover; cook 15-30 minutes or until hot.  Adjust seasonings.

Serve as meat filling for tacos, fajitas, enchiladas, quesadillas, or burritos.  Leftover beef may be refrigerated up to 3 days or frozen up to 3 months.

Source: This recipe came from a cookbook called "Simple 1-2-3 One Dish" ISBN-13: 978-1-4127-2323-7

Notes: This had such a great flavor.  It was really flavorful, but not too spicy.  I used it as a burrito filling.  I filled the burritos with this beef, some rice, beans, and corn.  Yum!


Above: This is how I served it for my little ones.  :)


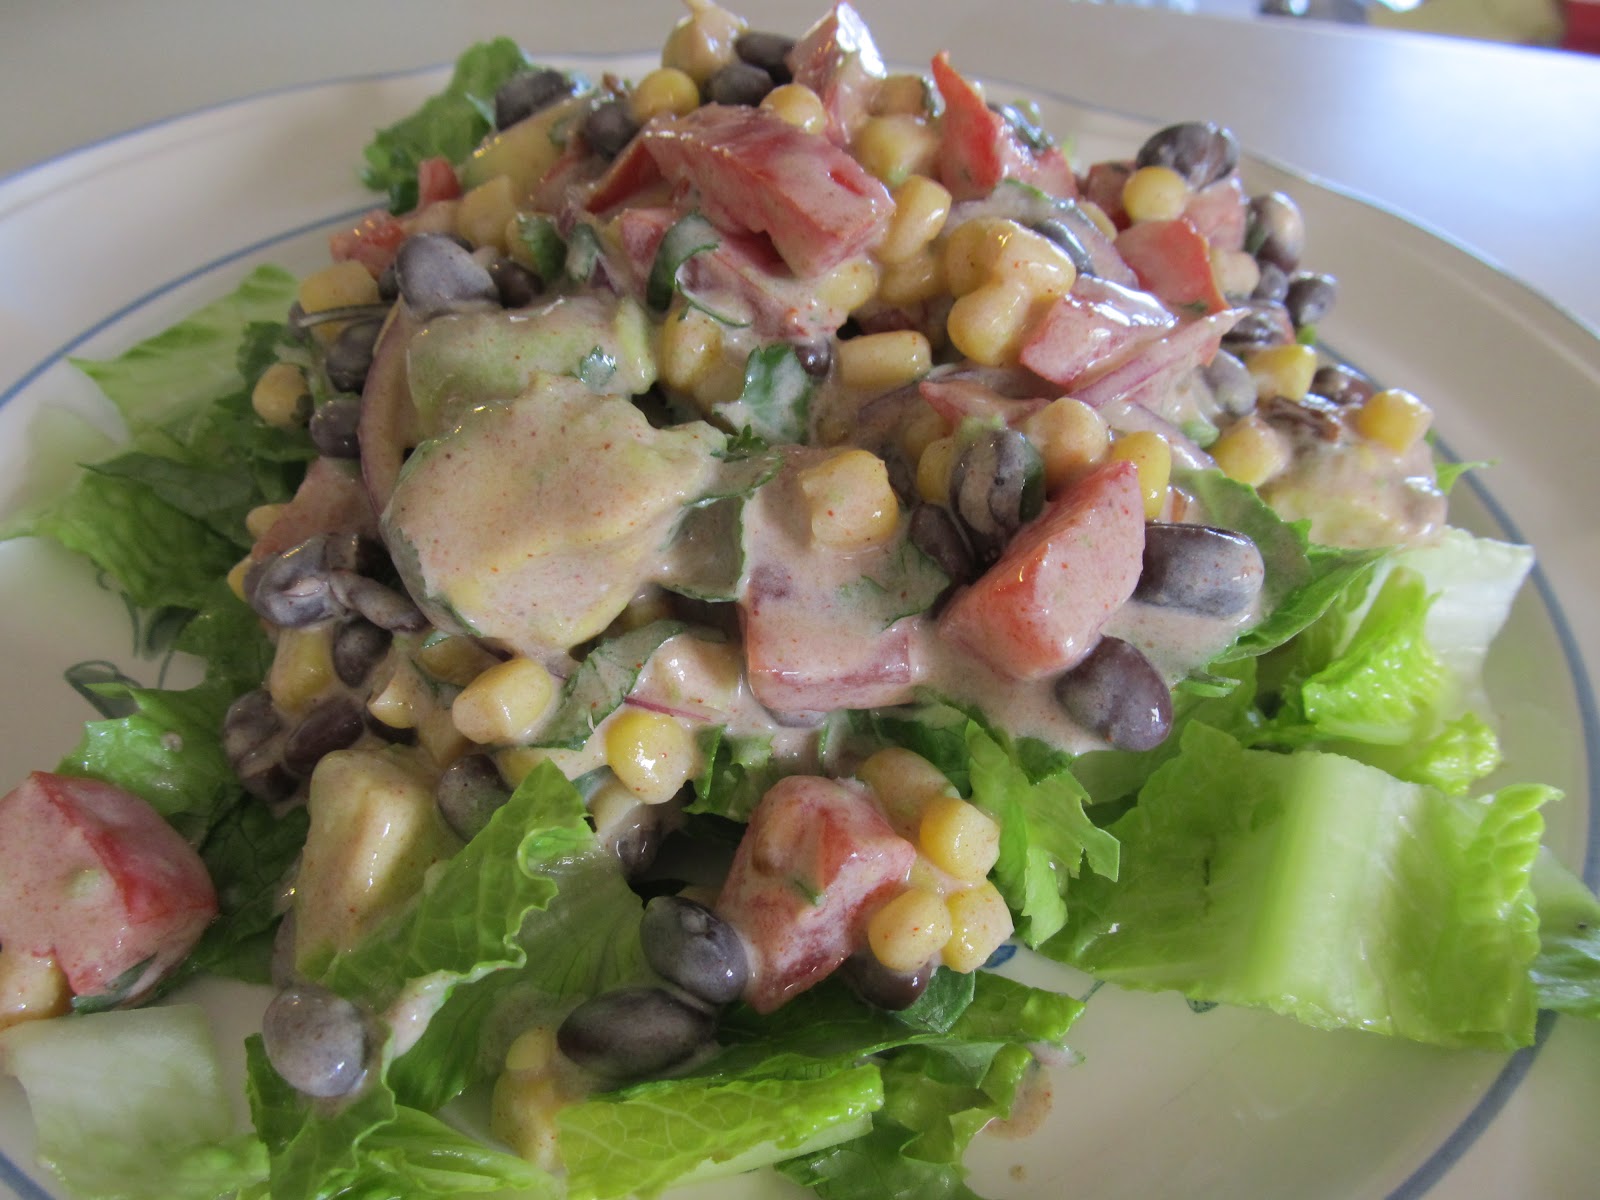
Chipotle Chicken Taco Salad

Ingredients:

Dressing:

1/3 cup chopped fresh cilantro
2/3 cup light sour cream
1 tablespoon minced chipotle chile, canned in adobo sauce
1 teaspoon ground cumin
1 teaspoon chili powder
4 teaspoons fresh lime juice
1/4 teaspoon salt

Salad:

4 cups shredded romaine lettuce
2 cups chopped roasted skinless, boneless chicken breasts (about 2 breasts)
1 cup cherry tomatoes, halved
1/2 cup diced peeled avocado
1/3 cup thinly vertically sliced red onion
1 (15 ounce) can black beans, rinsed and drained
1 (8 3/4 ounce) can no-salt-added whole-kernel corn, rinsed and drained

Directions:

To prepare dressing, combine first 7 ingredients, stirring well.

To prepare salad, combine lettuce and remaining ingredients in a large bowl.  Drizzle dressing over salad; toss gently to coat.  Serve immediately.

Tip: Add a spoonful of adobo sauce for a spicier salad.  Kidney or pinto beans also taste great in this dish.

4 servings (serving size: 2 1/2 cups)

Nutrition information: 249 calories, 8.2 g fat, 23.3 g protein, 25.1 g carbohydrate, 7 g fiber, 50 mg choelsterol, 2.2 mg iron, 650 mg sodium, 106 mg calcium.

Source: Cooking Light, August 2006 (and available on MyRecipes.com)

Notes: I've made this recipe as written a few times before.  It is wonderful.  This time around (as pictured), I made the recipe without chicken and with diced tomatoes instead of the grape tomatoes.  I wanted to lighten it up even more (since I'd already blown my calories for the day!) and I had accidentally used the last of my grape tomatoes the day before.

If you are going to eat the entire salad within the day of preparation, I would suggest tossing the dressing mixture with the lettuce.  However, if you aren't going to eat it within the same day (as my family wasn't able to), I would suggest topping the lettuce with the dressing mixture.  If you toss it, the moisture in the dressing mixture will wilt the lettuce and the entire salad will be no good the next day.  But if you add the dressing mixture to the lettuce each time you eat, it can last 2-4 days.


Santa Fe Chicken

Ingredients:

2 cups instant white rice, uncooked
1 can (15 oz.) black beans, rinsed
1 yellow pepper, chopped
1 can (10 1/2 oz) condensed cream of chicken soup
2 cups water
1/4 cup chopped fresh cilantro
4 small boneless skinless chicken breast halves (1 lb.)
1/2 cup Taco Bell Home Originals Thick 'N Chunky Salsa
1 container Philadelphia Cooking Creme Santa Fe blend (my addition--see notes for substitution)
1 cup Kraft Mexican Style Finely Shredded Four Cheese

Directions:

Heat oven to 400 degrees F.

Combine rice, beans, and peppers in 13x9-inch baking dish.  Mix soup, water, and cilantro; pour over rice mixture.

Top with chicken, salsa, and Santa Fe Cooking Creme.

Bake 45 minutes or until chicken is done (165 degrees F), topping with cheese for the last 10 minutes.

Recipe Tip: Save 50 calories and 6 g of fat, including 3 g of saturated fat, per serving by preparing with 98% fat-free reduced-sodium condensed cream of chicken soup and Kraft Mexican Style 2% Milk Finely Shredded Four Cheese.  If you don't have fresh cilantro, use 1 tsp ground coriander instead.

4 servings.

Nutrition information: 640 calories, 17 g fat, 100 mg cholesterol, 1090 mg sodium, 78 g carbohydrate, 10 g fiber, 3 g sugar, 45 g protein.

Source: Kraftrecipes.com

Notes: I LOVED the rice mixture in this recipe.  It was so flavorful and creamy.  It was perfect.  I didn't have a yellow pepper, I had a red pepper, so I used that instead.  I also added a drained can of corn to the rice mixture.  I also had some chicken tenderloins that I wanted to use up, so I used that in place of the chicken breasts.  I would also say that this recipe can serve 6-8 people.  It makes a ton of rice.  So, if you top it with chicken tenderloins, it could feed a lot more people.  If you are serving 6 people, this decreases the calories to around 400 per serving.

However, I thought that the chicken could have been more flavorful.  I would definitely sprinkle it with some spices next time around (such as cumin, a light dusting of chili powder, or a Mexican spice blend).

I added some Santa Fe Cooking Creme.  I had bought it because I wanted to give it a try, but then I couldn't figure out what I wanted to use it in.  When I found this recipe (especially since it had "Santa Fe" in the title), I thought it would be the perfect addition.  If you want to still add this element but don't have the cooking creme, I would suggest the following mixture: 1 cup sour cream, 1/2 cup milk, 2 tablespoons (or to taste) taco seasoning well blended.


I was so in love with this rice mixture, that I made it again--without the chicken--to serve as a side dish (I actually made it to go along with the Mexican-Style shredded beef recipe found above for the burrito filling).  However, here is my word of caution: when you make this recipe as is (with the chicken), the chicken keeps the rice moist and creamy.  It also takes longer to cook this way.  If you are cooking the rice mixture alone to serve as a side dish, decrease the oven temperature to 350 degrees and bake only until the rice is cooked and the moisture has been absorbed (30-45 minutes).


Slow Cooker Chalupa Bowl

Ingredients:

1 pound dried pinto beans
1 (3 1/2 pound) bone-in pork loin roast
2 (4 ounce) cans chopped green chiles
2 garlic cloves, chopped
1 tablespoon chili powder
2 teaspoons salt
1 teaspoon dried oregano
1 teaspoon ground cumin
1 (32 ounce) box chicken broth
1 (10 ounce) can diced tomatoes and green chiles with lime juice and cilantro
8 taco salad shells
1 small head iceberg lettuce, shredded
Toppings: shredded Monterey Jack cheese, pickled jalapeno slices, halved grape tomatoes, sour cream, chopped avocado, cilantro, etc.

Directions:

Rinse and sort beans according to package directions.

Place pinto beans in a 6-quart slow cooker; add roast and next 6 ingredients.  Pour chicken broth evenly over top of roast.

Cover and cook on high 1 hour; reduce to low, and cook 9 hours.  Or, cover and cook on high 6 hours.  remove bones and fat from roast; pull roast into large pieces with two forks.  Stir in diced tomatoes and green chiles.  Cook uncovered, on high 1 more hour or until liquid is slightly thickened.

Heat taco salad shells according to package directions; place shredded lettuce evenly into shells.  Spoon about 1 cup pork-and-bean mixture into each shell using a slotted spoon.  Serve with desired toppings.

8 servings

Source: Southern Living, October 2005

Notes: I assembled this the night before and put my slow cooker pot in the fridge so that I could simply put it in the warmer and turn it on the next morning.  I wasn't going to get up at six in the morning to get dinner ready!

One of the reasons I wanted to try this recipe was because I had a bag of dried pinto beans in my pantry that I have had no idea what to do with.  I prefer canned beans because I have always had a hard time getting dried beans to turn out tender--no matter how much I have soaked the beans or how long I have boiled them, I always end up with tough beans!  I figured that if the beans turned out tough in this recipe, I could remove them completely when I removed the pork to shred it.  But luckily, the beans were tender and delicious!  I think this recipe would work just as well with canned pinto beans--you would just decrease the cooking time because the lengthy cooking time in this recipe is due to the use of dried beans--not because the pork needs that amount of time to cook.

I added the can of tomatoes at the beginning of the cooking time rather than at the end.

The flavor was wonderful.  It wasn't overwhelming (meaning, it was good for my kids too), but it was just fulfilling.

I meant to put some canned jalapeno slices on top, but in the hectic rush to get my family fed, I totally forgot.  It would have been yummy though!  I'll have to remember to do that with our leftovers.

I used uncooked flour tortillas rather than taco salad shells, simply because that's what I had on hand.  This meat/bean mixture would work great as a taco filling, in taco salads, burritos, tostadas, quesadillas, and even enchiladas.


Cilantro-Lime Rice

Ingredients

1 cup long-grain white rice
Coarse salt
1/2 cup fresh cilantro
2 tablespoons fresh lime juice
1 tablespoon olive oil
1 garlic clove

Directions:

In a medium saucepan, bring 1 1/2 cups water to a boil.  Add rice and 1/ teaspoon salt; cover, and reduce to a simmer.  Cook until water is absorbed and rice is just tender, 16-18 minutes.

Meanwhile, in a blender, combine cilantro, lime juice, oil, garlic, and 2 tablespoons water; blend until smooth.  Stir into cooked rice, and fluff with a fork.

Source: Everyday Food, April 2008. You can find it here.

Notes: Holy cow!  I can't believe how good this tasted for how easy it was!  This is going to be my go-to Mexican rice recipe from now on!  Yum!

Wednesday, May 9, 2012

Amo l'Italia!


Bless those wonderful Italians for making pasta what it is today!  What would I do without pasta?  It's one of my favorites.  My comfort food.  I'd probably even choose it for my last meal if I had any say in the matter.

I'm going to share some new wonderful Italian food discoveries.  They are all quick and easy and I really think you'll like them.


Creamy Pasta with Crispy Salami

Ingredients:

3 eggs
1 cup grated Parmesan
4 ounces salami
Olive oil
3 crushed garlic cloves
3/4 pound spaghetti
Salt and pepper
Chopped parsley

Directions:

Whisk together eggs and Parmesan in a large bowl.  Cut salami into 1/2 inch strips.  Heat a skillet over medium-high, then coat with olive oil.  Cook salami and garlic until salami is crisp.  Cook spaghetti, before draining, reserve 1 cup pasta water.  Add hot pasta to egg mixture, along with garlic and half the salami.  Toss, adding enough pasta water to coat pasta in a creamy sauce.  Season with salt and pepper, if needed.  Serve topped with a sprinkle of parsley and remaining salami.

Source: Martha Stewart, Everyday Food magazine and online.

Notes: This is a fun variation on pasta carbonara.  If you don't have salami, you can go the traditional route and use bacon instead.

Oh, and I must strongly suggest that you use freshly ground pepper in this dish.  It makes all the difference!

I cooked a whole pound of pasta.  My youngest son is allergic to eggs, so before I added the pasta to the egg mixture, I reserved some of the pasta in a bowl just for him.  To that bowl, I tossed the pasta with a little butter, some Parmesan cheese, and a little garlic salt.  I also added some of the salami to his pasta (and he LOVED it).  Oh, and as always, I forgot the parsley.  :)


Pasta and Easy Italian Meat Sauce

Ingredients:

4 tablespoons butter
1 tablespoon olive oil
1 carrot, grated (about 1/2 cup)
1 onion, chopped
2 garlic cloves, chopped
3/4 pound ground beef
1 can (28 ounces) whole tomatoes
1/2 cup milk
1 dried bay leaf
1/2 teaspoon dried thyme
1/4 teaspoon ground nutmeg
Coarse salt and ground pepper
1 pound fettuccine
Grated Parmesan, for serving

Directions:

Heat butter and oil in a large saucepan over medium.  Stir in carrot, onion, and garlic.  Add ground beef, and cook until it turns from pink to brown, about 5 minutes.

Add tomatoes and their liquid, crushing them with the back of a large spoon.  Stir in milk, bay leaf, thyme, nutmeg, 1/2 teaspoon salt, and 1/8 teaspoon pepper.  Simmer 20 minutes.

Meanwhile, in a large pot of boiling salted water, cook fettuccine until al dente according to package instructions, about 12 minutes.  Reserve about 1/2 cup of the cooking water; drain fettuccine, and return to the warm pot.  Add meat sauce, and toss.  Add pasta water as needed if the sauce seems dry.  To serve, sprinkle with Parmesan.

Source: Martha Stewart Everyday Food recipe.

Notes: I decreased the butter to 1 tbsp.  I also increased the ground beef to 1 lb.  I made two final changes.  I added another 14.5 ounce can of tomatoes (diced or whole-peeled tomatoes work great).  I also added about 1/2 a teaspoon of red pepper flakes to give it a little kick.

The recipe suggests crushing the tomatoes with the back of a large spoon.  This never works super great for me.  I prefer to use kitchen shears to cut up the tomatoes while they are still in the can.  Then, when I have poured the tomatoes into the beef mixture, all they need to do is simmer.  Everything else is done.

Also, since I always add an additional can of tomatoes (I like more tomatoes than the recipe calls for), it is unnecessary for me to add additional pasta water.  The sauce never has a problem with being too dry with that many tomatoes in it.


Oh, and don't forget the Parmesan on top!  It's great either way though.


Italian Chicken

Ingredients:

6 boneless skinless chicken breast halves (about 8 ounces each)
1 can (14 1/2 ounces) Italian stewed tomatoes
3/4 cup plus 3 tablespoons water, divided
2 tablespoons dried minced onion
2 teaspoons chicken bouillon granules
2 teaspoons chili powder
1/2 teaspoon dried tarragon
1/2 teaspoon Italian seasoning
1/4 teaspoon garlic powder
3 tablespoons cornstarch
Hot cooked rice (or pasta)

Directions:

Place chicken in a slow cooker.  In a small bowl, combine the tomatoes, 3/4 cup water, onion, bouillon and seasonings; pour over chicken.  Cover and cook on low for 3-4 hours or until a meat thermometer reads 170 degrees F.

Transfer chicken to a serving platter; keep warm.  Skim fat from cooking juices; transfer to a small saucepan.  Bring liquid to a boil.  Combine cornstarch and remaining water until smooth.  Gradually stir into the pan.  Bring to a boil; cook and stir for 2 minutes or until thickened.  Serve with chicken and rice.

Source: Taste of Home.

Notes: I used 4 chicken breast halves (probably less than 8 ounces each).  I also used 2 cans of Italian stewed tomatoes instead of one.  Because I added another can of tomatoes, I didn't use the 3/4 cup water.  I increased the Italian seasoning and the garlic powder to 1 teaspoon each.

I debated on whether to use white rice or pasta.  I decided to go with the rice since that's what the recipe called for.  It was good, but I missed my pasta!  I think I would have served it with linguine, fettuccine, or spaghetti instead.

Also, rather than transferring the liquid to another pan, I added the water/cornstarch mixture directly to the slow cooker after removing the chicken.  I let the sauce thicken and then I returned the chicken to the sauce to coat it and re-heat it.

I chose this recipe because I had bought a ton of cans of Italian stewed tomatoes a few years ago for my food storage, but I hadn't been using them because I couldn't find many recipes that called for them.  So, I did a hunt specifically for Italian stewed tomatoes within my recipes and this is what I found!  It's a good, basic, pantry-friendly recipe to keep on hand.

In the future, I would use my kitchen shears to break up the tomato pieces for the sauce.  Just my personal preference.  I think I would have liked it better looks-wise and taste-wise.  Just to spread the tomato love around!

Sunday, May 6, 2012

Better Than Chex!

Well, I have been checked out for a while and Sarah has been carrying us.  So as I start to catch up, some of these blogs will be terribly out of season.  So forgive me if you are craving Spring and Summer and I give you Winter and Fall.

Last Fall I tried a couple of Chex mixes that were wonderful!  Each of them had a very distinct flavor.  Then today I tried one that will be a favorite for all of you cake batter lovers out there.

Chex Mix is one of the most versatile snacks there is.  Who knew that the original Chex Mix could possibly morph into such a myriad of flavors?  If chicken is the canvas of cooks, Chex Cereal may just be the canvas of snack makers!

Here we have one that is strictly seasonal, for sure.  But if you bring it to one party, you are sure to be invited to more!

CHEX PUMPKIN PIE CRUNCH


1/4 c. brown sugar
1 T. pumpkin pie spice
1/4 c. butter
2 t. vanilla
2 c. Cinnamon Chex cereal
2 c. Wheat Chex cereal
2 C. Honey Nut Chex cereal
8 oz. Pecans

In a small bowl, mix brown sugar and pumpkin pie spice.  Set aside.  In a small microwave-safe dish, microwave butter on High about 30 seconds or until melted.  Stir in vanilla.  In large microwavable bowl, mix all cereals and pecans.  Pour butter mixture over cereal mixture, stirring until evenly distributed.  Add sugar and spice mixture and stir until coated.

Microwave uncovered on High 5 minutes or until mixture begins to brown, stirring every minute.  Spread on wax paper or a cookie sheet to cool.  Store in airtight container.

Cooks note:  This recipe came from Chex.com (General Mills).  We made it before Pecans got added to my grandson's no-no allergy list.  I think peanuts might work, but the pecans were really nice.

Cooks note:  This was very sweet and very addicting.  It, too, has a very seasonal flavor.  Wonderful.  This recipe came from Chex.com (General Mills) also.


HOT BUTTERED YUM CHEX MIX


4 c. Honey Nut Chex Cereal
2 c. Cinnamon Chex Cereal
1/4 c. butter or margarine
1/4 c. packed brown sugar
2 T. honey
3/4 t. ground cinnamon
1/2 t. ground nutmeg
1/4 t. ground cloves
1 t. rum flavoring
2 c. miniature marshmallows

In large microwavable bowl, place cereals.  In 2-cup microwavable measuring cup, microwave butter, brown sugar and honey uncovered on High 2 minutes, stirring after 1 minute, until mixture is bubbly.  Stir in spices and rum flavoring.  Pour over cereal mixture stirring until coated.

Microwave uncovered on High 3 minutes, stirring and scraping bowl after every minute.

Cool slightly, about 5 minutes.  Stir in marshmallows.  Spread on waxed paper.  Store in airtight container.


CAKE BATTER MUDDY BUDDIES


Chex Funfetti Cake Batter Buddies
Adapted from: So Very Blessed

Ingredients:
5 cups Chex cereal (I used Rice Chex, but Corn Chex would work great!)
10 oz (5 squares) vanilla flavored Almond Bark
1 1/2 cups Funfetti cake mix (any kind of cake mix would work)
1/2 cup powdered sugar
1 tsp vegetable shortening

Directions:
1. Melt Almond Bark according to the package directions, adding vegetable shortening to thin (I heard that you can make it without the shortening, but it worked great for me to use it).
2. Pour the cereal into a large bowl and drizzle the melted Almond Bark over the cereal. Mix gently with a large spoon or spatula.
3. Dump the cake mix and powdered sugar onto the cereal and mix gently with large spoon until all the cereal is evenly coated.
4. Enjoy!! It's so good! :)

Cooks notes:  This didn't work up quite the way it showed.  I added sprinkles because the funfetti really got lost in the first batch.  Also, I added 6 cups of chex and it worked well because I had so much of the cake mix/powdered sugar left over.  

Yummy, but really sweet!