
Bwa ha ha ha! No, I didn't gouge out someone's orange bloodshot eyeballs or tear off a witch's fingers. These sweet confections are all in the name of Halloween. Even food can get a little spooky at this time of year.
The eyeballs are a more festive version of buckeyes. They are peanut butter balls dipped in white candy coating and the pupils are M&M's.
As for the fingers, they couldn't be easier. They are marzipan (if you love almonds, you'll love these).
The next recipe is for bone bread sticks. My bread sticks didn't turn out nearly as pretty as the ones that the folks at Rhodes Dough made. My church is at 1 p.m. and I had to be there early for our Primary program, so the rolls had a lot more time to rise than the recipe called for. As a result, my rolls turned out a little...let's just say they're "big boned" rather than chubby.
Then, of course, there is a lovely Halloween cheese ball.
To drink? Brew Ha Ha Punch.
And for dessert? Ghosts in the Graveyard!
Who could resist this holiday?
 Peanut Butter Eyeballs
Ingredients:
1/2 cup smooth peanut butter
3 tablespoons butter, chopped
1 1/4 cups powdered sugar
1 tsp vanilla extract
6 ounces white chocolate candy coating
1 small bag M&M's candy
Red decorating frosting or decorating gel
Directions:
In the bowl of a large mixer, blend peanut butter and butter until creamy.
Add powdered sugar and vanilla to peanut butter mixture and continue beating until it looks smooth.
Cover a cookie sheet with aluminum foil or waxed paper.
Using a spoon, scoop out a ball of peanut butter and roll between your palms to get them as round as possible. Place on the cookie sheet and freeze for at least 30 minutes.
Place the white chocolate in a microwave-safe bowl and microwave until melted. Stir thoroughly until it is smooth.
Dip the peanut butter balls into the white chocolate candy coating. You can use two forks or spoons to balance the candy on, or just grasp it in your fingers and roll it around until it is covered completely. Return it to the cookie sheet and proceed to dip the rest of the peanut butter balls.
While the chocolate is still wet, press an M&M candy into the center for the iris.
Return the eyes to refrigerator to harden.
Once the eyeballs are firm, you can use the red decorator frosting or gel to make squiggly blood vessels.
Source: About.com recipe created by Elizabeth LaBau. You can find the recipe here.
Notes: I've used the frosting and the gel to make the blood vessels. Both work great, but the gel is a little easier to control.
Marzipan Fingers
Ingredients:
7 ounces marzipan, homemade or purchased
8 whole blanched almonds or 8 pieces of sliced almonds
Red food coloring
Small, food-safe paintbrush
Directions:
Pour a small amount of red food coloring on a small plate, and use a small paintbrush to paint the almonds with food coloring. Set painted almonds aside to dry while you form the fingers.
Coat your hands with powdered sugar, or use plastic gloves. Knead the marzipan until it has softened slightly. Divide the marzipan into 8 equal pieces.
Working with one piece at a time, roll the marzipan between your palms so that it forms a thin tube. Work the tube until it resembles a finger: pinch small sections close together, leaving other sections wider to resemble knuckles. Use a toothpick or knife to create ridges on the knuckles.
Taper one end of the finger, and press an almond firmly into the end to resemble a fingernail. Using your nails, fray the other end of the finger so that it looks severed. Dip the severed end of the finger into food coloring (or paint the finger with the paintbrush) and place the finger on a baking sheet. Repeat with remaining marzipan and almonds.
Store marzipan fingers in an airtight container for up to 2 weeks, or freeze well-wrapped marzipan fingers for up to 3 months.
Source: About.com recipe created by Elizabeth LaBau. You can find the recipe here.
Notes: I skipped the severed finger part of the recipe. I was running short on time and thought that the fingers looked great without the "blood" on the bottom. Also, I couldn't find blanched almonds, so I used sliced almonds. Finally, rather than painting each almond with red food coloring, I simply put them in a plastic sandwich baggie and put the food coloring in the bag. I then swished around the almonds and food coloring until the almonds were completely coated. I then put the almonds on a paper plate covered in a paper towel to blot them and let them dry completely.

Bone Chillin' Breadsticks
Serves 12
Ingredients:
12 Rhodes Dinner Rolls, thawed, but still cold
1/4 cup butter, melted
Parmesan cheese
Poppy seeds
Garlic salt (this isn't part of the original recipe--it's my addition)
Directions:
Using the flat of your hand, roll the center part of a roll into a 6-inch rope leaving both ends large and rounded. With scissors, clip 1 1/2 inches into the center of each end. Separate and lay the cut sides flat on a large sprayed baking pan. They will look like bones. Brush well with melted butter and sprinkle with Parmesan cheese, poppy seeds, and garlic salt to taste.
Cover with plastic wrap and let rise about 20-30 minutes. Remove wrap and bake at 350 degrees for 15-20 minutes.
Source: Rhodes Dough recipe. You can find the recipe and a picture of the bread sticks on their website here.

Cheddar Cheese Ball
Ingredients:
1 1/4 pounds extra sharp cheddar cheese, shredded
1 cup sour cream
1/4 cup (1/2 stick) unsalted butter, melted
1/3 cup dry sherry (see notes)
1 1/4 tsp. coarse salt
Pinch of cayenne pepper
1/3 cup poppy seeds
Directions:
Process all ingredients except poppy seeds in a food processor until smooth. Transfer to a large bowl lined with plastic wrap. Refrigerate until firm, about 1 hour.
Unmold onto a plate, Press poppy seeds evenly over surface, rounding top. Refrigerate until ready to use, up to 2 days.
Source: Martha Stewart website. You can find it here.
Notes: I didn't use the sherry (I'm pregnant! I know it's not a lot of alcohol, but I'm not taking any chances). I don't cook with alcohol anyway. Instead, I used about 1/6 cup red wine vinegar mixed with 1/6 cup water (to equal 1/3 cup liquid).

Brew Ha Ha Punch
Yield: 4 quarts
Ingredients:
2 quarts water
2 (0.13 ounce) pkgs. Green Lemon-Lime Kool Aid
1 (46 ounce) can pineapple juice
1 quart ginger ale
Directions:
Stir together sugar and 2 quarts water until sugar is dissolved. Stir in remaining ingredients. Chill.
Note: For a scary presentation, place punch bowl into a larger bowl, and add dry ice to larger bowl.
Source: Southern Living, October 1998. You can find it here.
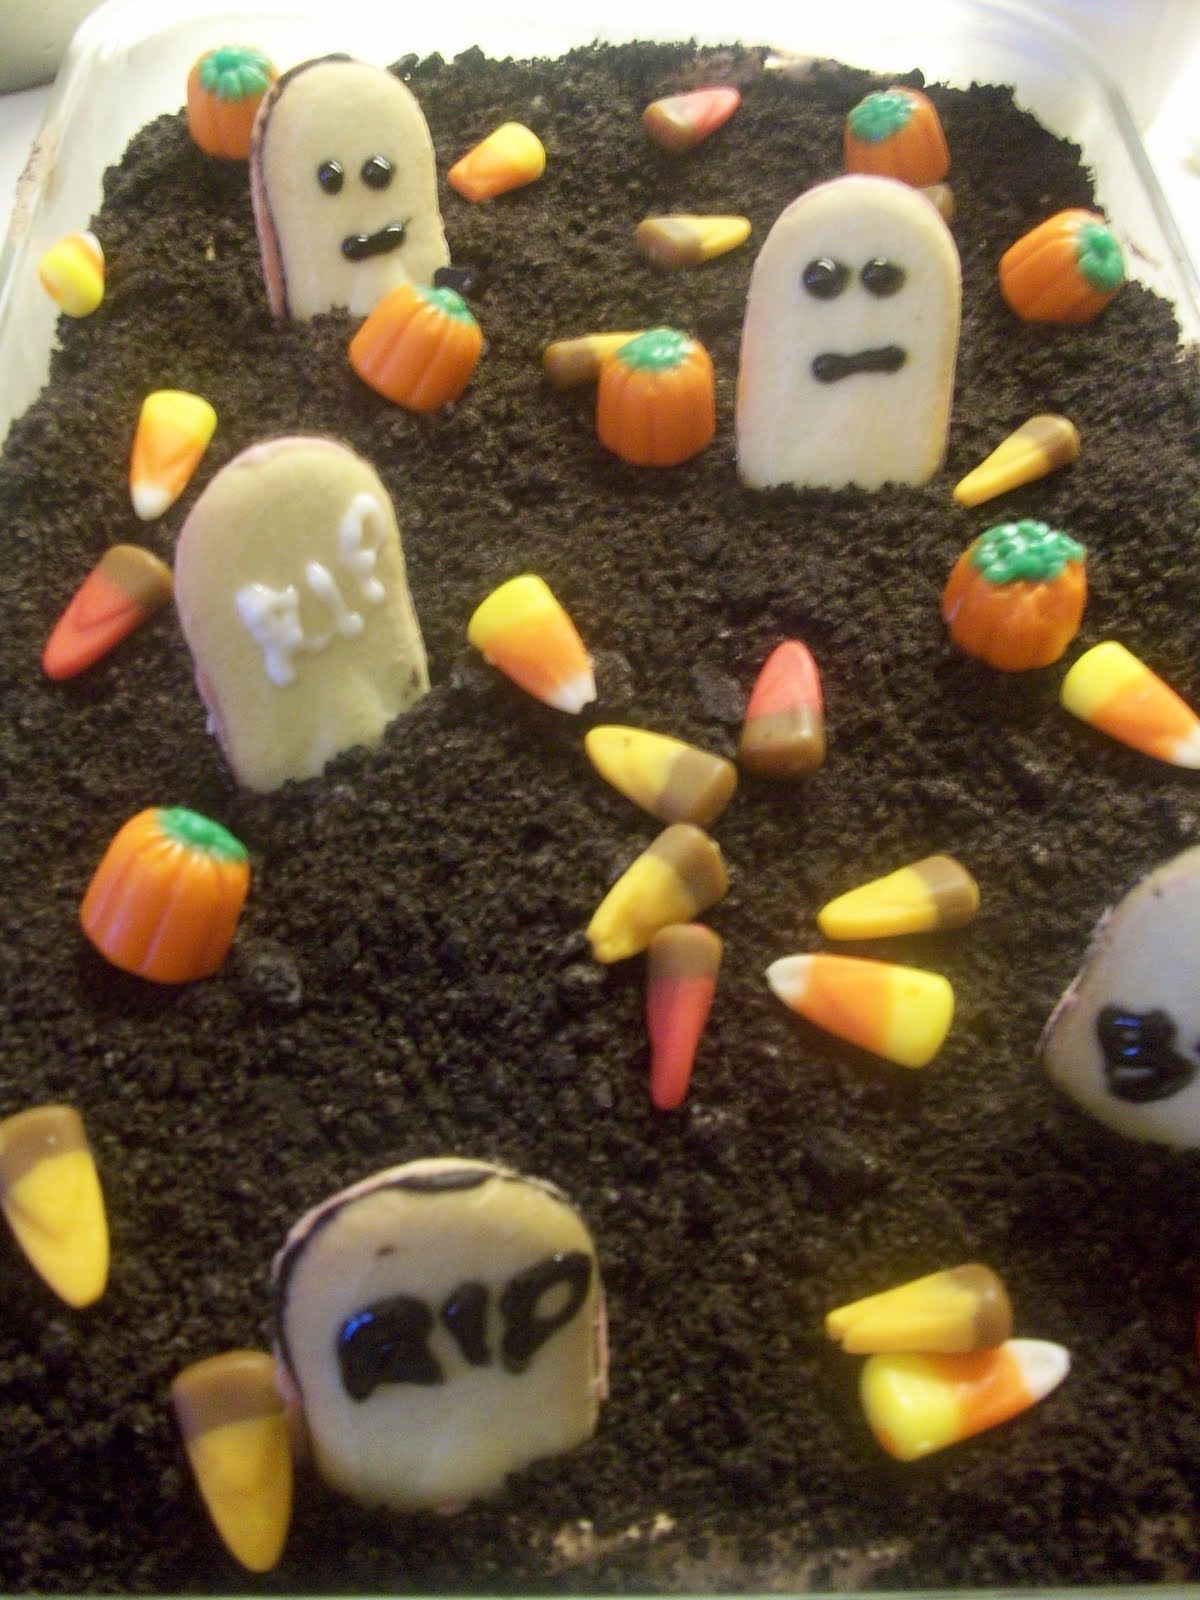 Ghosts in the Graveyard
Ingredients:
2 pkgs. (3.9 oz each) Jell-O Chocolate Instant Pudding
3 cups cold milk
1 tub (12 oz) Cool Whip whipped topping, thawed, divided
15 Oreo cookies, crushed (about 1 1/2 cups)
Assorted decorations: Milan sandwich cookies, decorating gel, candy pumpkins, candy corn pieces
Directions:
Beat pudding mixes and milk in large bowl with whisk 2 min. Let stand 5 min. Stir in 3 cups Cool Whip and half the cookie crumbs. Spread into 13x9 inch dish; sprinkle with remaining crumbs.
Refrigerate 1 hour. Meanwhile, decorate creme sandwich cookies with decorating gel to resemble tombstones.
Insert decorated cookies into top of dessert just before serving. Add candies. Drop large spoonfuls of remaining Cool Whip onto dessert to resemble ghosts.
Source: Kraft recipes website. You can find it here.
Notes: My son wasn't feeling well today, so dessert was rushed. As a result, the ghosts didn't actually make it into the graveyard tonight. But the graveyard looked cute--even without the ghosts!
In thinking about it, I think I like this cheese ball recipe better than the one we've used for so many Christmases.
ReplyDeleteAnd I'm not good at putting the ghosts in the graveyard and don't like that much plain Cool Whip, but they do look cute when done right. The dessert is surprisingly delicious; especially considering how easy it is.
Also, the brew ha ha had a great color for Halloween. It could use some dressing up...ice cubes with plastic spiders in them or something like that. I thought it had a good flavor and would also be perfect for St. Patrick's Day.
Oh, and the brew ha ha recipe needs a correction. It should read 2 pkg. of green lemon-lime Kool Aid, no sugar. Just the regular cheap packages.
Correction made!
ReplyDeleteHow FUN! I'll have to try these next year, they turned out great!
ReplyDeleteVery fun. What about the dinner in a pumpkin? How did that turn out
ReplyDeleteThe dinner in a pumpkin was good, but it had some kinks that needed to be worked out before it became blog-worthy. I think Mom said that it cooked for three hours, but the potatoes were under-done and the meat was a little tough. We decided that we would probably start the stew in a slow cooker and finish it off by putting it inside a pumpkin and putting that in the stove to finish cooking (so that the pumpkin could cook and take on the flavor of the stew). It really was quite yummy if you spooned some of the flesh of the pumpkin into the stew. But, as I said, there were just a few wrinkles to iron out first.
ReplyDeleteI thought that the flavor of the stew was actually quite good. The recipe called for it to simmer 2 hours on the stove and I think my stove's low is almost nothing. I think I may try the same recipe next year; but I will make the stew the day ahead and cook it about 6 hours in the crockpot and then 2 more hours the next day in the oven inside the pumpkin. The flavor was nice for stew because it had a touch of garlic, tomatoes, and green pepper. Too bad, so sad.
ReplyDeleteI had one of the fingers today and while it tasted wonderful, I must admit that it kind of grossed me out; especially when I ate the fingernail. Just a little too realistic!
ReplyDelete