
Well, as has happened with many other years, we had grand plans to do some fun April Fools' Day recipes. But due to scheduling conflicts and this and that, we didn't do very many--not nearly as many as we had originally planned. I still have the ingredients to do a few more...and if I get the chance, I will add them to this particular post once they are completed and photographed (but only if they are a success, of course!).
So, this year, I only made two April Fools' Day recipes (at least so far). I had planned to make a meatloaf "cake" with mashed potato "frosting." In my mind, I had hoped to make something along the lines of this beauty found on the Martha Stewart website. The problem I encountered was that my meatloaf shrank considerably and my two meatloaf "cake" layers didn't stay perfectly round. When I discovered this, I figured that I could probably hide the lack of a perfect circle with mashed potato "frosting," but it would have been a pretty short little "cake."
To be honest with you, by that time, my kids were hungry and cranky and I didn't want to put in the work to frost a "cake" that may or may not have turned out. But I didn't want to give up my April Fools' Day theme...so I made a compromise. Instead of making meatloaf "cake," I made meatloaf "brownies" with "ice cream" mashed potatoes on top. Yeah, it might be a stretch, but if you squint your eyes just right, you can see the resemblance. :)
I think I will still try the meatloaf "cake" idea again next year. I wanted to use our tried and true family favorite meatloaf for the "cake" because I hadn't included that recipe on the blog yet. But the problem with this is that it is a very basic meatloaf without a lot of fillers and binders. I think that's what caused it to shrink as much as it did. I think if I used a meatloaf recipe that called for eggs, breadcrumbs, oats, etc. that it would have been more successful in keeping its shape. So, next year, I'll have to try either the Martha Stewart recipe or the Taste of Home recipe (or heck, even both if I have the time and I'm really in the mood for meatloaf!). I'll let you know how it goes if I do!
But at any rate, you have to trust me, our tried and true meatloaf recipe is a really good one. It's much prettier if you make it into individual portions as the original recipe instructs. But it looks pretty decent as a "brownie" wedge too. :) It's one tasty meatloaf, that's for sure!
My April Fools' Day dessert had much greater success. I think most desserts can masquerade as main dishes much easier than main dishes can disguise themselves as desserts. So, my "pizza" cake was as cute as a button, really easy, and super tasty. Plus, it is very kid-friendly...my boys ate a lot of it!
So, though it is belated, below you will find our April Fools' Day recipes...hopefully with more to be added shortly.

"Brownie" Wedges with "Vanilla Bean Ice Cream"
aka
Meatloaf Wedges with Salt and Pepper Mashed Potatoes
Ingredients:
3 recipes Old-Fashioned Meatloaf (recipe found below)
Salt and Pepper Mashed Potatoes (recipe found below)
Directions:
Make Old-Fashioned Meatloaf according to recipe. Rather than forming the beef mixture into individual portions, press it into two 9" round cake pans (you can spray the cake pans with non-stick cooking spray, or you can line them with aluminum foil to reduce clean-up). Bake for 30-40 minutes or until the meatloaf is browned and no longer pink inside (you can use a meat thermometer to test the internal temperature just to be sure, if you like).
While meatloaf is baking, make mashed potatoes.
Cut meatloaf into wedges. Using an ice cream scoop, scoop some mashed potatoes on top of the meatloaf and serve.
Source: this recipe was inspired by the Martha Stewart recipe mentioned above as well as this recipe found on the Taste of Home website. But instead, I used an old family favorite meatloaf recipe and a mashed potato recipe that I made up myself.
Notes: It would have been cute if I had used some beef gravy for "hot fudge sauce" or additional chili sauce as "strawberry syrup," but as I mentioned above, this was kind of an impromptu creation and I didn't have those ingredients handy.
You could also bake the meatloaf in square 8x8 baking pans, or even in a 9x13 baking pan and just cut the meatloaf into "brownie" squares instead of wedges.

Old-Fashioned Meatloaf
Ingredients:
1 lb. ground chuck
1/4 cup grated onion
1/4 cup chopped parsley
1/2 cup chili sauce, divided
2 tbsp Worcestershire sauce
Salt and pepper, to taste
Directions:
Preheat the oven to 350 degrees F. Place the chuck, onion, parsley, 2 tablespoons of the chili sauce, the Worcestershire, and salt and pepper in a bowl. Toss together lightly.
Form the meat into a 5-inch by 3-inch oval loaf in a small baking pan. Spread the remaining tablespoon of chili sauce all over the surface of the meatloaf. Bake for 30 minutes, or until cooked through. Do not overbake.
Serves 4
Nutrition information: 285 calories, 9 g carbohydrates, 2 g protein, 17 g fat, 86 mg cholesterol.
Source: This recipe is from the October 28, 2001 issue of Parade magazine.
Notes: This recipe is just so good. It's so easy and basic, but it always hits the spot.
Salt and Pepper Mashed Potatoes
Ingredients:
5 lbs. potatoes, peeled and cut into 1-inch squares
1-2 cups milk
1/2 cup reduced-fat sour cream
2 tbsp butter
Salt and pepper, to taste
Directions:
Boil potatoes until tender when pierced with a knife. Drain and return to pot. Pour 1 cup of milk, sour cream, and butter over potatoes. Sprinkle with salt and pepper, to taste. Mash until ingredients are fully incorporated into the potatoes. Add additional milk if the potatoes aren't creamy enough.
Source: Me.
Notes: I like a lot of salt and pepper on my potatoes. I would say that I added about 2 teaspoons of salt and 1 teaspoon of pepper to the whole thing while I was mashing it. But do it to your taste.

Pizza Cake
Ingredients:
1 package (18-1/4 ounces) yellow cake mix
1 cup vanilla frosting (see notes below for substitute)
Red liquid or paste food coloring
3 ounces white baking chocolate, grated
2 strawberry Fruit Roll-Ups
Directions:
Prepare cake mix according to package directions. Pour the batter into two greased and floured 9-in. round baking pans.
Bake at 350 degrees F for 20 minutes or until a toothpick inserted near the center comes out clean.
Cool for 10 minutes before removing from pans to wire racks to cool completely.
Place each cake on a 10-inch serving platter. Combine the frosting and food coloring; spread over the top of each cake to within 1/2 inch of edges. Sprinkle with grated chocolate for cheese.
Unroll Fruit Roll-Ups; use a 1-1/2 inch round cutter to cut into circles for pepperoni. Arrange on cakes.
Yield: 2 cakes (6-8 servings each).
Source: Found on the Taste of Home website originally published in Quick Cooking, May/June 2002, p41.
Notes: When I found this recipe, I read it over quickly and then made it based solely on my memory of the recipe. Ha ha! As a result, my memory proved to be faulty, but it still worked out great. For some reason, I could have sworn that instead of red frosting, the cake was topped with strawberry jam. I honestly didn't remember that the recipe called for frosting until I was typing it up for our blog tonight! Oops!
Well, as I was making the cake, I discovered that I didn't have strawberry jam in my pantry as I had thought. However, I did have red raspberry seedless jam. So, I used that and it worked great and tasted fantastic.
I stirred up the jam until it was smooth and then I covered the tops of the cakes with it using a rubber spatula. I then topped the jam with the shaved white chocolate and fruit roll up "pepperoni."
Also, we got Fruit-by-the-Foot instead of Fruit Roll-Ups. It worked alright, but I would suggest getting the roll-ups unless you want either really tiny round pepperoni or larger oval-sized pepperoni (which is what I ended up with). The Fruit-by-the-Foot just isn't wide enough to make decent-sized round pepperoni with. I also used kitchen shears to cut out the "pepperoni." Honestly, with how sticky fruit roll-ups are, I can't imagine that it would work well to use a cookie cutter as the recipe states. I think kitchen shears are the only way to go!


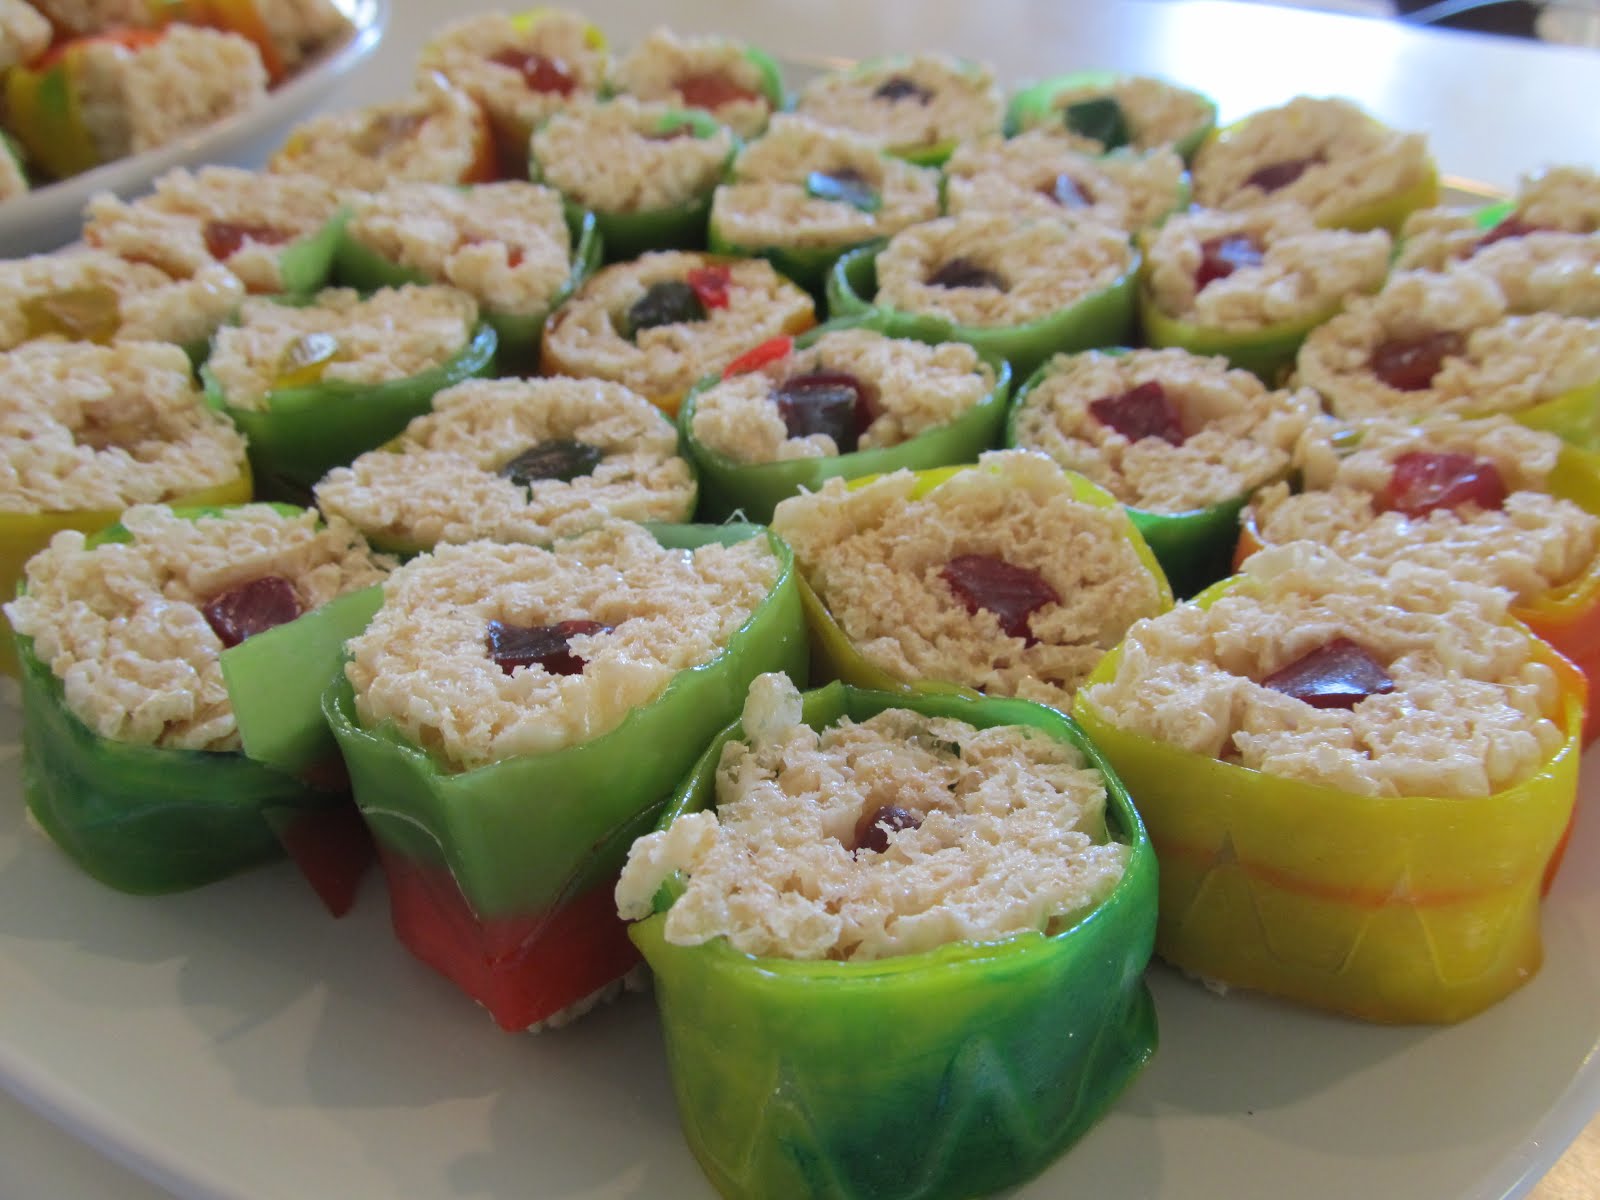
Candy Sushi
This candy sushi recipe makes adorable sushi look-alikes from Rice Krispies, gummy worms, and other premade candies. Note that this recipe creates two "types" of sushi, the maki rolls and the fish-topped nigiri. You can make both, or choose just one type and omit the instructions for the other. As written, the recipe makes approximately 2 dozen rolls and 2 dozen nigiri.
Ingredients:
4 tbsp butter
4 cups miniature marshmallows
6 cups crispy rice cereal
20 gummy worms
2 boxes green-colored Fruit Roll-Ups
30 fish-shaped gummy candies
Directions:
Prepare a 12x19" baking sheet by lining it with waxed paper and spraying the paper with nonstick cooking spray.
Place 2 tablespoons of butter in a large microwave-safe bowl, and microwave until melted, about 45 seconds.
Add 2 cups of miniature marshmallows to the bowl, and microwave until the marshmallows are completely melted, about 1 minute, stirring every 30 seconds. Stir the mixture until it is completely smooth.
Add 3 cups of rice cereal and stir until completely coated. Immediately pour mixture out onto the prepared baking sheet. Spray your hands with nonstick cooking spray, and begin to press the candy into the sheet in a thin layer. Begin working from the edge of the shorter side of the sheet. The mixture will only cover approximately half of the baking sheet.
With the short side of the baking sheet nearest you, place a pair of gummy worms an inch from the edge. Place another pair directly below, and repeat until you have a line of worms stretching across the baking sheet.
Using the waxed paper to help you, roll the cereal mixture around the gummy worms, pressing firmly to make a tight roll. Take a large, sharp knife and cut the log away from the rest of the mixture. Place it off to the side, and repeat the worms/rolling/cutting procedure for the remainder of the cereal.
Slice the logs into 1-inch rounds. Wrap each round in a strip of green-colored Fruit Roll-Ups.
To make the fish-topped "nigiri," repeat steps 1-4 to make the rice candy base, but do not press the rice mixture as thinly. It should be about 3/4 inch thick once pressed into the baking sheet.
Cut the candy into rectangles about 3/4 inch by 1.5 inches. Place a candy fish on top of each rectangle, and wrap a 1/2-inch strip of green Fruit Roll-Up around the entire package.
For a finishing touch, decorate your sushi platter to look more authentic. Suggestions include substituting chocolate sauce for soy sauce, green-tinted whipped cream (or melted white chocolate) for wasabi, and thinly sliced pink fish candies for pickled ginger.
Note: These candies are best eaten the day they are made, as the fruit wrapping gets sticky if left overnight. Alternately, you can prepare them up until the final step, and wrap them once you are ready to eat them.
Source: About.com recipe created by Elizabeth LaBau.
Notes: These were soooo good! I can't believe how tasty the combination of rice crispies, gummy candies, and fruit roll-ups are! These are one of my new favorites. This is going to be a yearly tradition for April Fools'!
I used Fruit-by-the-Foot instead of Fruit Roll-Ups. It doesn't come in plain green like the fruit roll-ups do, but it's already the right width and less cutting is needed to fit the roll-ups around the rice crispies. I used the "Color-by-the-Foot" flavor (which has green, orange, and yellow).
Also, I would suggest getting the large Swedish fish. We used the small ones. This worked fine, but I had to kind of make the fish peek out of the fruit roll-up so you could still see them. Besides, more or bigger Swedish fish is ALWAYS a good thing!
And here's a BONUS (added 4/19/12):
You can your favorite rice crispy treat recipe to make a rice crispy treat "cake!" Those rice crispy treats are just so versatile! I made one for my Mom's birthday. Here is a picture:

Above: My rice crispy treat cake before my little "accident."

My rice crispy cake after the accident. You see, what happened was this: I thought it would look cute if I wrote "Happy birthday" in red frosting on top of the cake. I didn't want to get one of my pastry bags dirty (I hate cleaning those), so I improvised and used a sandwich bag. I started writing the "H" and everything was going great...until my sandwich bag exploded and a big glob of red frosting landed right in the middle of the "cake." I thought "Great. Now what do I do?" I tried to remove the frosting, but it had left its mark and nothing was going to erase it. I decided to just use the little frosting I had made for writing to frost the top of the "cake." But then it just looked too...red. So, I sprinkled a little powdered sugar on top as well as some additional red sugar sprinkles and voila. I think I made a nice save. But I should have just left it alone after I took the first picture. I had a premonition that something would go wrong (that's why I actually took the first picture). And I was right. My rice crispy cake played an April Fools' Day prank on ME! Ha ha!
By the way, here is what I did for this rice crispy creation:
Rice Crispy "Cake"
Ingredients:
6 tbsp butter
6 cups miniature marshmallows
9 cups crispy rice cereal
2 red fruit-by-the-foots
red sugar sprinkles
Directions:
Spray non-stick cooking spray into two 9-inch round cake pans (you can also use two square pans, if you prefer a square cake).
Melt butter in a large microwave safe bowl. Microwave until melted (45 seconds to a minute). Add marshmallows and microwave until melted (1-2 minutes). Stir until smooth. Add crispy rice cereal and stir until marshmallows and cereal are incorporated.
Divide the mixture evenly and gently press (do not pack) rice crispies into each 9-inch round cake pan.
Once the rice crispies have had a few minutes to set, remove from the cake pans and place the two layers on top of each other (flat layer down for the first one and flat layer up for the second one).
Wrap fruit-by-the-foot around the "cake" to resemble a ribbon. Sprinkle rice crispies with sugar sprinkles. Decorate further however you desire (or dare!).
Source: this was just inspired by a bunch of rice crispy cakes I have seen on blogs and on the Martha Stewart website.
Notes: Be very careful not to press the rice crispies in too firmly. I pressed mine too hard. The result was that it became really dense, and therefore really hard to cut. Plus, cover it with plastic wrap until you are ready to serve to avoid the "cake" drying out. I just put mine in a cake carrier and it wasn't enough to lock out the oxygen and lock in the moistness.
The meatloaf does look good as a brownie wedge. You could have used brown gravy for "chocolate sauce." You are very innovative! :)
ReplyDeleteI added our fantastic candy/rice crispy sushi to this blog post. Yum!
ReplyDeleteSeriously amazed at how good that sushi tasted. Pete loved it. He dropped one of his in the dirt while we were out catching "bad guys" so I was dispatched to get him a bag full. He wanted me to be sure and get an orange one, a red one, and a green one.
ReplyDeleteI really had trouble finding fruit roll ups. And they don't make those ones in the produce department that were fresher fruit. They would really have been yummy.
Something about the sweet rice crispies and the tart fruit roll up really worked.
I also added Mom's rice crispy birthday "cake" to this post.
ReplyDelete