Friday, November 18, 2022

My Boys' Favorite Pasta


I have shared this recipe before here, but it was shared with another recipe and never got the spotlight it deserved. So, here it is again with the highlight it deserves!


Chicken Bacon Penne Pasta

Ingredients:

2-3 chicken breast halves
1 bottle favorite marinade (I like Kroger's Herb & Garlic 30 minute marinade, 12 fl oz)
1 lb. thick-cut bacon, cooked and diced
2 cups heavy cream
1 tsp. black pepper
1 tsp. salt (or more or less, to your taste)
1/2 cup (1 stick) butter
1 teaspoon garlic, minced
1/2 cup shredded Parmesan, and additional 1/4-1/2 cup for sprinkling on top
1 (16 oz) package) penne pasta

Directions:

Place chicken and marinade in slow cooker. Heat on low for 6 hours, or until done. Shred chicken.

Cook penne pasta according to package directions.

In a small pan, whisk cream, pepper, butter, and garlic. Heat slowly.

Combine chicken, bacon, pasta, and sauce. When combined, stir in 1/2 cup shredded Parmesan cheese. Sprinkle with additional Parmesan cheese, to taste. 

If desired, bake this pasta in a 9x13 pan in a 350 degree F oven for about 20 minutes, or until the cheese has melted and the pasta is warm and bubbling throughout.

Source: I got this from my old neighbor, Emily Tanner. I believe she got it from another neighbor. So, pass it on and enjoy!

Notes: This recipe can be baked or not. It tastes great both ways. This pasta is also freezer friendly. I freeze it in a 9x13 aluminum pan, let it thaw in the fridge overnight, and then bake it in a 350 degree F oven, covered with aluminum foil, until thawed (about 40-60 minutes). Remove the foil and continue to bake for another 20-30 minutes, or until the cheese is melted and it is warm and bubbling throughout.

Monday, October 3, 2022

Pirate Dinner!

I decided to do some themed dinners for Halloween. Here is my first (which I actually broke up into two dinners over two separate nights). But who doesn't love a good pirate theme?

The first night, I served the watermelon pirate ship, crab sandwiches, "fish and chips", and chocolate malt ball cannonballs.

The second night, I served the meatballs, veggie desert island, and pirate gold treasure.


Above: First up is the hardest and most time-consuming part of the dinner. After this, everything is easy. Get an oval-shaped watermelon and cut off the top. Use the top to cut into small rectangles to make the sails. Use bamboo skewers to skewer the watermelon rectangles to make the sails. Scoop out the watermelon with a melon baller. You can have just watermelon balls, or you can also add grapes as well. I used some white yarn for the rigging. I also carved a skull and crossbones into the front sail. You could also print a pirate flag and just attach it to the top of one of the bamboo skewers.


Above: Watermelon skin is not easy to carve. So, you might just prefer printing up a pirate flag and attaching it to a bamboo skewer.


Above: Make a palm tree out of a green bell pepper top and a peeled carrot stick. All of the ideas for this that I saw had the palm tree sticking out of a stiff cheeseball shaped like an island. That was my original plan, but we had a heavy eating weekend and I decided that the last thing I needed was a cheeseball, so instead, I decided to prop up my carrot and bell pepper palm tree in some light ranch dressing that I already had on hand. However, I had to create a wedge underneath the dressing so the carrot didn't keep falling over. It was a huge pain and I don't recommend it. Ha ha! Stick to the cheeseball, if you plan to do this.


Above: Awwww, that palm tree was a huge pain, but it looks cute though, doesn't it?


Above: Fish and Chips. Goldfish crackers and Ruffles potato chips. You could layer these in one bowl together, or if you have picky eaters (like I do), you could serve them in two separate bowls.


Above: I used frozen homestyle meatballs cooked on low for 4 hours in my slow cooker with 1 cup grape jelly and 1 cup barbecue sauce for these "cannonballs".


Above: Aren't these crab sandwiches adorable? Use croissants that come in this shape (rounded crescent). Put your favorite sandwich fillings inside. You could make an actual crab sandwich with crab salad. My picky boys wouldn't have eaten that though. So I used mayo, mustard, cheddar cheese slices, and turkey. I made the eyes by using a glue gun to glue googly eyes onto toothpicks.


Above: They turned out so cute! Those eyes gave them such personality! Ha ha!


Above: Dessert was super easy. Get your favorite gold-wrapped candies and voila! Pirate's gold or buried treasure! Whatever you prefer to call it!


Above: You can have a second version of cannonballs and serve chocolate-covered malt balls for dessert.

Halloween Charcuterie Boards

Some years, decorating and holidays seem like a big pain. Other years, I can't wait! So, instead of waiting, I start celebrating a month early! Enjoy these charcuterie boards I have made throughout September.


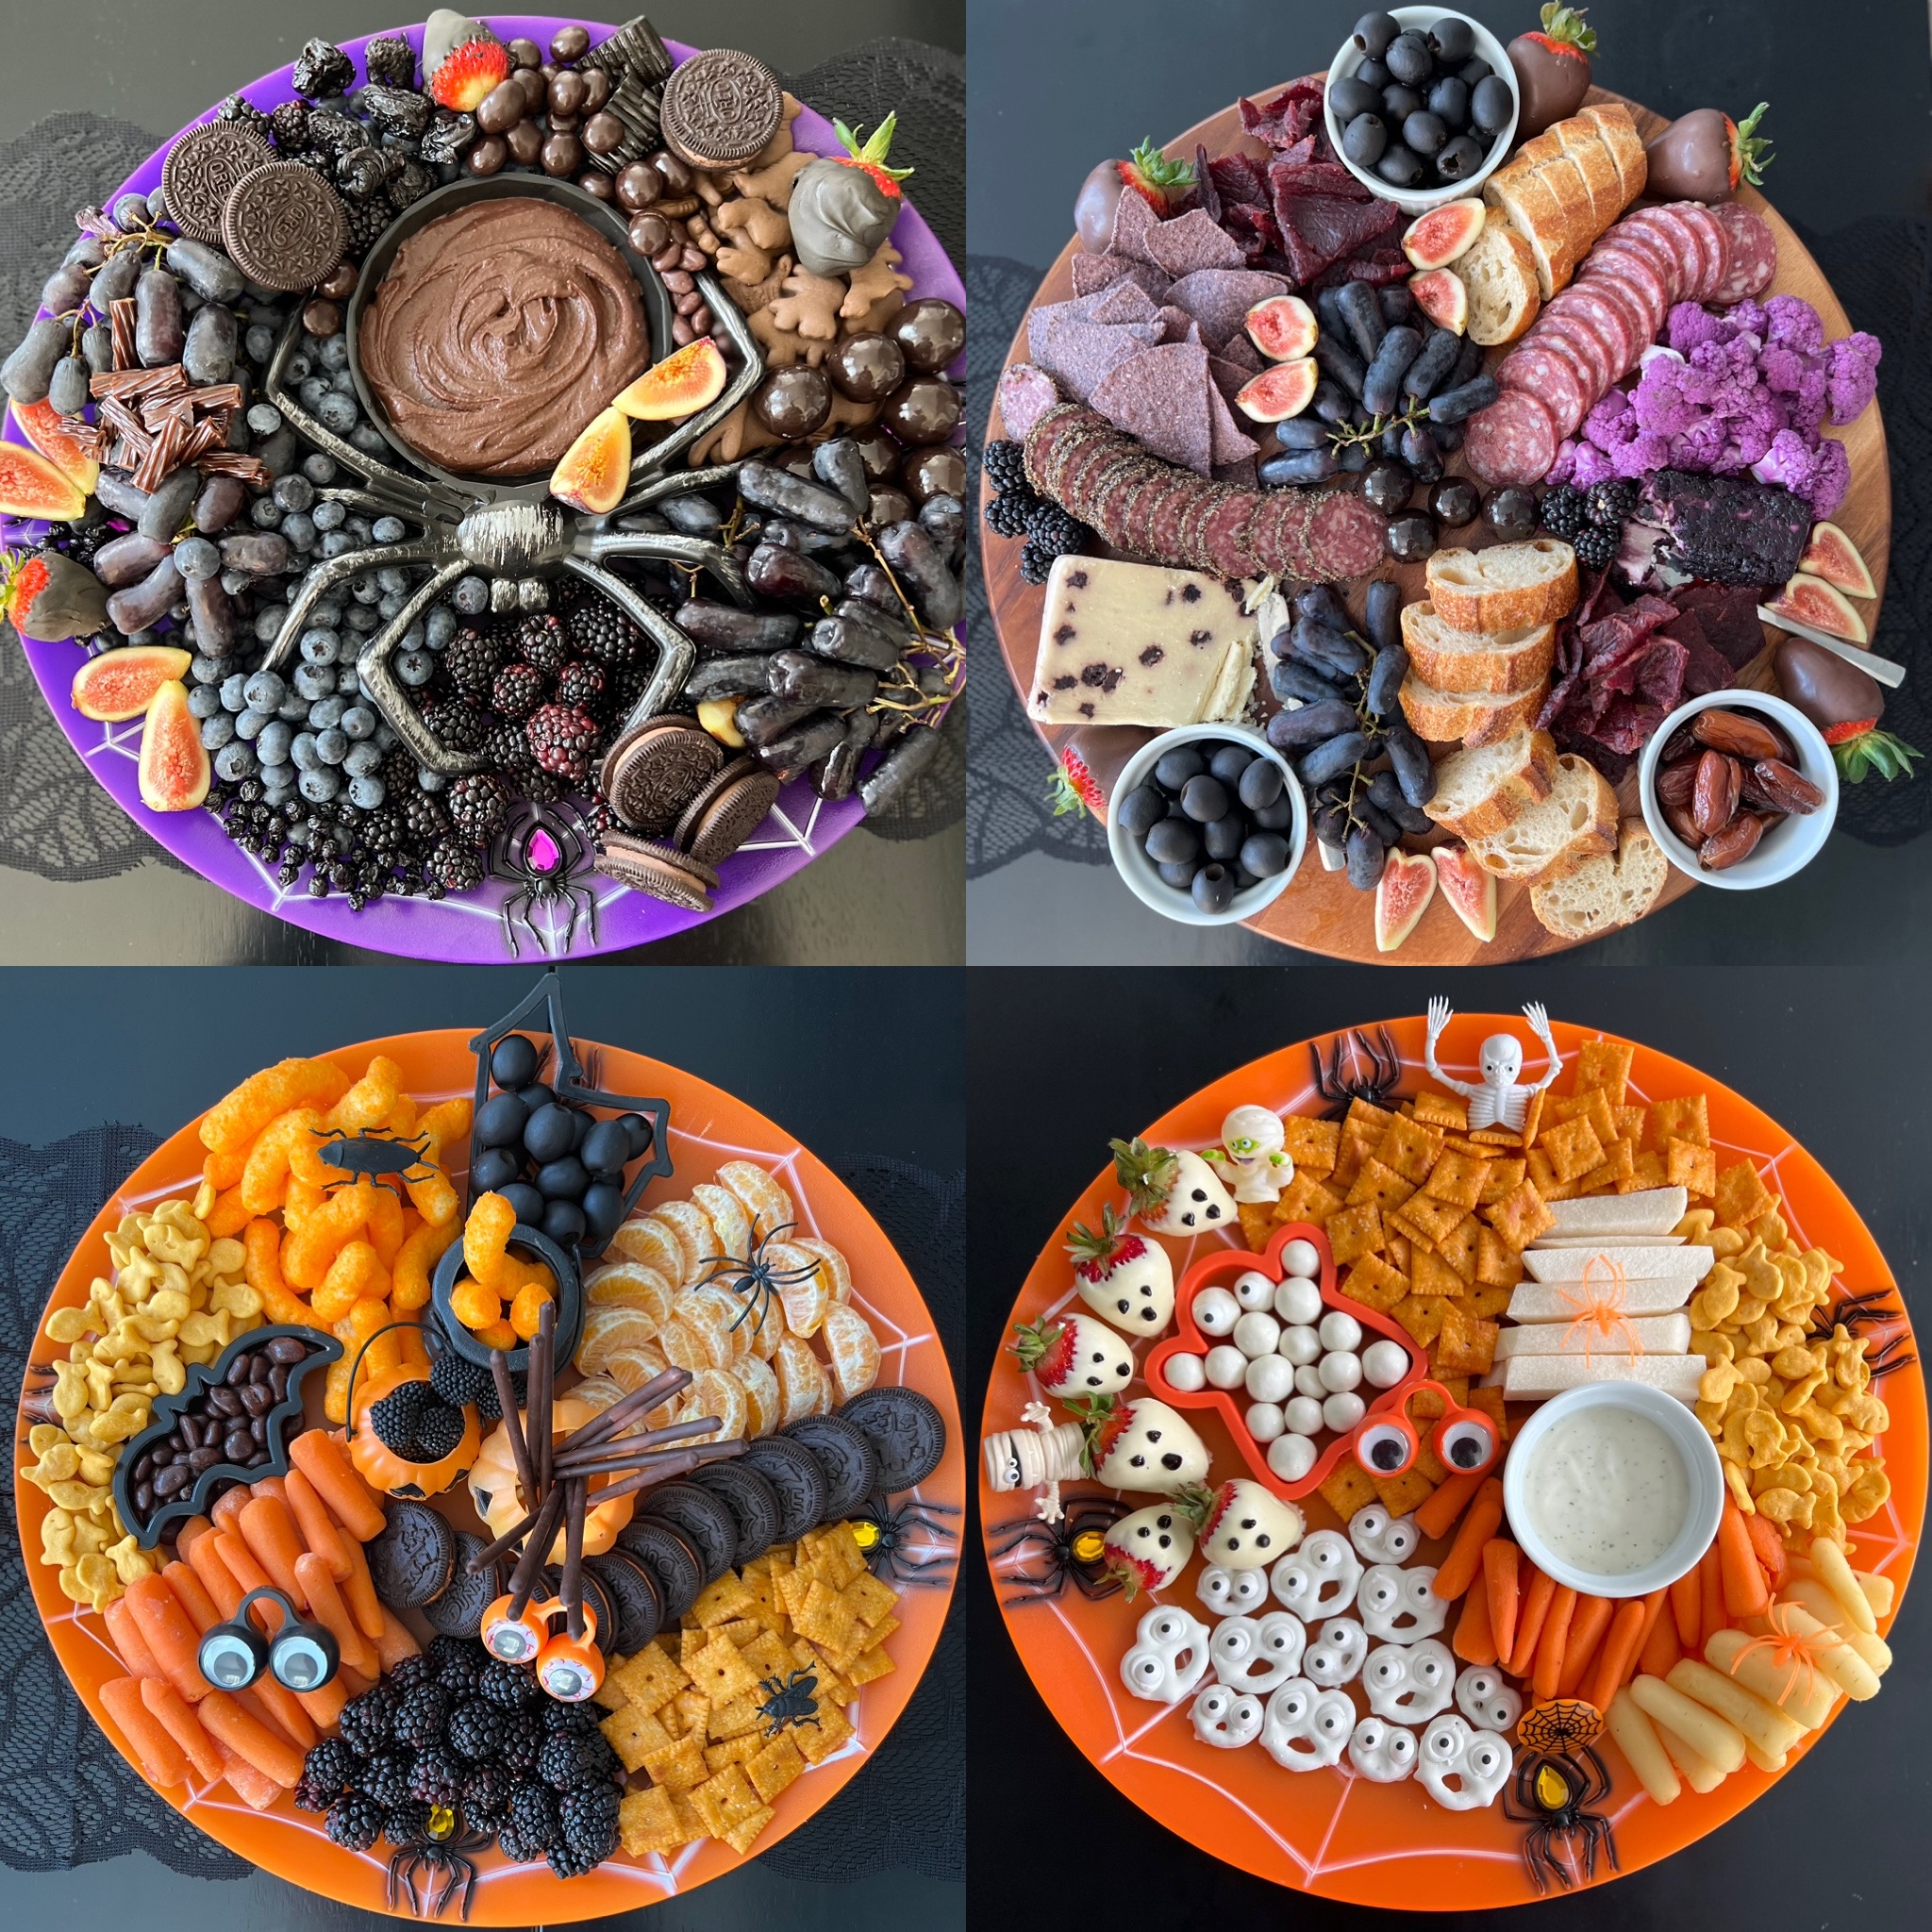
Above: I found this spider bowl at the Dollar Tree. I decided to focus on a black/dark-themed charcuterie board. Included here are Boar's Head Dark Chocolate Dessert Hummus, figs, dark chocolate dipped strawberries (the chocolate was tinted with black food dye), Oreos with chocolate filling, moondrop grapes, prunes, chocolate animal crackers, blackberries, blueberries, chocolate Twizzlers, dried blueberries, black licorice candies, dark chocolate Raisinets, and Brookside Dark Chocolate, Pomegranate Flavor.


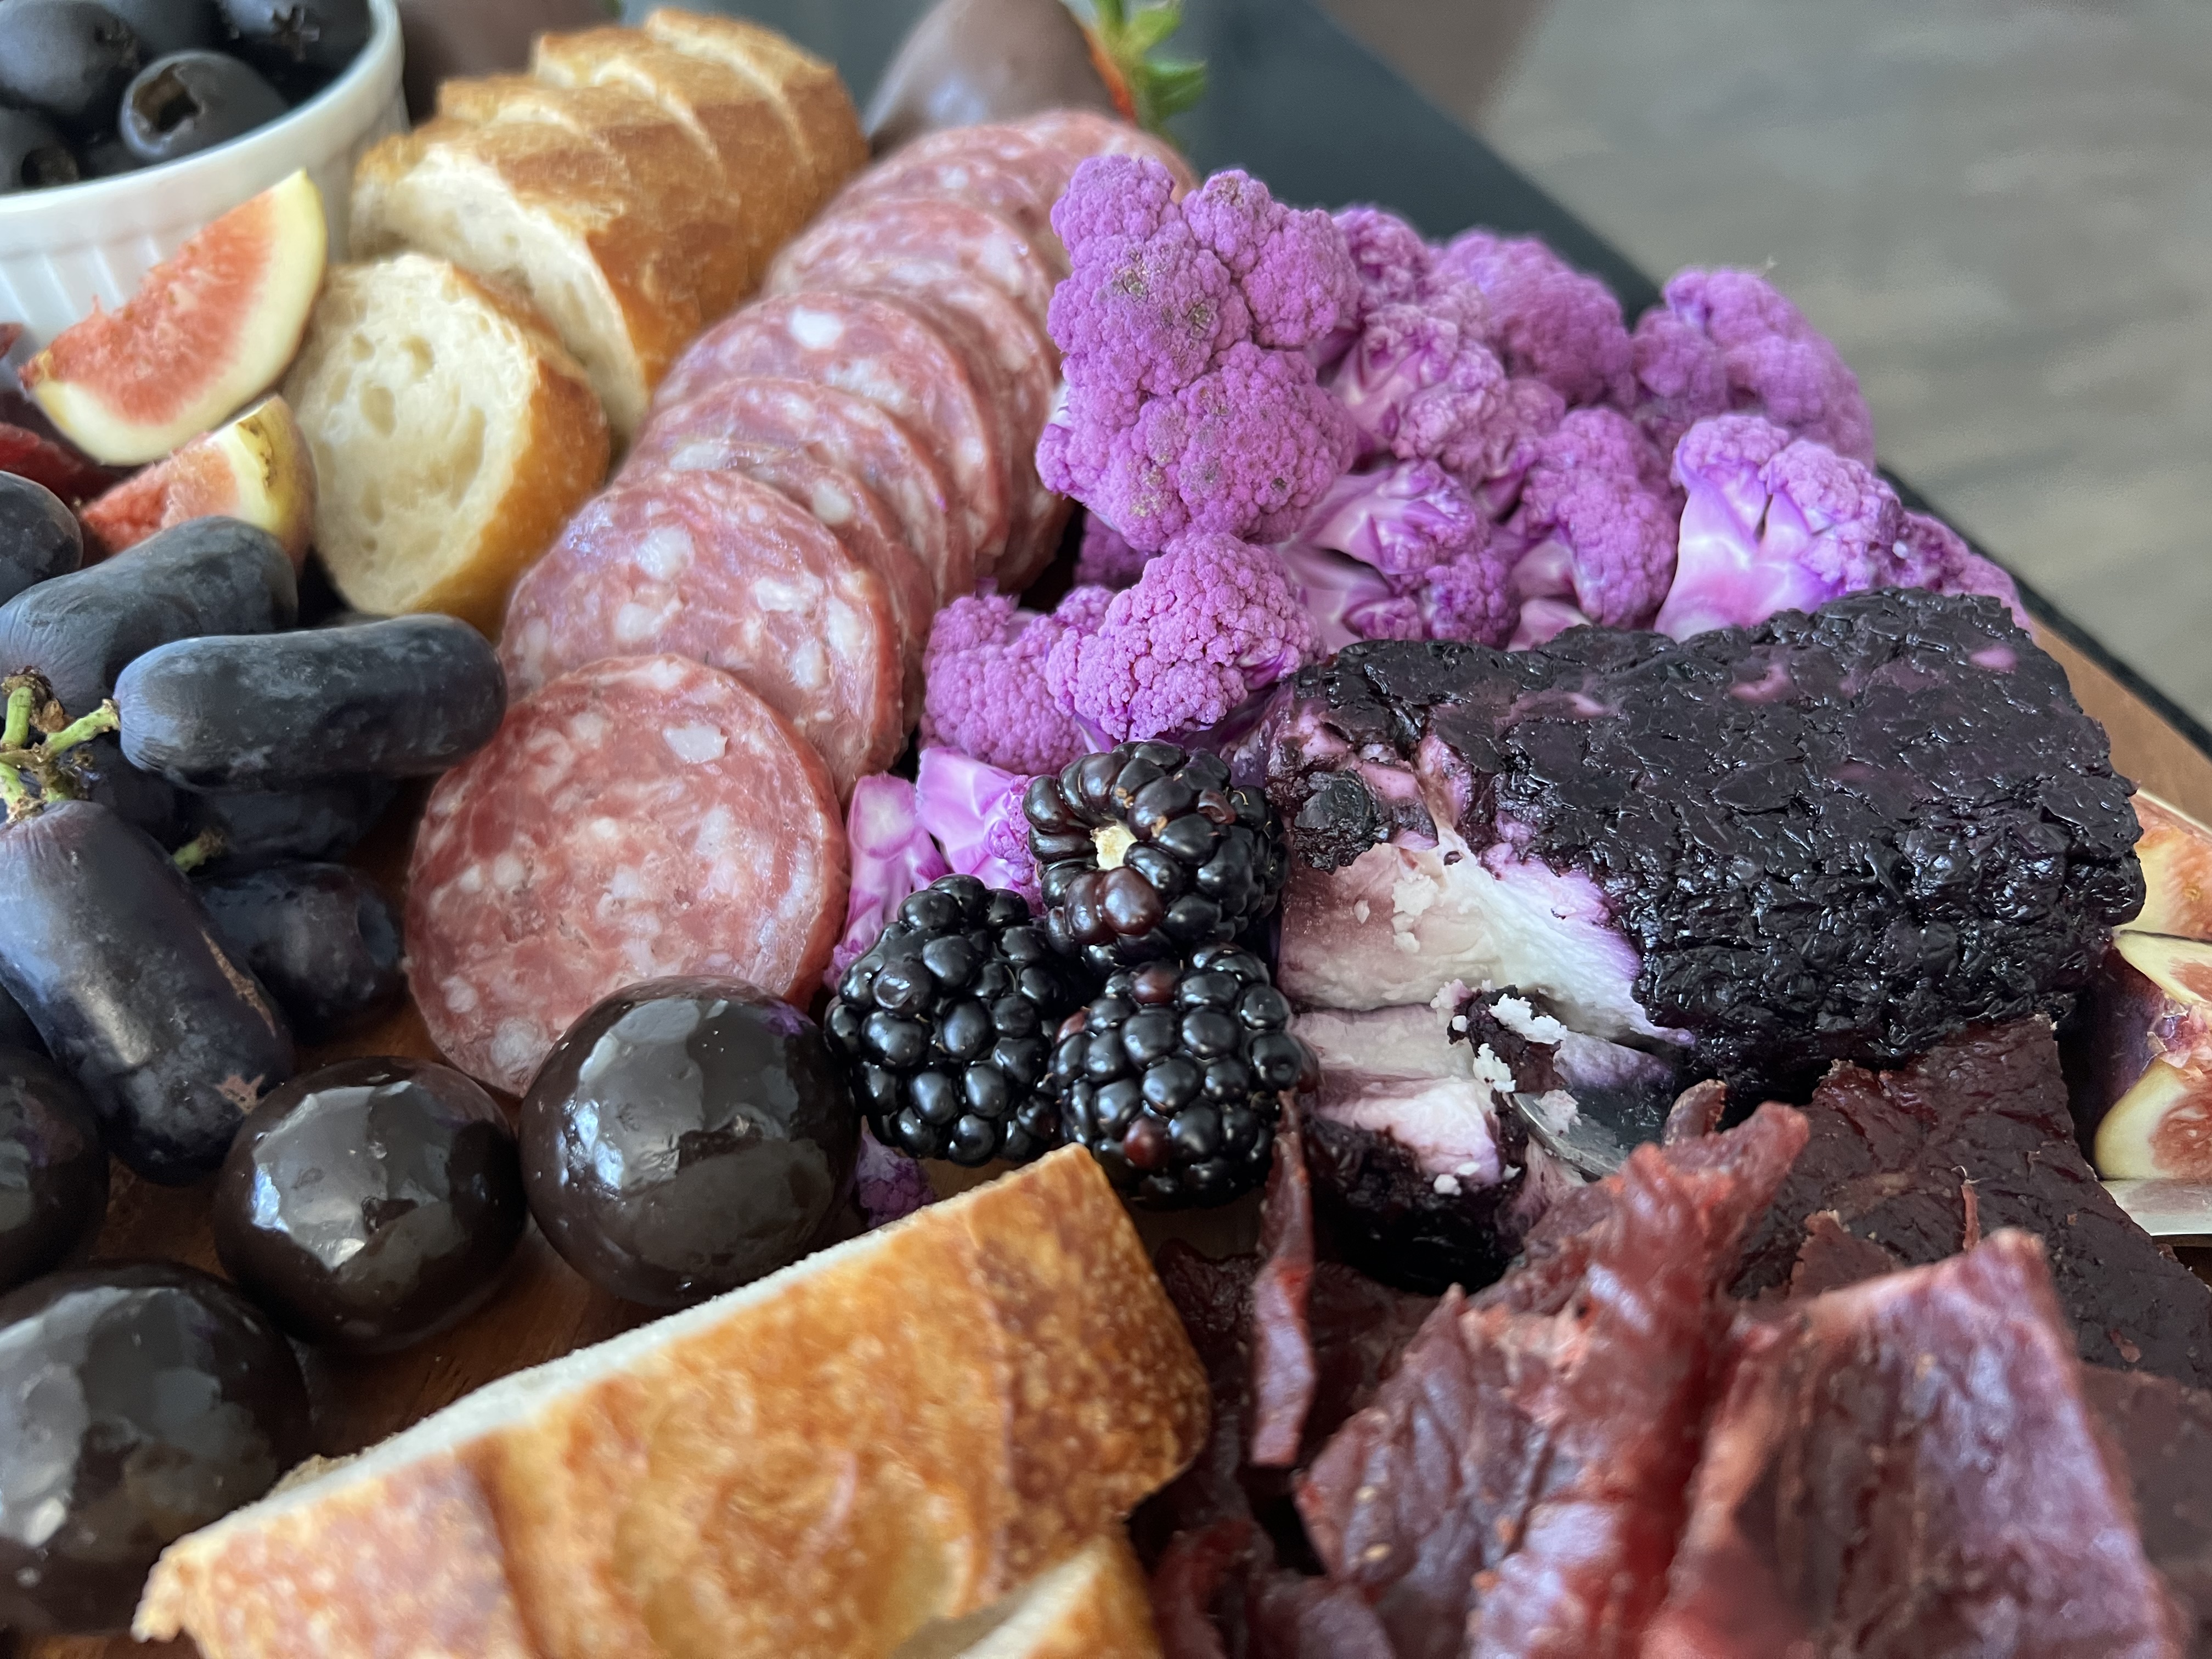
Above: My focus for this one was to go with shades of black, purple, brown, and white. Included here are moon drop grapes, purple cauliflower, figs, dates, black olives, blue corn tortilla chips, sliced baguettes, beef jerky, Boar's Head Superiore Uncured Sopressata, MontChevre fresh goat cheese (blueberry vanilla), Boar's Head Uncured Peppered Salame, dark chocolate malt balls, blackberries, and another kind of blueberry cheese that I can't find the name of right now. Ha ha.


Above: That's the blueberry cheese I can't find the name of. But these boards don't have to be recreated exactly. Just take inspiration from these and use your own favorite black, purple, brown, and white foods.


Above: MontChevre fresh goat cheese (blueberry vanilla).


Above: Purple cauliflower, blue corn tortilla chips, purple carrots, salsa (in the black bowl to the side), cilantro ranch (green goddess dressing could also be used), and fig jam (it went with the charcuterie board above...it was fantastic with the crackers/baguettes, cheese, and salami).


Above: My theme here was orange and black foods. Included are orange Cheetos Puffs, black olives, Cuties orange segments, Halloween orange and black Oreos, Cheez-Its, blackberries, baby carrots, dark chocolate Raisinets, Goldfish crackers, Haribo Raspberries Gummi Candy (just the blackberry ones), chocolate Pocky Biscuit Sticks, and various Halloween trinkets (that I have had for years, but I cleaned first, of course!).


Above: Orange, black, and white focus. Moon drop grapes, blue corn tortilla chips, purple gummy bears, orange gummy bears, Fritos Honey BBQ Flavor Twists, crunchy California rolls, and more cleaned Halloween trinkets. 


Above: My focus here was orange and white foods. We have Cheez-Its, Goldfish crackers, jicama sticks, ranch dressing, baby orange carrots, baby white carrots, white vanilla candy coating dipped strawberries, white yogurt dipped pretzels, white yogurt dipped malt balls, and more cleaned Halloween trinkets.


Above: My theme here was a black and white plate. I was hoping the white bowls placed the way they were would look like eyes and a mouth. Not sure if it succeeded, but something to learn from in the future! I used Oreos with chocolate filling, black olives, dark chocolate malt balls, blackberries, bite-sized vanilla wafers, string cheese, moon drop grapes, vanilla yogurt-dipped malt balls, and more cleaned Halloween trinkets.


Above: This is just a tiny one with a red and black theme. One of these days, I will have to make a big one. Chocolate hummus, moondrop grapes, raspberries, blueberries, and strawberries.

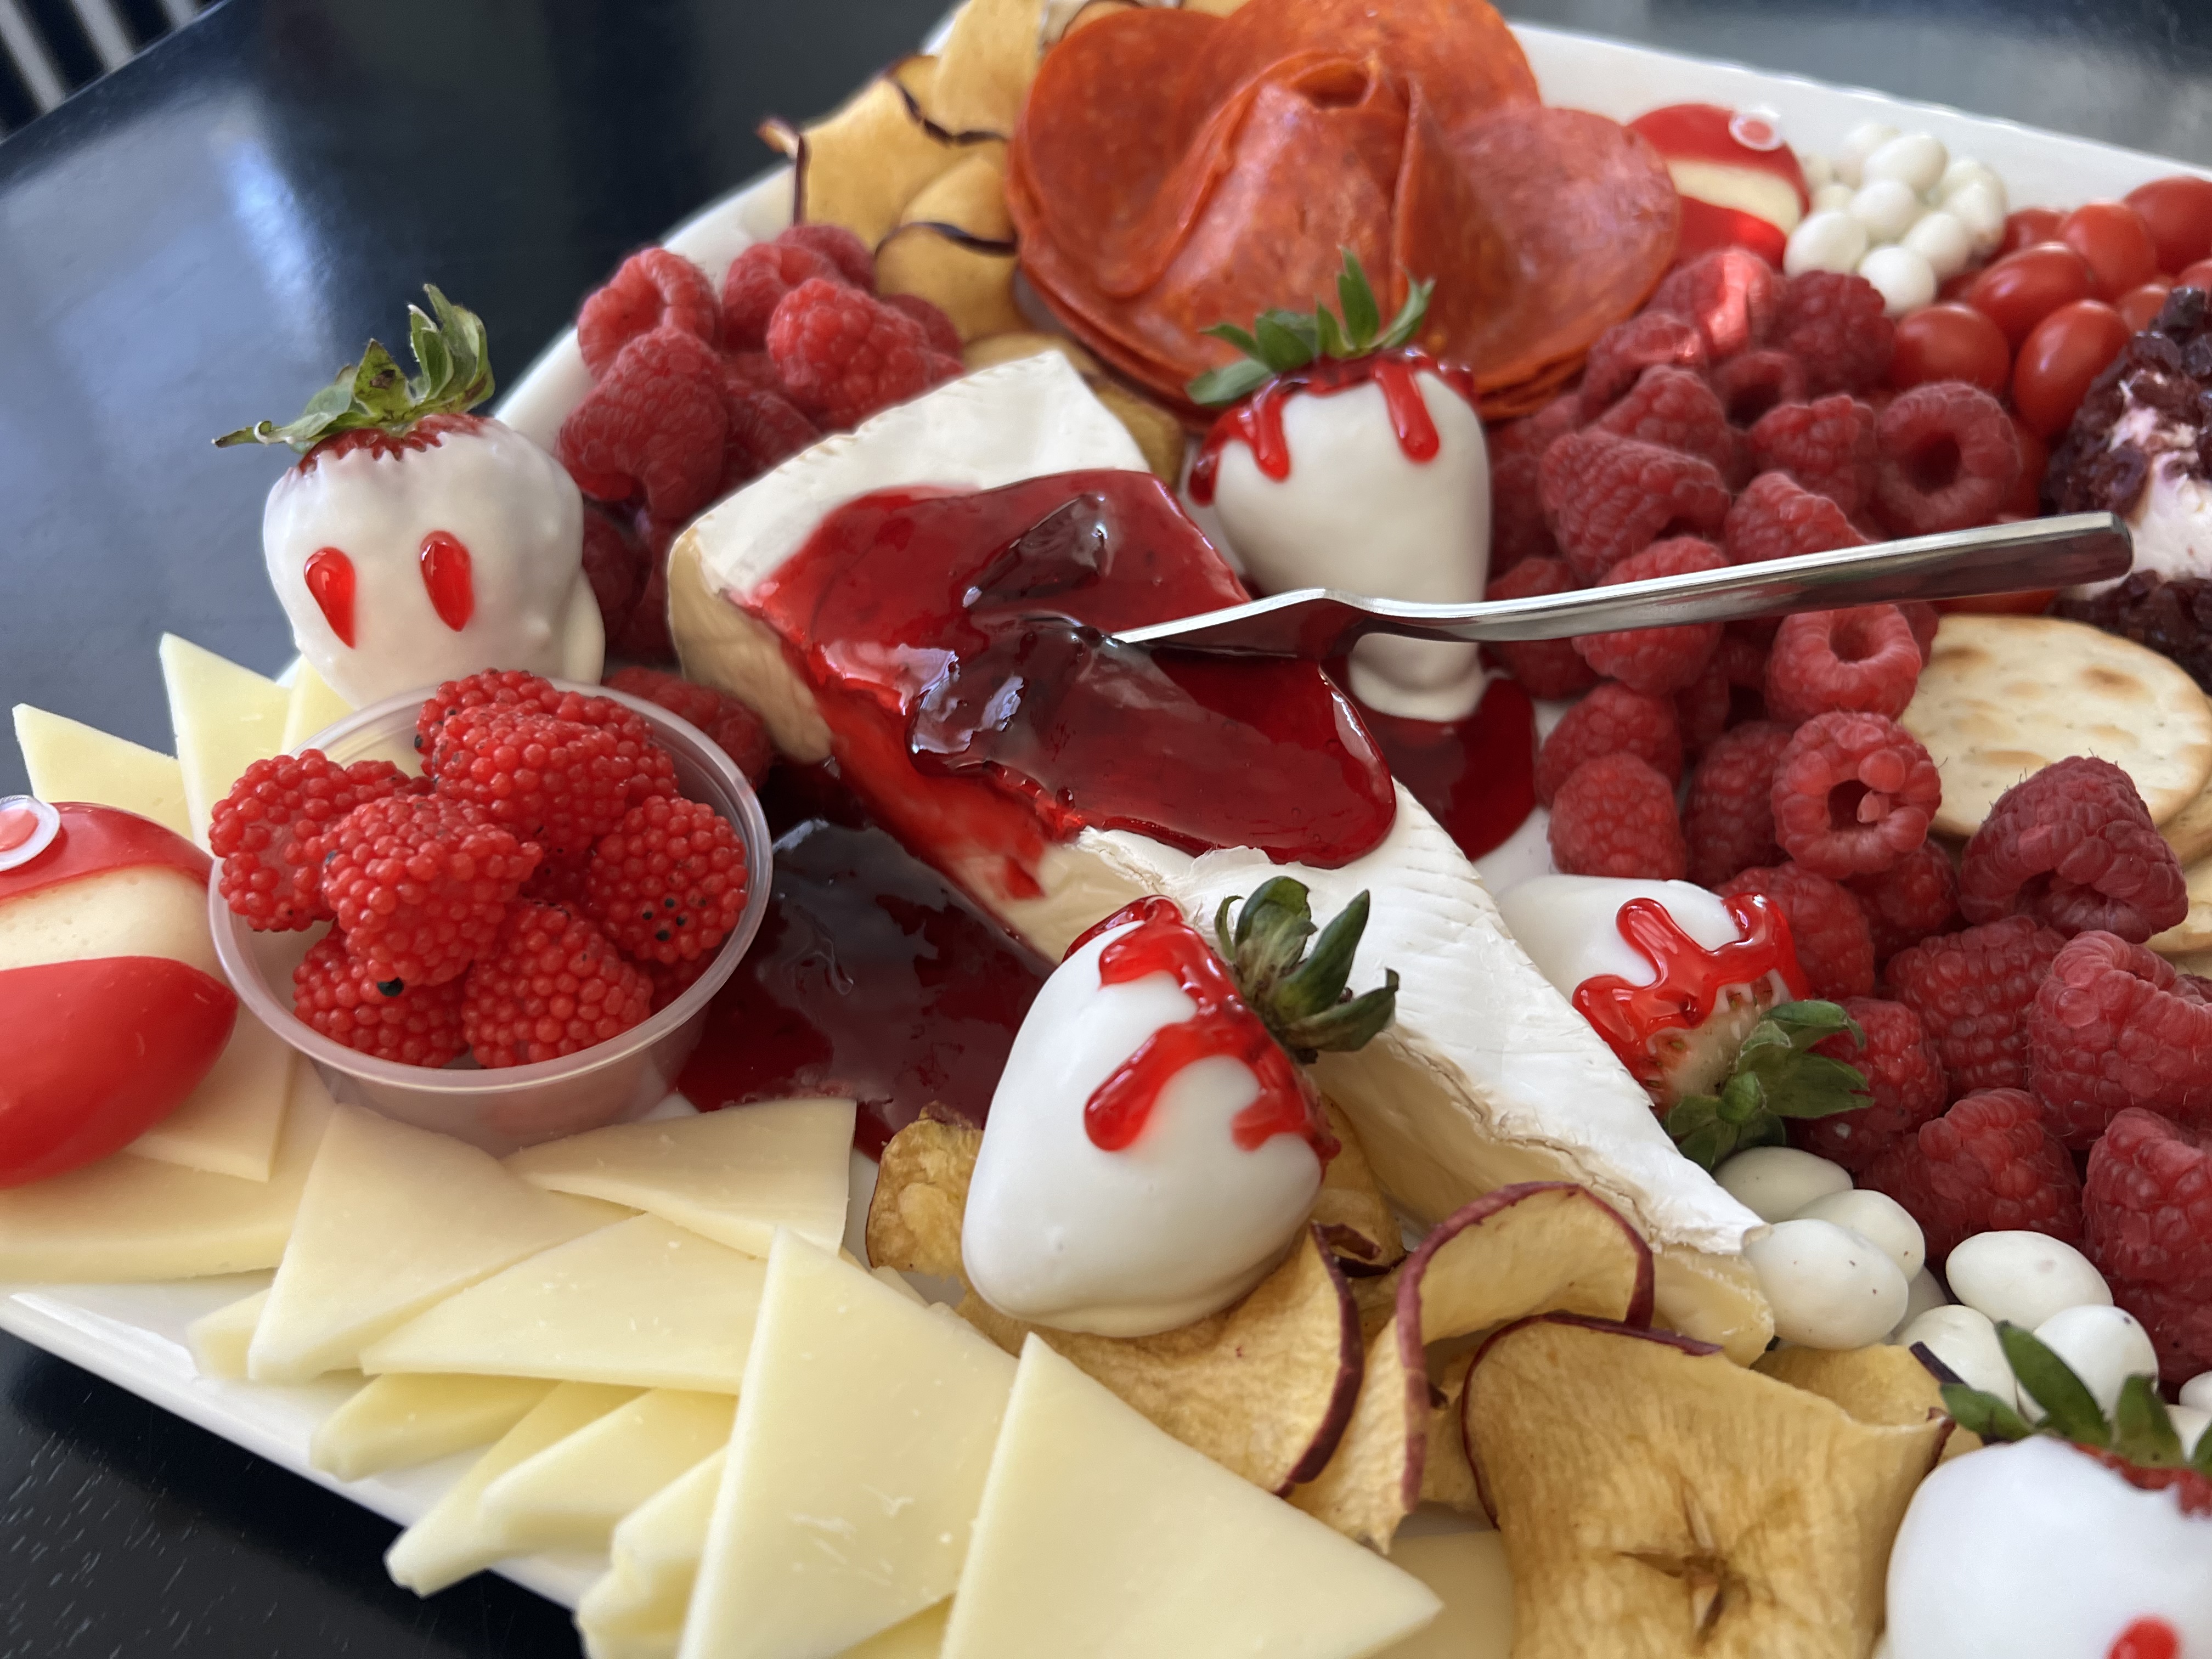
Above: The theme here was red and white with blood/vampires. I should have given the Babybel cheese some fangs with blood to keep with the theme. Ha ha. Oh, well. Next time. Included here are white vanilla candy coating dipped strawberries with red gel frosting for blood drips and fang marks dripping with "blood", pepperoni roses, water crackers, raspberries, grape tomatoes, Haribo Raspberries Gummi Candy (red raspberries only), a wedge of brie cheese with homemade plum jam drizzled on top (any red jam or jelly would work), apple chips, yogurt covered almonds, yogurt covered peanuts, mozzarella cheese sliced into a triangle shape, Babybel cheese, and a cranberry covered cheese that I can't find the name.


Above: That's the cranberry cheese I can't find the name of. But, really, the point is for you not to recreate these charcuterie boards exactly, but for you to be inspired by them. Put your own favorite red and white foods in your board!


Above: Here is a green and purple fruit tray. Red grapes, moon drop grapes, blackberries, blueberries, and sliced green apples. If you soak the green apples in Sprite, the acidic acid keeps them from browning and makes them less tart.


Above: Here is a green and purple/black fruit and veggie snake tray. In hindsight, I wish I had replaced the purple carrots with black olives. I sliced an English cucumber into slices and left the end intact for the head. I cut out two circles for the eyes and cut out a slit to slide the tongue into. The eyes and tongue are made out of a mini red pepper. This tray has blackberries, purple cauliflower, purple carrots, blueberries, and English cucumber. (Well, and red mini sweet pepper for the eyes and tongue). I served ranch dressing for dipping on the side.


That's it! For now...

Have fun creating holiday charcuterie boards of your own!

Wednesday, January 20, 2021

Ice Cream Cake

My son broke from tradition this year and rather than a regular cake, he asked me for an ice cream cake for his birthday. He's more of an ice cream fan than a cake fan anyway, so it was fitting. His current favorite flavor of ice cream is mint chocolate chip, so that is what he asked for. To be specific, he asked for a "mint chocolate chip Pokemon ice cream cake." Above is a picture of the cake without the Pokemon cake topper. I looked up a bunch of ice cream cakes online and kind of came up with my own plan that was a combination of a bunch of different ice cream cakes that I found online. 

I saw some gorgeous ice cream cakes in my online searches. I saw a version very similar to the one I made using Neapolitan ice cream sandwiches that was soooo pretty! It would be so cute for a girl's birthday cake. Cookies and cream ice cream sandwiches and a cookies and cream cake would be so good too. I saw a really fun banana split cake ice cream cake too. I love that you can be really creative with these ice cream cakes.


Step 1: While cake layer is baking, crush Oreos with a rolling pin. 


Step 2: Cut ice cream sandwiches. 


Step 2 continued: Place ice cream sandwiches in spring form pan. 


Step 3: Spread crushed Oreos and mag shell on bottom of spring form pan. 

Step 4: Spread first layer of ice cream on top of Oreo/magic shell crust.

Step 5: Top with cake layer and gently press onto ice cream layer below it.


Step 6: Top cake layer with second layer of ice cream. 


Step 7: Top final layer of ice cream with a layer of frozen whipped topping.


 Step 8: Remove from spring form pan and decorate as desired.


Mint Chocolate Chip Ice Cream Cake

Ingredients:

1 box devil's food cake mix (with eggs, water, and oil called for on package)
Mint chocolate chip ice cream sandwiches (I used 7, see notes below)
17-20 Oreo cookies
1 (7.25 oz) bottle magic shell topping
1 quart (56 fl oz) mint chocolate chip ice cream
1 (8 oz) container whipped topping
Oreo Fudge Covered Mint Creme Sandwich Cookies or additional Oreos, for topping
Dairy whipped cream topping, for decorative topping, if desired
Chocolate syrup, for topping, if desired

Directions:

Step 1: Prepare cake mix according to package directions. Divide the batter into four equal portions. You will only need 1/4 of the cake batter for your ice cream cake. Pour 1/4 of the batter into an 8 inch round cake pan that has been sprayed with cooking spray. Bake the thin cake layer in a 350 degree F oven for 13-15 minutes, or until cake is done when tested with a toothpick. Let cake cool completely. See my notes for tips on how you can use the extra batter.

While cake is baking, place 17-20 Oreo cookies in a zip top bag and crush with a rolling pin.

Step 2: While the cake is cooling, remove mint chocolate chip ice cream and frozen whipped topping from freezer to soften. Prepare ice cream sandwiches by cutting them into equal pieces (measuring about two inches long and one inch wide). 

You can get rectangular shaped ice cream sandwiches and square shaped ones. I got square shaped ones. I cut mine into thirds. If you are using rectangular shaped ice cream sandwiches, cut them into fourths (in half length-wise and in half width-wise to get four equal sized rectangular pieces).

Place ice cream sandwich pieces inside of a 10-inch spring form pan along the edges. 

Step 3: Mix a little magic shell topping (about 1/4 cup) with your crushed Oreos, until coated. Then pour the Oreo mixture into the middle of your spring form pan and spread until the bottom is evenly covered. Pour a little more magic shell over the Oreos to ensure full coverage. Place in freezer until set.

Step 4: Once ice cream is softened and crust is set, remove ice cream cake from freezer and evenly spread about two to three cups of ice cream on top of the Oreo/magic shell layer. Place in freezer until set.

Step 5: Remove cake from freezer. Add cake layer. Mine just fit into the middle space. Press cake gently down until it is firmly against the ice cream layer below it. Place in freezer until set.

Step 6: Remove cake from freezer. Add second ice cream layer to cake by spreading about two to three more cups of softened ice cream on top of the chocolate cake layer. Place in freezer until set. Put remaining mint chocolate chip ice cream back in the freezer as well.

Step 7: Remove cake from freezer. Evenly spread top with thawed frozen whipped topping until even with the top of the ice cream sandwiches. Place in freezer until set and ready to serve.

Step 8: Just prior to serving, remove ice cream cake from freezer. Remove spring form pan and decorate as desired. I decorated mine with whipped cream topping and fudge covered Oreos. I used 8 fudge covered mint Oreos and 8 sprays of whipped cream topping around the top of my ice cream cake. Serve with additional whipped cream topping and a drizzle of chocolate syrup or magic shell, if desired.


Notes: You can use the extra batter however you like. You could bake the additional batter in 2-3 additional 8-inch round cake pans and use those layers for a traditional cake. Or you could bake the additional batter in a 9x13 inch pan and frost that. Or you could use the extra batter to make cupcakes. Or you could throw it out if you don't want the extra temptation. Ha ha! I probably should have done that.

Instead, I baked my batter into four separate 8 inch round cake pans so I had four thin cake layers. I did it this way because I had never made this before and I wasn't sure if I would be using one or two layers of cake in my ice cream cake. I used one layer for the ice cream cake, and used the extra layers to make two different flavors of ice cream cakes, because I am crazy like that. More on that later. Those ice cream cakes were very basic.


Above: A peek at the layers inside.

 
Above: Yes, I made three ice cream cakes because I am crazy. We had extra flavors of ice cream in our freezer and extra cake layers, so I got creative. Though, I didn't try to be pretty with these ones. This one had a cake layer on the bottom, Moose Tracks peanut butter ice cream, a layer of whipped topping, and then drizzled melted peanut butter and magic shell topping. I figured that this will keep in the freezer for awhile, so why not?

 
Above: This one had a cake layer, Double Dribble ice cream (caramel, chocolate, and vanilla swirl ice cream), another cake layer, a layer of whipped topping, and then a drizzle of magic shell.