Saturday, September 28, 2013

Individual Portions: Part 3


Here is my final individually portioned recipe that I tried (at least, for this round). It was so easy. You could actually have your kids help you make this. They might have fun with it.

I used a standard muffin pan for this recipe. It made for a perfect size for a child's lunch or for a buffet-style dinner.


Mini Deep-Dish Pizzas

Ingredients:

Olive oil, for muffin pan
All-purpose flour, for rolling
1/2 pound homemade or store-bought pizza dough, in 6 pieces
Coarse salt and ground pepper
1/2 cup shredded mozzarella (4 ounces)
1 large tomato, coarsely chopped
Desired toppings, such as cooked vegetables, pineapple and ham, olives, mushrooms, or pepperoni

Directions:

Preheat oven to 450 degrees. Lightly brush 6 standard cups with oil. On a lightly floured work surface, roll out each dough piece to a 6-inch round. Fill each cup with 1 round, gently pressing dough into bottom and sides of cup. Season with salt and pepper.

Sprinkle each dough cup with 1 tablespoon each of cheese and tomato. Add desired toppings and another tablespoon each cheese and tomato. Bake until dough is golden brown and crisp, about 12 minutes. Let cool 2 minutes before removing from cups.

Source: Everyday Food, September 2010. You can find the recipe here.


Notes: I used bottled pizza sauce instead of the tomatoes to make it more kid friendly for my boys. This was so easy and a nice way to change things up for pizza.

Individual Portions: Part 2


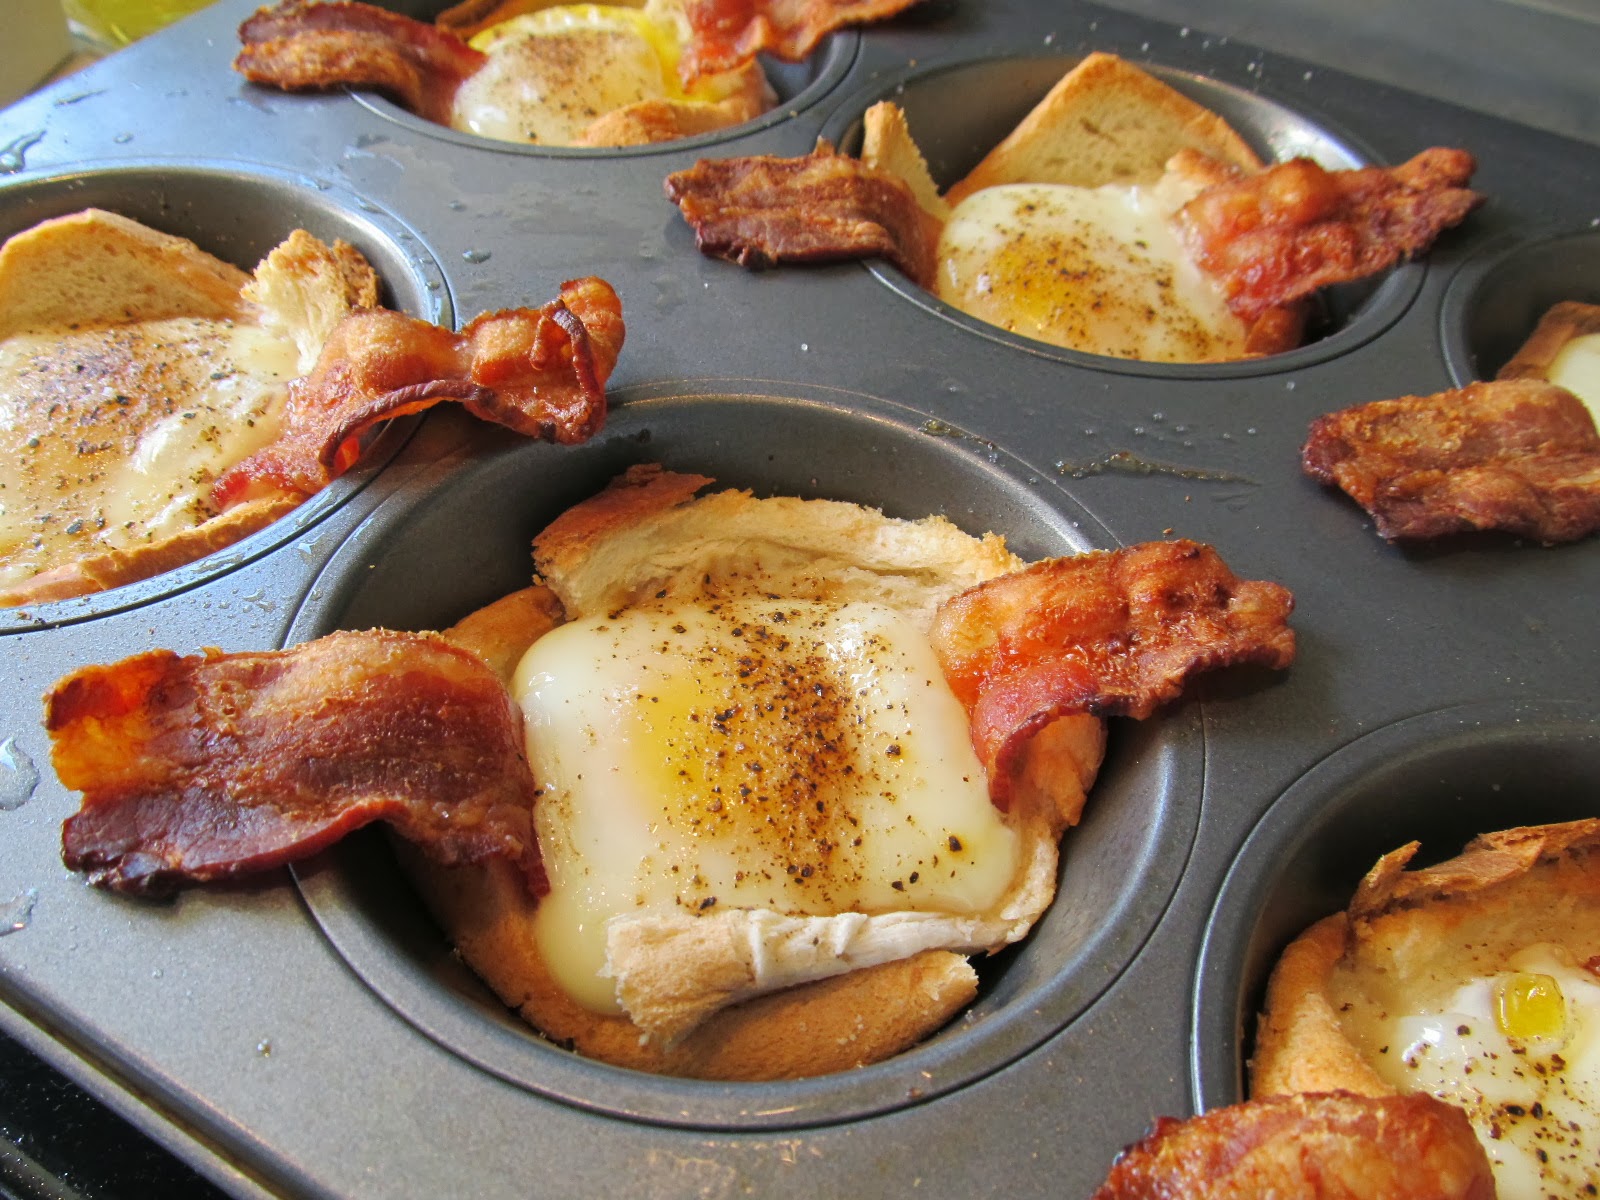
I'm always a fan of breakfast for dinner. These would make a great breakfast, brunch, lunch, or dinner, depending on your mood!

These were delicious. They definitely hit the spot. The only change I might make in the future is to add two pieces of bacon (crisscrossed in an X shape). There were also beyond easy. Try them out!


Bacon, Egg, and Toast Cups

Ingredients:

3 tablespoons unsalted butter, melted
8 slices white or whole-wheat sandwich bread
6 slices bacon
6 large eggs
Coarse salt and ground pepper

Directions:

Preheat oven to 375 degrees. Lightly butter 6 standard muffin cups. With a rolling pin, flatten bread slices slightly and, with a 4 1/2 inch cookie cutter, cut into 8 rounds. Cut each round in half, then press 2 halves into each muffin cup, overlapping slightly and making sure bread come up to edge of cup. Use extra bread to patch any gaps. Brush bread with remaining butter.

In a large skillet, cook bacon over medium, until almost crisp, 4 minutes, flipping once. (It will continue to cook in the oven). Lay 1 bacon slice in each bread cup and crack an egg over each. Season with salt and pepper. Bake until eggs are just set, 20 to 25 minutes. Run a small knife around cups to loosen toasts. Serve immediately.

Recipe Notes: Standard muffin pans come in a 6 or 12 cup size; if baking 6 items in a 12-cup pan, leave empty space in between. Nonstick pans are nice but not essential. Beware of very thin pans, which often lead to burning. Place pans on a baking sheet to make them easier to get in and out of the oven.

Source: Everyday Food, September 2010. You can find the recipe here.


Notes: I didn't use cookie cutters to cut the bread into rounds. I rolled the bread out with a rolling pin and sliced them in half diagonally. I also used larger muffin pans (jumbo size). However, the smaller/regular/standard size would have worked just great too.

I cooked my bacon in the oven (400 degrees for about 15 minutes, until it was partly cooked, but not crisp yet).


I thought this would be great since my younger son is allergic to eggs. He can eat them as long as they are cooked for at least 20 minutes at 350 degrees. After cooking for 25 minutes, the yolks were still  slightly runny...which tasted awesome to my husband and I, but I would have cooked it a little longer until the yolks were completely cooked for my son. As it was, my boys wouldn't eat them (picky, picky eaters!), so my husband and I did! If you decide to cook your eggs until the yolks are completely cooked, I would make sure that your bacon is less cooked than shown above so that it doesn't get overcooked or burned.

Individual Portions: Part 1


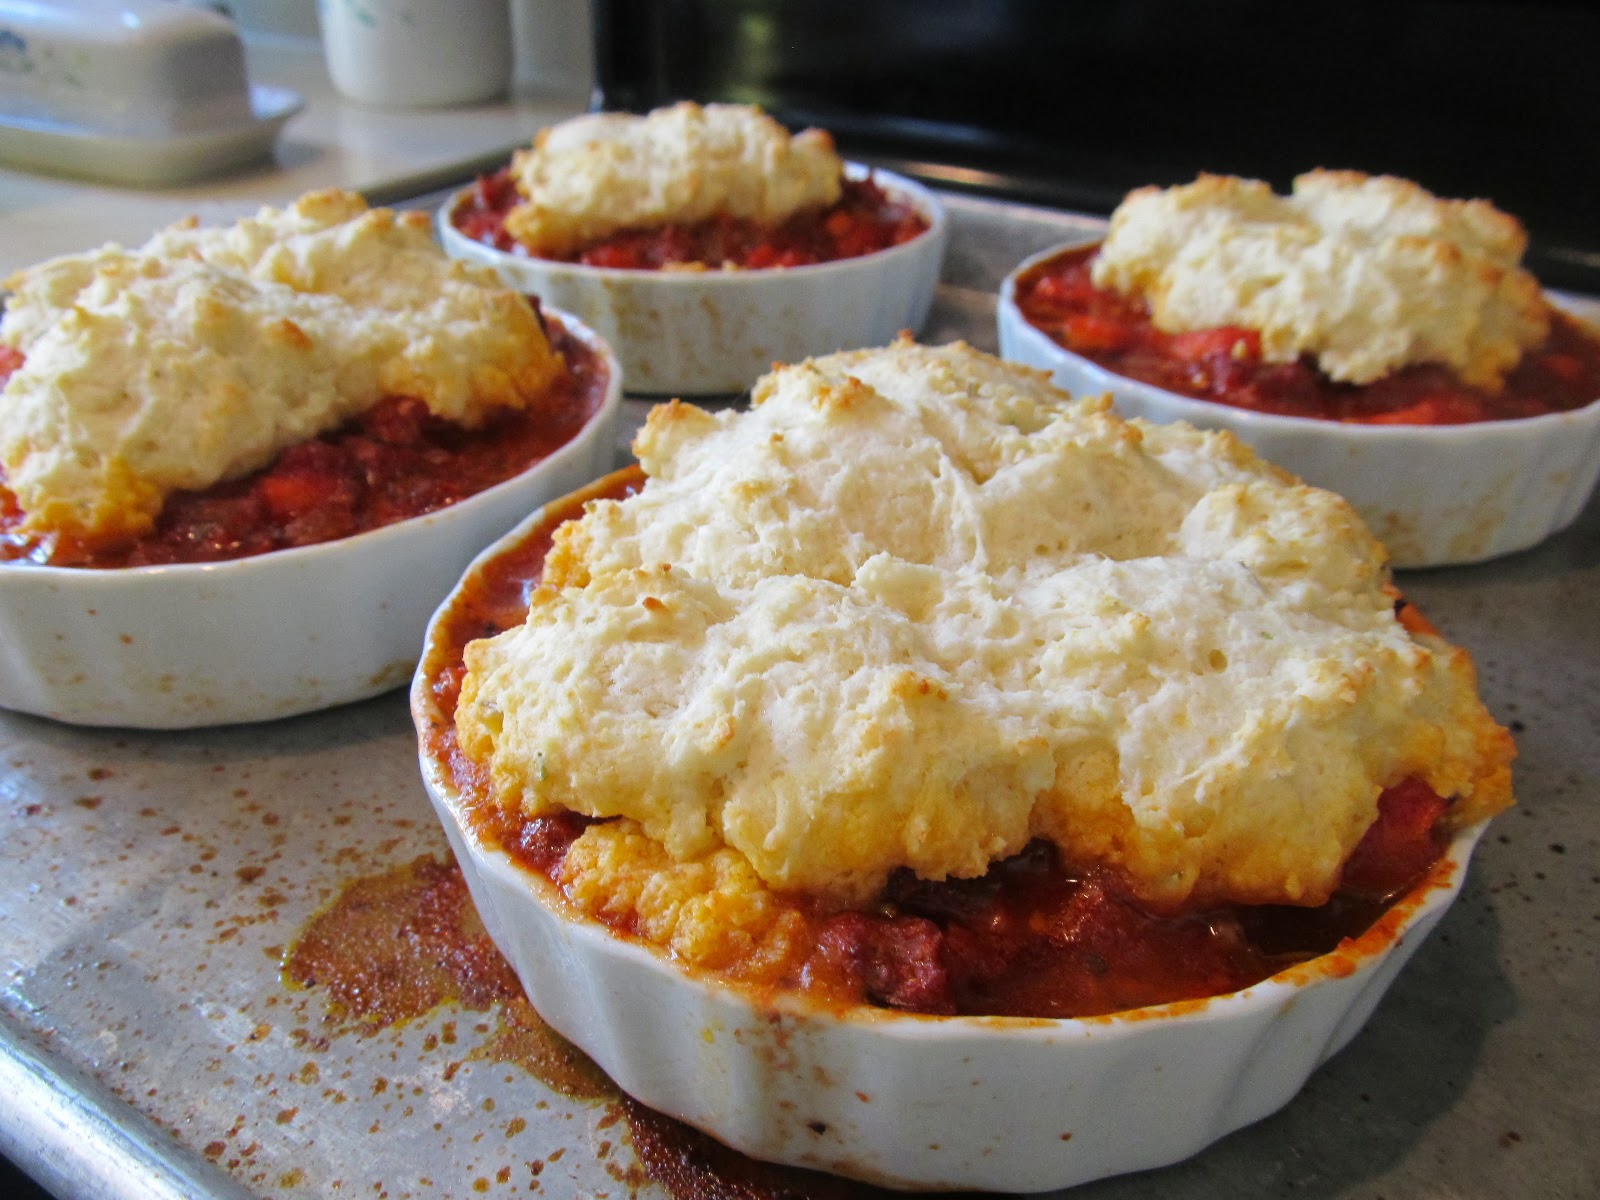
Would you like to try a different kind of pot pie than your traditional chicken pot pie? Yes? Well, then you need to try this pot pie!


Italian Potpies

Ingredients:

1 tablespoon olive oil
1 medium onion, finely chopped
2 carrots, finely chopped
Coarse salt and ground pepper
1 pound beef sirloin, thawed if frozen
2 cups homemade or best quality store-bought tomato sauce (the recipe I used is below)
1 cup all-purpose flour, (spooned and leveled)
1/4 cup grated Parmesan (1 ounce)
1 1/2 teaspoons baking powder
1/4 teaspoon crushed dried rosemary
4 tablespoons butter, melted
1/2 cup whole milk

Directions:

Preheat oven to 450 degrees, with rack in lowest position. In a large skillet, heat oil over medium. Add onions and carrots; season with salt and pepper. Cook, stirring occasionally, until tender, 6 to 8 minutes. Add beef, and cook, breaking up meat with a wooden spoon, until no longer pink, 3 to 5 minutes. Add tomato sauce, bring to a boil, reduce to a simmer, and cook, stirring occasionally, until meat mixture has thickened, 8 to 10 minutes; set aside.

In a medium bowl, whisk flour, Parmesan, baking powder, rosemary, and 1/2 teaspoon salt; make well in center, and add butter and milk. Stir just until dough comes together.

Spoon meat mixture into four 8-ounce ramekins; mound dough on top. Place on a large rimmed baking sheet; bake until topping is golden brown, and toothpick inserted in topping comes out clean, 10 to 12 minutes.

Source: Everyday Food, December 2008. You can find the recipe here.


Notes: The only change I made to this recipe is that I didn't have 8-ounce ramekins. I only had 6-ounce ramekins and 4-ounce ramekins. So, I used four 6-ounce ramekins and two 4-ounce ramekins. So, I got four larger servings and two kid-sized servings.

The only change I would make in the future is to line my pan with foil to make for easier clean up.


My boys were being super fussy about eating this. I thought they would be really excited about the fact that they got their very own serving/portion in a little dish. It was like pulling teeth to get them to take a bite. Once they did, of course, they really liked it. It was just one of those nights!

These were super delicious and they made great leftovers too.


Above: Seriously, why would my boys have been weird about eating this? Yum!

Three-Ingredient Marinara (with one more ingredient that I added)

Ingredients:

1 can (28 ounces) whole peeled tomatoes
2 tablespoons olive oil
4 cloves garlic, minced
Salt and pepper
1 teaspoon Italian seasoning (my addition)

Directions:

In a food processor or blender, puree tomatoes until smooth. In a straight-sided skillet or small pan, heat oil over medium. Add garlic and cook until fragrant, about 30 seconds. Add pureed tomatoes and season with salt and pepper. Bring to a simmer and cook until thickened, about 15 minutes.

Source: Everyday Food, March 2013. You can find it here.

Notes: As mentioned above, the only change I made was to add some Italian seasoning since they were Italian pot pies, I wanted some Italian flavor (that flavor would have been evident in a bottled marinara sauce already). This was so quick and easy to make. I let mine simmer while the vegetables and beef were cooking. By the time they were done cooking, the sauce was ready and I simply mixed the two together.

Good Use for Garden Tomatoes: Part 4


No basil in this recipe though (the last three posts used garden tomatoes and basil). This recipe uses fresh thyme instead. It's a nice way to change up your tomato pasta flavor. I did a little improvising on this recipe too. This recipe called for spaghetti. I used rotini--mostly because my boys have been getting rascally with spaghetti lately (wrapping it around their necks to make necklaces, etc.). So, I thought a more fun pasta shape would be a nice change for them. It was! They ate everything I gave them. Which is amazing, let me tell you. The recipe also called for cherry or grape tomatoes...but I had some home grown Roma tomatoes that I wanted to use up. So, I quartered those and used that instead. So, slightly different from the recipe as written, but still very delicious. Plus, as I mentioned before, my boys actually ate it! That scored major points for me.


Sauteed Tomato and Herb Pasta

Ingredients:

Salt and pepper
3/4 pound spaghetti
3 tablespoons olive oil
2 pints cherry tomatoes
3 cloves garlic, minced
2 teaspoons fresh thyme leaves
1/2 cup shaved Parmesan (1 1/2 ounces)

Directions:

In a large pot of boiling salted water, cook pasta according to package directions, then drain and return to pot.

Meanwhile, in a large skillet, combine oil, tomatoes, garlic, and thyme over medium. Cook, stirring occasionally, until tomatoes are soft and skins have burst, 12 to 15 minutes.

Add tomato mixture to pasta; toss to combine and season with salt and pepper. Serve warm. Top with Parmesan.

Source: Everyday Food, July/August 2013. You can find the recipe here.

Notes: As mentioned above, I used rotini instead of spaghetti, I used Roma tomatoes in place of the cherry tomatoes, and I grated my Parmesan instead of shaving it. This was so easy and so good! I love pasta!

Friday, September 27, 2013

Good Use for Garden Tomatoes and Basil: Part 3


I like to make gazpacho from time to time to eat for lunch.

Here is a new gazpacho I recently found that I used my mom's garden tomatoes in. It was very yummy. I kind of improvised on the directions. It is a recipe by Alton Brown. His recipes are always so good, but they are almost always very labor intensive. With kids, I just didn't have the time to follow the directions exactly. my changes are in the notes below the recipe.


Gazpacho

Ingredients:

1 1/2 pounds vine ripened tomatoes, peeled, seeded, and chopped
1 cup cucumber, peeled, seeded, and chopped
1/2 cup chopped red bell pepper
1/2 cup chopped red onion
1 small jalapeno, seeded and minced
1 medium garlic clove, minced
1/4 cup extra-virgin olive oil
1 lime, juiced
2 teaspoons balsamic vinegar
2 teaspoons Worcestershire sauce
1/2 teaspoon toasted, ground cumin
1 teaspoon kosher salt
1/4 teaspoon freshly ground black pepper
2 tablespoons fresh basil leaves, chiffonade

Directions:

Fill a 6-quart pot halfway full of water, set over high heat and bring to a boil.

Make an X with a paring knife on the bottom of the tomatoes. Drop the tomatoes into the boiling water for 15 seconds, remove and transfer to an ice bath and allow to cool until able to handle, approximately 1 minute. Remove and pat dry. Peel, core, and seed the tomatoes. When seeding the tomatoes, place the seeds and pulp into a fine mesh strainer set over a bowl in order to catch the juice. Press as much of the juice through as possible and then add enough bottled tomato juice to bring the total to 1 cup.

Place the tomatoes and juice into a large mixing bowl. Add the cucumber, bell pepper, red onion, jalapeno, garlic clove, olive oil, lime juice, balsamic vinegar, Worcestershire, cumin, salt and pepper and stir to combine. Transfer 1 1/2 cups of the mixture to a blender and puree for 15 to 20 seconds on high speed. Return the pureed mixture to the bowl and stir to combine. Cover and chill for 2 hours and up to overnight. Serve with chiffonade of basil.

Source: Food Network. Recipe by Alton Brown. You can find it here.


Notes: I didn't peel my tomatoes. I don't mind tomato peels in my gazpacho. Do you? It's just easier to skip that step! Less messy too. I simply chopped my fresh tomatoes and threw them in a bowl. The same hold true for my cucumbers. I didn't peel or seed those either. I also didn't toast my ground cumin. Finally, I forgot to blend a portion of the gazpacho in my blender.

The chopping required for gazpacho takes long enough, so I figured that was enough.

Long story short, my gazpacho turned out differently than Alton Brown's, but the moral of the story is that the flavors were all still there and the flavor combination of this soup is delicious.

Good Use for Garden Tomatoes and Basil: Part 2


I've said it before and I will say it again, pasta never gets old for me. I never tiring of trying out a new recipe. So yummy! My ultimate comfort food.

Here is another recipe I found that helped me to use up some of my mom's garden tomatoes. It is a recipe straight from the Olive Garden website. Did you know that they actually share many of their recipes online? You should check it out! Click here.


Capellini Pomodoro

Ingredients:

14 oz capellini pasta (angel hair)
8 medium tomatoes, cut into 1/2" pieces
11 fresh basil leaves, chopped
2 cloves garlic, chopped
6 Tbsp olive oil
Salt and freshly ground pepper, to taste


Directions:

Cook capellini pasta according to package directions.

Mix diced tomatoes, chopped basil, garlic, and oil. Season with salt and pepper.

Drain pasta. Toss pasta with tomato mixture in a saute pan and heat throughout.

Serve immediately.

Source: Olive Garden website. You can find the recipe here.

Notes: I used a whole pound of pasta here. Who are we kidding? I'm not going to measure out. I also used a pasta spoon to scoop the pasta directly into the tomato mixture and skipped heating it in a saute pan. Because, really, the tomato mixture isn't meant to be cooked. You just don't want it to make the pasta cold when you toss the two together. However, if you take the pasta directly from the hot water that it cooked in straight to the tomato mixture, it will be just the right temperature.

Again, add Parmesan or leave it off. It's great both ways!

This is just so good!

Good Use for Garden Tomatoes and Basil: Part 1


Is there any better vegetable than a garden tomato? I just don't think there is!

I found some great ways to make use of my mom's garden tomatoes (thanks for sharing your crop, mom!). I'll share them one by one (to make them easier to keep straight!).


Pasta with Roasted Tomato Sauce

Ingredients:

5 plum tomatoes
1/2 teaspoon sugar
Coarse salt and ground pepper
1/2 cup extra-virgin olive oil
3 tablespoons capers (optional)
2 teaspoons fresh lemon juice
3/4 pound spaghetti
Handful fresh basil leaves, to taste

Directions:

Roast the tomatoes: Preheat oven to 350 degrees. Halve plum tomatoes. On two large rimmed baking sheets, arrange tomatoes, cut side up, and sprinkle with sugar. Bake until softened and edges are crinkled, about 1 hour. Let cool.

Set a large pot of salted water to boil. Meanwhile, in a bowl, combine tomatoes, oil, capers (if using), and lemon juice; season with salt and pepper. Cook pasta until al dente. Drain pasta and return to pot; toss with tomato mixture. Serve pasta topped with basil.


Source: Everyday Food, September 2009. You can find it here.

Notes: I used home grown tomatoes which were a little small. So, I used a lot more than five. Even so, I used more tomatoes than what the recipe calls for because I like my pasta with a lot of tomatoes! I used kitchen shears to cut the tomatoes into bite size pieces. I should have used more capers too because I loved the capers in this recipe!

I used bottled lemon juice because I was lazy and a whole pound of pasta rather than 3/4 pound because that way, you just have more leftovers, right? Yum! Oh, and I cut the basil with my kitchen shears rather than having whole basil leaves in my pasta.

Oh, and heck, just throw some grated Parmesan on top too, if you like. It was great with and without the Parmesan.

This was really good and very simple to put together. A great weeknight meal.