Pages

Tuesday, January 6, 2015

Let it Cool


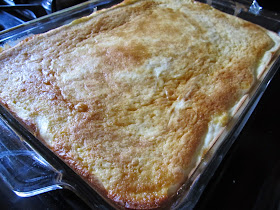
When I tried this at first, the recipe didn't specify what temperature to serve it at and I tried it when it was still warm out of the oven (actually, it was still pretty piping hot), and I thought, "Meh." However, after it cooled completely, this dish came into its own. I would definitely be sure to serve this dish at room temperature or even chilled. It is almost cheesecake-like when it is served at the right temperature.

You can serve this topped with a little powdered sugar, fresh fruit, canned pie filling, or jam (preferably homemade).


Blintz Brunch Bake

Ingredients:

2 pkg. (8 oz each) Neufchatel cheese, softened
1 container (15 oz) part skim ricotta cheese
5 eggs, divided
3/4 cup sugar, divided
2 tsp zest and 3 tbsp. juice from 1 lemon
1 cup flour
3/4 cup butter or margarine, melted
1/4 cup milk
1 tbsp. baking powder

Directions:

Heat oven to 325 degrees F.

Beat Neufchatel, ricotta, 2 eggs, 1/4 cup sugar, lemon zest, and juice in large bowl with mixer until blended.

Whisk remaining eggs, sugar, flour, butter, milk, and baking powder in separate bowl until blended. Spread 1/3 of the batter onto bottom of 13x9-inch baking dish sprayed with cooking spray; cover with Neufchatel mixture, then remaining batter.

Bake 45 minutes, or until center is set.

Recipe notes: If baking in a 13x9-inch metal baking pan, increase the oven temperature to 350 degrees F. Sprinkle with powdered sugar just before serving, if desired.

Makes 12-16 servings (depending on how large you would like to cut the pieces).

Source: Kraft recipes. You can find it here.

Notes: As I mentioned above, I initially served this warm and that was all wrong for this dish. I also mentioned that the original recipe doesn't specify what temperature to serve it at, but it is much better at room temperature or chilled. Be sure to have a group to serve this for because you don't want to feel guilty after eating the whole pan by yourself!


Above: It keeps its shape better after it has cooled too. Yummy stuff! We particularly liked it topped with homemade strawberry freezer jam.
Open to Variations


I made this treat because it sounded yummy and just right for Christmas. Now I want to try it again because you can get creative with the flavor combination. The original recipe calls for a spice cake mix, but this would also work beautifully with a devil's food cake mix too.


Gingerbread-Caramel Bars

Ingredients:

1 pkg. (2-layer size) spice cake mix
2 tsp. ground ginger
1/2 cup butter, melted
1 egg
35 KRAFT caramels, unwrapped
1 can (5 oz) evaporated milk
1 pkg. (4 oz) Bakers White Chocolate, coarsely chopped, divided

Directions:

Heat oven to 350 degrees F.

Line 13x9-inch pan with foil, with ends of foil extending over sides; spray with cooking spray. Beat cake mix, ginger, butter, and egg with mixer until blended. (Dough will be stiff.) Press 2/3 of the dough onto bottom of prepared pan.

Bake 10 to 10 minutes or until lightly browned. Meanwhile, microwave caramels and milk in microwaveable bowl on high 3 to 3 1/2 minutes, or until caramels are completely melted and sauce is well blended, stirring after each minute.

Drizzle caramel sauce over baked layer in pan. Reserve 2 tbsp. chopped chocolate; sprinkle remaining over caramel sauce. Crumble remaining gingerbread dough over dessert. Bake 25 to 30 minutes or until center is almost set. Cool completely.

Microwave reserved chocolate in microwaveable bowl on high 30 seconds to 1 minute, or until completely melted, stirring every 30 seconds; drizzle over dessert. Let stand until chocolate is firm. Use foil handles to lift dessert from pan before cutting into bars.

Recipe Notes: When cutting dessert bars, carefully wipe off the knife blade between cuts with a clean damp towel. This prevents the filling from building up on the blade, ensuring clean cuts that leave the edges of the cut bars intact.

Source: Kraft recipes. You can find it here.

Notes: As mentioned above, don't you think a Chocolate-Caramel Bars version (using a chocolate cake mix and minus the ginger...maybe with the white chocolate, or using milk chocolate, or perhaps more melted caramel drizzled on top, or skipping the chopped/melted chocolate altogether) would be fantastic too? These were quite yummy.

The only thing I have to say is that when I tried to drizzle the caramel sauce over the baked layer in the pan, most of the sauce went right underneath the already baked layer! I thought I had ruined them...but the batter/cake layer and the caramel sauce baked together into bars and all was well.

Oven-Baked: Part 2


A lot of times, I will substitute chicken breasts in place of chicken thighs in a recipe...this is a recipe that you should not make that substitution. Chicken thighs are used here for a reason...a very delicious reason.

Also, while you do brown the chicken first, all of the rest of the cooking takes place in one baking dish. That makes for some easy preparation and clean-up.

I did make some changes, so be sure to check my notes at the end of the recipe.


Lemon Chicken with Potatoes

Ingredients:

3 tablespoons butter
2 tablespoons packed brown sugar
1 1/2 teaspoons Italian seasoning
1 teaspoon salt
1 package (28 oz) boneless skinless chicken thighs
1 lb baby red potatoes, quartered
1/2 medium yellow onion, cut into large pieces
1 lemon, sliced
1/4 teaspoon pepper

Directions:

Heat oven to 400 degrees F. Spray 13x9-inch (3-quart) baking dish with cooking spray.

Meanwhile, in 10-inch nonstick skillet, melt 2 tablespoons of the butter over medium-high heat. In small bowl, stir together brown sugar, Italian seasoning and 1/2 teaspoon of the salt. Sprinkle over chicken thighs.

Cook chicken thighs in skillet 3 to 4 minutes on each side or until golden brown and crispy.

Arrange chicken thighs, potatoes, onions, and lemon slices in baking dish. Sprinkle with remaining 1/2 teaspoon salt and 1/4 teaspoon pepper. Melt remaining 1 tablespoon butter, and drizzle over mixture.

Bake 30 to 40 minutes or until potatoes are tender and juice of chicken is clear when thickest part is cut (at least 165 degrees F).

Source: Pillsbury website. You can find it here.

Notes: I used a 3 lb. bag of chicken thighs and I increased the potatoes a bit too (I love potatoes so I just filled the baking dish with them. I probably used about 2 lbs of potatoes total). As a result, I doubled the brown sugar/Italian seasoning mixture.

The potatoes took longer than 40 minutes to roast/soften sufficiently...so, here's my advice: I would pop the potatoes in the oven and start cooking those while you are browning the chicken. Once the chicken is browned, I would nestle the chicken thighs in the potatoes and continue cooking for 30-40 minutes, or until the potatoes are tender.

Another change I made was that I used part of the brown sugar mixture on the chicken, and I mixed the rest in with the potatoes. I even sprinkled a little on top after I had tossed the mixture together. I wanted the flavor throughout the dish. The flavor of the lemon, brown sugar, and Italian seasoning is so amazing with the chicken and potatoes. This recipe, my friends, is a keeper.

Oven-Baked: Part 1


In addition to finding some great one-pot dinners recently, I found some lovely oven-baked dinners. So, instead of just one-pot, it was just one-baking-dish...yeah, that doesn't have the same ring to it. However, these were both amazingly easy and super delicious. I will share one recipe here and stay tuned for the second recipe in part two!


Easy Oven-Baked Chicken Fajitas

Ingredients:

1 large onion
1 medium red bell pepper (I used two)
1 lb. boneless skinless chicken breasts
1 package (1 oz) fajita seasoning mix
2 tablespoons vegetable oil
Tortillas
Desired toppings such as shredded cheese, sour cream, salsa, and chopped cilantro

Directions:

Heat oven to 400 degrees F. Spray 13x9-inch (3-1uart) glass baking dish with cooing spray. Cut onion and bell pepper into even slices; place in baking dish.

Cut chicken breasts into thin strips; add to vegetables in dish. Sprinkle with seasoning mix; drizzle with oil. Stir until combined and pieces are coated.

Bake 35 to 40 minutes, stirring once halfway through baking, until chicken is no longer pink in center.

Spoon small amount of chicken and veggies onto each tortilla. Top each with sour cream, salsa, and cilantro, or your favorite fajita toppings.

Makes 9 servings.

Recipe notes: You can use any color of bell pepper you want in this dish, or even add more than one kind. This also tastes great with a squeeze of lime juice over the baked chicken and veggies.

Source: Betty Crocker. You can find it here.

Notes: I can't tell you how much I loved the fact that I could bake this and walk away rather than watching it as I sauteed it on the stove top. This was so easy! I will probably always make fajitas this way from now on.


Above: This picture doesn't do it justice (darned bad lighting because of winter time! Natural light...where have you gone?!), but the colors were beautiful. I might mix orange and red peppers next time...or even red, orange, and yellow.

One-Pot: Part 4


Here is the final one-pot recipe I tried. I was in the mood for something a little lighter this time, so I substituted black beans for the ground beef. So, you can make it with the beef, or turn it into a vegetarian meal and use black beans instead. Also, to reduce the heat and make it creamier, I added in about 1 cup of sour cream. It turned out really well.


One-Pot Enchilada Rigatoni

Ingredients:

1 lb lean (at least 80 percent) ground beef (I substituted 1 can of black beans)
1 can (19 oz) mild enchilada sauce
1 can (12 oz) evaporated milk
1 lb uncooked rigatoni pasta
1 can (11 oz) Mexicorn (whole kernel corn with red and green bell peppers, Green Giant brand)
2 cups shredded Mexican cheese blend (8 oz)
1 cup sour cream (my addition)
Salt, to taste (my addition)
Favorite toppings (such as crushed tortilla chips, chopped cilantro, sliced green onions, sliced olives, additional sour cream, shredded cheese, diced avocado, etc.)

Directions:

In nonstick 5-quart Dutch oven, cook beef with salt to taste over high heat, stirring frequently, until brown. Do not drain.

Add enchilada sauce, evaporated milk, 4 cups hot water, and the corn. Bring to a boil over high heat. Add the pasta and cook according to package directions. Reduce heat and continue to cook, if necessary, until the pasta is al dente (not hard, but not too soft).

Remove from heat; stir in cheese and sour cream. Serve topped with favorite toppings (such as crushed tortilla chips, chopped cilantro, sliced green onions, sliced olives, additional sour cream, shredded cheese, diced avocado, etc.).

Source: Pillsbury website. You can find it here.

Notes: Because of the enchilada sauce, this one-pot meal was very flavorful. No need to tweak the flavor on this one. It was very good. Have fun with the toppings. It adds a lot to the meal. I actually wasn't a fan of the crushed tortilla chips on top, but to each his/her own!


Above: We tried this with cilantro on top as well as sliced green onions. However, the more toppings the better. Next time, I am going to make sure I have a lot more topping choices on hand. Diced avocado, olives, shredded cheese, etc. would all be so awesome.

One-Pot: Part 3


This one was a good recipe, but required a bit of tweaking before it really hit the spot for me. Be sure to be generous with your salt and pepper and add garlic salt or powder to taste to get the flavor just right.


One-Pot Creamy Beef Stroganoff

Ingredients:

1 lb. lean (at least 80 percent) ground beef
2 packages (8 oz each) sliced button mushrooms
1 can (12 oz) evaporated milk
1 lb uncooked medium egg noodles
1 container (12 oz) chive and onion sour cream
Salt and pepper, to taste (my addition)
Garlic salt or garlic powder, to taste (my addition)

Directions:

In nonstick 5-quart Dutch oven, cook beef over high heat, stirring frequently, until brown. Do not drain. Season with salt and pepper and garlic salt or powder.

Add mushrooms. Cook about 5 minutes or until browned.

Add evaporated milk, 4 1/2 cups hot water. Bring to a boil. Once boiling, add the noodles. Noodles will not be completely covered at first. Reduce heat; simmer uncovered 7 to 8 minutes, stirring frequently, just until noodles are tender. Remove from heat; stir in sour cream.

Source: Pillsbury website. You can find it here.

Notes: On its own, following the recipe exactly, it was just a little lacking in flavor. However, adding the garlic, to taste, as well as the salt and pepper helped. Some of the reviewers on the Pillsbury website suggested some other additions. One reviewer suggested cooking some chopped onion with the beef while it was browning. One reviewer substituted beef broth for the water. Other reviewers suggested added a can of cream of mushroom soup or cream of onion soup.

I topped mine with some fresh chopped flat leaf Italian parsley.

This made a lot, and we had a lot of leftovers. It reheated very well.


Above: Mushroom money shot.

One-Pot: Part 2


Here's another one-pot wonder. I really liked this one. This one is also very kid friendly and super easy to throw together. The leftovers were really good too.


One-Pot Chicken Alfredo Penne

Ingredients:

1 can (12 oz) evaporated milk
1 lb. uncooked penne pasta
1 box (9 oz) frozen sweet peas
2 cups shredded or pulled deli rotisserie chicen
1 jar (15 oz) Alfredo pasta sauce
1 cup grated Parmesan cheese

Directions:

In nonstick 5-quart Dutch oven, heat evaporated milk, 4 cups hot water. Bring to a boil over high heat and add the pasta. Cook pasta according to package directions (mine called for 11 minutes), stirring frequently.

Reduce heat to medium. Stir in chicken, peas and Alfredo sauce. Cook 3 minutes longer, stirring frequently.

Remove from heat; stir in cheese. Season with salt and pepper, to taste.

Source: Pillsbury website. You can find it here.

Notes: You can also add a little salt and pepper, to taste, if you desire. I really liked this one. I felt that this one required the least tweaking. It was just good on its own. I did poach my own chicken breasts rather than using a deli rotisserie chicken. This was really good.

One-Pot: Part 1


Earlier this year, I happened upon this super easy, tasty, and amazing recipe. Apparently, a lot of people must have been a big fan of it (like I was), because a bunch of other one-pot meals were created as a result of it. While the original recipe is still my favorite (and still the best of the bunch), the others were also amazingly easy and quite tasty. Let me share my findings!


Three-Ingredient One-Pot Mac and Cheese

Ingredients:

1 can (12 oz) evaporated milk
1 lb. uncooked elbow macaroni
2 cups shredded sharp Cheddar cheese (8 oz)
Salt, to taste
(Garlic powder or garlic salt, to taste--my addition)

Directions:

In 5-quart nonstick Dutch oven, heat evaporated milk, 4 cups hot water, macaroni and salt, to taste, to boiling over high heat. Reduce heat to medium-high; cook 6 minutes, stirring frequently.

Reduce heat; simmer uncovered 8 minutes, stirring frequently.

Remove from heat; stir in cheese until melted.

Source: Pillsbury website. You can find it here.

Notes: When this was all done, I tasted it and I felt it was just missing something...so I added a little garlic salt and voila! Problem solved. This is the perfect macaroni and cheese option when you need something a little more than Kraft Macaroni and Cheese (which still has its place, of course) and something a little less than these macaroni and cheese recipes. I really liked this. It is really easy and very kid friendly.