Our family loves to cook. We're always trying new recipes. The only problem is that when you try so many recipes, it's hard to keep track of them all! So, we're going to post and share our recipe favorites here--both old and new.
Pages
▼
Monday, November 21, 2016
It's Not Fall Without Pumpkin
So, apparently my mom hates pumpkin. However, I just have to have something with pumpkin in it around this time of year. It's just a flavor that says "autumn" to me.
Here's a great cake to help you take care of your pumpkin cravings this fall.
Pumpkin Layered Magic Cake
Ingredients:
Cake Layer:
1 box Betty Crocker SuperMoist yellow cake mix
1 cup water
1/2 cup vegetable oil
3 eggs
Pumpkin Layer:
1 can (15 oz) pumpkin (not pumpkin pie mix)
1 cup packed brown sugar
1 cup half-and-half
3 eggs
2 teaspoons pumpkin pie spice
1/2 teaspoon salt
Topping:
1 package (8 oz) cream cheese, softened
3/4 cup powdered sugar
1 teaspoon vanilla
1/8 teaspoon salt
2 cups heavy whipping cream
Pumpkin pie spice, for sprinkling
Directions:
Heat oven to 350 degrees F. Spray bottom only of 13x9-inch pan with cooking spray.
In large bowl, beat Cake Layer ingredients with electric mixer on low speed until moistened. Scrape bowl; beat 2 minutes on medium speed. Spread in pan.
In another large bowl, mix Pumpkin Layer ingredients with whisk until smooth. Carefully spoon pumpkin mixture over cake batter in pan.
Bake 48 to 53 minutes or until cake is set when touched lightly in center. Cool 30 minutes. Refrigerate at least 4 hours to chill.
In large bowl, beat cream cheese, powdered sugar, vanilla, and 1/8 teaspoon salt until smooth. Add whipping cream; beat until smooth, and stiff peaks form. Spread over chilled cake. Sprinkle lightly with pumpkin pie spice. Store covered in refrigerator.
Source: Betty Crocker. You can find it here.
Notes: I was worried after I baked this that the pumpkin layer hadn't sunk to the bottom. I really couldn't tell from the outside of the pan, but once I cut into it, it had turned out perfectly. This dessert is so easy to put together and will take care of your pumpkin craving for sure.
Monday, November 7, 2016
Turning Cereal Into Dessert
I know, I know. Most cereal is sweet enough that it could be considered dessert, but if you want to turn it into a technical dessert, these recipes are for you.
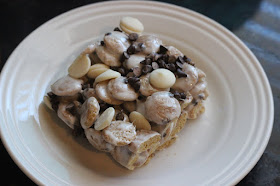
Cookie Cereal Marshmallow Treats
Ingredients:
4 tablespoons butter
10 oz. marshmallows (1 large bag)
6 cups cookie cereal
1 bag white melting chocolate/candy coating wafers
Mini chocolate chips
Directions:
Melt the butter in a large pot and add the marshmallows. Stir the marshmallows until completely melted and smooth. Add cookie cereal and stir to combine.
Press cookie cereal into a buttered cookie sheet (you can line the sheet with foil to make for easier removal).
Press flat and let the cookie cereal treats sit until completely set and cooled.
Cut treats into squares. Melt the white chocolate according to the package directions. Dip half of each treat square into the melted white chocolate. Tap off any excess chocolate.
Place dipped treats on a sheet of waxed paper and sprinkle with mini chocolate chips. Let treats sit until chocolate has set.
Source: Big Bear's Wife. You can find the recipe here.
Notes: We didn't melt the white candy coating wafers and dip the treats into the melted chocolate. We simply sprinkled the candy coating wafers on top along with the mini chocolate chips. We did this to cut down on time, but still incorporate the white chocolate flavor.
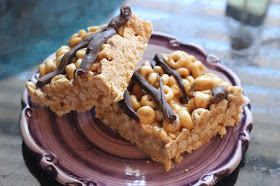
Honey Nut Cheerios Peanut Butter Bars
Ingredients:
1 cup white sugar
1 cup light corn syrup
1 cup peanut butter
6 cups Honey Nut Cheerios
1/2 cup chocolate chips (optional)
Directions:
Butter a 9x13-inch baking pan and set aside.
In a large pan, melt sugar and corn syrup over medium heat until it barely comes to a boil. Remove from heat and stir in peanut butter. Add Cheerios, 2 cups at a time and stir until fully coated.
Press mixture into a 9x13-inch dish.
Optional: Melt 1/2 cup chocolate chips in the microwave for 1 minute and drizzle chocolate on top of the bars.
Store leftovers in an air-tight container for up to 3 days.
Source: I Heart Nap Time. You can find it here.
Notes: These were quite tasty!
Cookie Butter and White Chocolate Cheerios Marshmallow Treats
Ingredients:
7 cups Honey Nut Cheerios
2 tablespoons unsalted butter
1/3 cup Biscoff cookie spread
1 (10 1/2 ounce) bag miniature marshmallows
3/4 cup white chocolate chips
Directions:
Line a 9x13-inch baking pan with foil and coat with non-stick cooking spray; set aside.
In a large pot over medium-low heat, melt the butter and Biscoff cookie spread. Add in the marshmallows and stir constantly until completely melted. Toss in the white chocolate chips and stir.
Remove pot from the stove and fold in the Cheerios cereal until evenly coated with the melted marshmallows.
Pour mixture into the prepared pan and press into pan.
Cut into squares after mixture has fully set and cooled.
Store leftovers in an airtight container for up to 3 days.
Source: Belly Full. You can find it here.
Notes: I would increase the cookie butter next time. It was a very subtle taste and I would like to make the cookie butter flavor more prominent. I would use at least 1/2 cup next time.


