Pages

Saturday, January 19, 2013

Goody, Goody Gumdrops!


This is a recipe that I found before Christmas and I knew I just had to try it. They were fun to make, delicious, and my boys loved them!


Homemade Gumdrops

Ingredients:

2 1/2 cups sugar, divided
1 1/3 cups applesauce
2 packages (3 oz. each) red, or green gelatin
2 envelopes unflavored gelatin
1 teaspoon lemon juice

Directions:

In a large saucepan, combine 2 cups sugar, applesauce, red or green gelatin, unflavored gelatin, and lemon juice; let stand for one minute. Bring to a boil over medium heat, stirring constantly. Boil for 1 minute. Immediately pour into cold 11x7-inch baking dish coated with cooking spray. Refrigerate for 3 hours or until firm.

With a spatula, loosen gelatin from sides of pan. To remove, invert onto waxed paper. Using kitchen shears or small cookie cutters dipped in hot water, cut into 1-inch squares or shapes.

Place on waxed paper. Dry at room temperature for about 8 hours or until slightly sticky. Roll in remaining sugar. Store in an airtight container.

Yield: About 1 3/4 pounds. Makes 70 servings.

Nutrition information: 1 piece (out of 70) is 35 calories, trace fat, 0 cholesterol, 3 mg sodium, 9 g carbohydrate, trace fiber, trace protein.

Source: I found this on the Taste of Home website. You can find it here.

Notes: It was a lot of fun to make (my older son loved dipping the gummies into the sugar). I would definitely suggest NOT using cookie cutters for these. First of all, you would need really little cookie cutters, and if you had them, it would take approximately 12 billion years to cut out the shapes--and then you would have leftover pieces that would just go to waste. The squares were a lot easier to cut with kitchen shears--though these would look cute in heart shapes for Valentine's day. Since I cut these into squares, I ended up with a LOT more than just 70 pieces. My boys were also impatient and wanted to dip the pieces in sugar right after I cut them--instead of waiting 8 hours for them to dry. So, we dipped some in sugar right away and waited on the rest. Honestly, I didn't see the difference. If anything, they were a little more sticky (and therefore the sugar stuck to them easier) right after I had cut them. If you are impatient, just go ahead and dip them in sugar right after you cut them up.

I thought I had two 3 oz boxes of strawberry gelatin...but it turned out I didn't. One of the strawberry gelatin boxes was only .3 oz. I happened to have a 3 oz box of cherry...so I mixed cherry and strawberry and it still tasted great. You don't have to limit this to just red or green gelatin. Any kind would work.


Breakfast Breads with a Fruit Kick


I've really been into making some fun bread-based breakfasts lately. I've got to cut it out though because I am not losing the weight I gained for Christmas.

Anyway, let me share two fun and fruity breakfast ideas with you. The first is a lemon pull-apart recipe. The second is a super simply recipe using canned refrigerated crescent rolls and...FRUIT ROLL-UPS! Who knew, right? It was such a cool and unusual idea that I had to try it, and do you know what? It was delicious!

I hope you like them.


Lemon Pull-Aparts

Ingredients:

12 Rhodes Dinner Rolls, thawed but still cold.
Zest from 2 whole lemons
1/2 cup sugar
1/4 cup butter, melted

Citrus Glaze:

1 cup powdered sugar
1 tablespoon butter, melted
2 tablespoons fresh lemon juice

Directions:

Mix lemon zest with sugar. Cut rolls in half and place in a 12-inch sprayed deep dish pizza pan or a 9x13-inch sprayed baking pan. Drizzle 1/4 cup melted butter over rolls. Sprinkle with lemon zest/sugar mixture, reserving 1/2 of mixture to sprinkle on just before baking. Cover with sprayed plastic wrap. Let rise until doubled in size. Remove wrap. Sprinkle on remaining lemon/sugar mixture. Bake at 350 degrees F. for 20-25 minutes. Remove immediately from pan and place on cooling rack. Combine glaze ingredients and mix well. Drizzle over pull-aparts.

Source: Rhodes bread website. You can find the recipe here.


Notes: My husband preferred these warm, and I preferred these after they had cooled completely. Go figure. Try it out and see which way you like them best!


Strawberry Breakfast Crescents

Ingredients:

1 (8-oz) can Pillsbury Refrigerated Crescent Dinner Rolls
4 rolls Betty Crocker Fruit RollUps Strawberry Fruit Snack
2/3 cup powdered sugar
1/4 teaspoon vanilla
2-3 teaspoons milk

Directions:

Heat oven to 350 degrees F. Spray cookie sheet with cooking spray. Unroll dough. Separate into 8 triangles.

Unroll fruit snack rolls; cut each diagonally into 2 triangles. Place each fruit roll triangle on 1 dough triangle (fold or tuck each fruit roll so all is on dough). Roll up each dough triangle, starting with shortest side of triangle and rolling to opposite point; place point side down on sprayed cookie sheet. Curve into crescent shape.

Bake at 350 degrees F. for 12 to 15 minutes or until golden brown. Cool 2 minutes; remove from cookie sheet. Meanwhile, in a small bowl, mix powdered sugar, vanilla, and enough milk until smooth and desired drizzling consistency.

Drizzle glaze evenly over warm rolls. Serve warm.

Nutrition information: Makes 1 servings (serving size is 1 roll). 160 calories, 5 g fat, 0 mg cholesterol, 370 mg sodium, 29 g carbohydrate, 0 g fiber, 18 g sugar, 2 g protein.

Source: I found this on the Pillsbury website. You can find the original recipe here.


It Can't Be True


 When considering titles for this blog post, the following options came to mind:
  1. Too Good To Be True
  2. No Way!
  3. I Can't Believe It
  4. Dangerous Knowledge
  5. Uh-Oh
  6. Using a Microwave?
  7. I'm In Trouble
The reason for this is because when you see this recipe, you will think to yourself, "No way. This is too good to be true. I can't believe it and I won't believe it."

Then, after you have tried this recipe, you will think to yourself, "Uh-oh. This is dangerous knowledge to have. I can't believe you can make this with a microwave. If I don't find someone to share this with, I am going to be in trouble."

The recipe I am going to share is for homemade microwave caramels. These are unbelievably just as good as the homemade caramels that you make using a pot and a candy thermometer. Only this time, no pot or candy thermometer is necessary.

The one and only time I tried to make caramel before this was a failure. I watched that candy thermometer like a hawk and I stuck to that recipe like glue (two cliches in one sentence. Are you proud of me?). It looked good...but then it hardened...and hardened. It wasn't delicious, soft, melt-in-your mouth caramel. It still turned out to be delicious (after all, it had cream, sugar, and butter in it...how can you go wrong?). However, it turned out to be hard candy. So, I ended up melting the whole thing in the microwave so that it was pourable again, and I poured it into sucker molds and made caramel suckers. Still lovely and deliciously edible, but not what I had been hoping for. I have been reluctant to try my hand at candy-making ever since (candy making definitely doesn't come naturally to me).

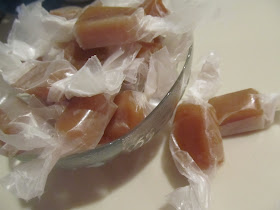
I think it is impossible to fail with this recipe, if you follow it. This caramel was soft, chewy, and delicious. Find someone that you need to give a thank you gift to, because otherwise you will gain 5 pounds eating this stuff in two or three days! I gave a third to a next-door neighbor, a third of it I sent to work with my husband to share with his co-workers, and we kept a third of it to eat at home. Delicious!


Microwave Caramels

Ingredients:

1/2 cup butter (1 stick)
1 cup white granulated sugar
1 cup light brown sugar
1 cup light corn syrup (such as Karo Syrup)
1 can (14 oz) sweetened condensed milk

Directions:

Spray an 8x8-inch glass baking dish with nonstick cooking spray.

Combine all ingredients in a large microwave-safe bowl. Cook in 2 minute increments, stirring after each, for a total of 12 minutes.

Pour caramel into 8x8-inch baking dish and allow to cool completely. Cut caramels into desired sized pieces and wrap each individual caramel in waxed paper.

Store in an airtight container, or in the refrigerator.

Source: I originally found the idea on Pinterest. It can be found on at least a dozen different blogs and websites. Here are the two sites that I got the recipe from (the first site includes a halved version of the recipe--I think it is the original source. The second site includes the recipe as shared above.) Halved version from Food.com found here. Recipe as shown above found here.

Notes: I kept a tally on a piece of paper as to how many minutes the caramel had been in the microwave because I knew that I would lose track of it otherwise. One of the versions of the recipe that I found off of Pinterest also included 1 teaspoon of vanilla. If you decide to add this, I would suggest adding it in while you are stirring the caramel mixture before you cook it for the last two minutes. I originally cut my caramel into 40 pieces (ten cuts across and four cuts down). However, I realized that because this made for pretty thick caramels that I could cut each of those pieces into three or four pieces each. So, I would say that, depending on how small or big you want your caramels to be, you could get anywhere from 40 large to 120 smaller pieces of caramel out of one batch.


Above: I started out with the plan to cut 40 pieces of caramel.


Above: After awhile, I started cutting the original pieces of caramel into thirds. They were still good-sized pieces of caramel. If I had started doing it that way, I would have ended up with 120 pieces total. If you want them in-between these two sizes, I would suggest cutting them into 80 pieces (7 cuts down the pan, 10 cuts across the pan).

Yum! I could have eaten them all! (Don't worry...I didn't eat them all...but I ate way more than I should have!)

Saturday, January 12, 2013

Chilly...Bears?


Along with my love of restaurants (that then usually go out of business), I try hard not to love any product that isn't really, I mean really established...because those usually get discontinued too!

One thing that we used to get every Christmas when we were younger was a type of ice cream sandwich called Chilly Bears. It was basically a cute little teddy bear-shaped sugar cookie with vanilla ice cream inside. They aren't available anymore, sadly.

However, a close (though not, by any means, exact) match to these wonderful little treats can be found below. They didn't really end up looking like bears. In fact, they didn't turn out very pretty at all...but they were still delicious!

Chilly Bears Ice Cream Sandwiches

Ingredients:

Refrigerated sugar cookie dough
Favorite vanilla ice cream, softened (I used Dreyers Slow Churned Vanilla)

Directions:

Roll out refrigerated sugar cookie dough and use cookie cutters to cut out the shape of your choice (teddy bears, gingerbread men, hearts, circles, etc. I would suggest making round cookies because the bears and gingerbread men tend to become unrecognizable with storebought cookie dough! The circles or hearts would look cuter...but then, it wouldn't be a Chilly Bear!).

Preheat oven according to package directions. Bake slightly longer than directed. You don't want the cookies to be soft (once they are sandwiched with ice cream, they will soften up again). You want the cookies to be hard, but not too hard (not to point where they are browned).

Let the cookies cool.

Once the cookies are cool, top one cookie with softened ice cream (about 3 tablespoons or so per ice cream sandwich). Top with another cookie and gently press together. Wrap in plastic wrap.

Repeat with remaining cookies and ice cream.

Store in the freezer. Eat right out of the freezer whenever you want a Chilly Bear!

Notes: The taste of the sugar cookies isn't an exact match for the ones that were used for the official Chilly Bears product. However, these are still delicious and they are about as close as we can get!

Why Haven't I Made This in Awhile?


There used to be this little cafe by my Mom's house. It might still be there, but knowing my luck, it is probably closed down--because every restaurant I have ever loved has closed. Even if it is a chain restaurant that isn't in danger of closing, if there is a menu item that I come to love, they will discontinue it! It just seems to be my luck. Anyway, this little cafe used to sell Italian sodas, hot cocoa, and steamed milk, etc. I went there repeatedly for their steamed milk. Then I discovered that I could easily make it at home. Let me tell you how.

Steamed Milk (1 serving)

Ingredients:

1 cup milk (whole, 2%, 1%, and Skim all work)
Flavoring, to taste (for example, your favorite extract, caramel ice cream topping, flavored coffee creamers, or Italian soda syrup work well)
Sugar, to taste (if you use Italian soda syrup, you probably won't need to add anymore sugar)

Directions:

Microwave:

Pour milk, flavoring, and sugar into a microwave-safe mug. Stir to mix. Microwave for 1 minute. Check temperature. If it is not warm enough, microwave for an additional 30 seconds and check again. Repeat until your steamed milk is the right temperature for you.

Stovetop:

Pour milk, flavoring, and sugar into a small saucepan. Heat milk on medium until small bubbles form around the edges of the pan and the milk starts to look frothy. Pour into a mug and enjoy!

If you want to be a little more decadent, you can even top this with whipped cream. However, it isn't necessary because it is delicious on its own!

Source: My Mom? Me? I don't remember.

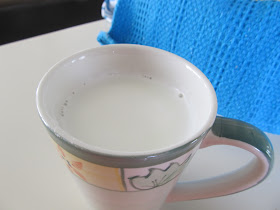
Notes: The mug of steamed milk pictured here has 1 cup of milk, 1/2 teaspoon of almond extract, and about 2 teaspoons of sugar. I microwaved it for a minute and a half. It was perfect! So satisfying! It can give you the warmth and comfort that you get from hot chocolate, but it can be a lot lighter (especially if you use skim milk). Good stuff!

I tend to make my steamed milk in the microwave if it is just for me, but if I am making it for a crowd, I double, triple, or quadruple it and make it using the saucepan method.

Coconut, caramel, vanilla, and almond are some of my favorites flavors of steamed milk.


One of My Favorites! Marinara: Basic and with Variations


I know I have said this before, but pasta is one of my all-time favorite comfort foods. It never gets old for me. Mmmmm.

So, when I saw that my beloved Everyday Food Magazine (in its very last issue ever, sniff, sniff) had a recipe for Basic Marinara sauce that could then be changed into four other kinds of pasta sauce by adding different ingredient combinations, I was intrigued. It was especially handy because it used canned whole peeled tomatoes and I had a ton of them in my food storage. So, over the course of about a month, I made about 1 different kind of pasta sauce each week. I loved them all! They were soooo good!

You can never go wrong with this good, Basic Marinara. I loved that recipe. The Mushroom Sauce and Puttanesca were tied as my favorites, with the Amatriciana sauce (and Basic Marinara) following closely on their heels. The Meat Sauce was my least favorite of the bunch...not because it wasn't delicious (which it was), but because I have had meat sauces that I have liked better.

Just one note in regards to the recipe, it suggests using 3/4 pound cooked pasta, and that all this sauce and 3/4 pounds of pasta serves only 4 people. I don't agree with that. I always cook a whole pound of pasta and it feeds between 6-8 people (depending on what you serve along with the pasta. If you have a nice salad and some crusty bread, a pound of spaghetti will definitely feed 6 adults, and possibly even 8 adults).

Serve these sauces over your favorite pastas: spaghetti, linguine, angel hair, farfalle, penne, rigatone, gnocchi...the sky is the limit!

Anyway, on with the show!


Basic Marinara

Ingredients:

1/4 cup olive oil
3 gloves garlic, minced
1 medium yellow onion, diced small
salt and pepper
1 can (28 ounces) whole peeled tomatoes, pureed

Directions:

In a large saucepan, heat oil and garlic over medium until fragrant. Add onion and cook, stirring occasionally, until onion is very soft, 15 minutes. Season with salt and pepper. Add tomatoes and bring to a boil. Reduce to a rapid simmer and cook until slightly thickened, 10 minutes. Season with salt and pepper. Serve with 3/4 pound cooked pasta.

Serves 4

Nutrition information per serving (without pasta): 179 calories, 14 g fat, 2 g protein, 11 g carb, 2 g fiber.

Notes: This was really good, and very kid friendly.

Variations:


Meat Sauce

Ingredients (in addition to the ingredients listed above for the Basic Marinara):

1/2 cup diced celery
1/2 cup diced carrot
1 pound ground beef


Directions:

Add 1/2 cup each diced celery and carrot with onion. When vegetables are soft, add 1 pound ground beef and cook until just cooked through, 8 minutes. Add pureed tomatoes and follow the Basic Marinara recipe from there.

Nutrition information per serving: 390 calories, 25 g fat, 25 g protein, 13 g carb, 3 g fiber.

Notes: My husband really, really liked this sauce. As I mentioned, I liked it too, but I felt it wasn't quite as good as some of the other meat sauces I have tried and posted on this blog. However, I love how basic this one is...it is definitely a good recipe to have on hand.


Mushroom Sauce

Ingredients (in addition to the ingredients listed above for the Basic Marinara):

1 pound quartered cremini mushrooms (I used button mushrooms)
1/2 teaspoon dried thyme
1/3 cup dry white wine, optional (I didn't use this)
Chopped fresh parsley, for garnish

Directions:

Once onion is soft, add 1 pound quartered cremini mushrooms and 1/2 teaspoon dried thyme and saute over medium-high until browned, 10 minutes. Add 1/2 cup dry white wine, if using, and cook until evaporated. Add pureed tomatoes and follow the Basic Marinara recipe from there. Serve topped with fresh parsley.

Nutrition information per serving: 234 calories, 14 g fat, 5 g protein, 16 g carb, 3 g fiber.

Notes: As mentioned above, I used button mushrooms instead of cremini (they were on sale). I used ground dried thyme instead of regular dried thyme because I was out, and I skipped the white wine. FANTASTIC!


Puttanesca

Ingredients (in addition to the ingredients listed above for the Basic Marinara):

3 anchovies
3 tablespoons capers
1/2 cup quartered pitted Kalamata olives
1/2 teaspoon red-pepper flakes

Directions:

Once onion is soft, add 3 anchovies, 3 tablespoons capers, rinsed and drained, 1/2 cup quartered pitted Kalamata olives, and 1/2 teaspoon red-pepper flakes and cook 1 minute, crushing anchovies with a spoon. Add pureed tomatoes and follow the Basic Marinara recipe from there.

Nutrition information per serving: 235 calories, 18 g fat, 3 g protein, 13 g carb, 2 g fiber.

Notes: Oh my goodness, I loved this. I had never used anchovies in my cooking before (you will find them by the tuna fish in the grocery store). This was so flavorful. It reminded me a little of the Barilla Green Olive Marinara sauce that is super hard to find (one of my favorites). However, since this was homemade, it was even better than the Barilla sauce! Yum! I still have some anchovies, capers, and Kalamata olives...maybe I'll have to make this again next week! Especially since my picture didn't turn out that great and doesn't do it justice.

In regards to my picture and the flavorful sauce, I would suggest tossing this sauce with the pasta as opposed to simply putting the sauce on top of the pasta. It will go further and you won't miss out on any flavor.


Amatriciana

Ingredients (in addition to the ingredients listed above for the Basic Marinara):

4 ounces diced bacon (about 4 slices)
3/4 teaspoon red-pepper flakes
1 cup grated Pecorino Romano (Parmesan cheese can be substituted)

Directions:

Once onion is soft, add 4 ounces diced bacon and 3/4 teaspoon red-pepper flakes; cook until bacon is crisp, about 8 minutes. Add pureed tomatoes and follow the Basic Marinara recipe from there. Serve topped with 1 cup grated Pecorino Romano.

Nutrition information per serving: 419 calories, 34 g fat, 14 g protein; 12 g carb, 2 g fiber.

Notes: This had such a yummy, smoky flavor because of the bacon. I thought this sauce was even better after a day or two in the fridge. I pretty much devoured the leftovers for lunch. Yum!

Thanks To My Sister!


I never liked condensed tomato soup. Blech. Then one day, my sister doctored some up using nothing but her knowledge of cooking and her imagination and a whole new beautiful culinary world was opened up to me. Before that, it had never occurred to me that I could actually make anything without following a recipe!

This is one of those recipes that we have been making for ages and I was surprised that we had never added it to the blog before.

This recipe takes canned tomato soup to the next level. Trust me, you are going to love it!

Italian Tomato Soup with Parmesan

Ingredients:

2 cans condensed tomato soup
2 cans of water (to dilute soup)
1-1 1/2 teaspoons dried oregano
1 teaspoon salt (or to taste)
1/4-1/2 teaspoon pepper (or to taste)
Fresh diced tomato, optional
1/2 cup shredded Parmesan cheese

Directions:

Whisk tomato soup and water together over medium heat until smooth. Add oregano, salt, and pepper and simmer until heated through. Stir in 1/4 cup of the shredded Parmesan cheese. Add fresh diced tomato, if using.

Top each serving of soup with the remaining Parmesan cheese and serve with your favorite grilled cheese sandwiches.

Source: My beautiful sister, Laurie.

Notes: I like the kick of pepper and I prefer my soup a little on the spicy side, but you can season this soup according to your own taste. Start with the smaller measurements and go from there. I used 1 1/2 teaspoons oregano, 1 teaspoon salt, and 1/2 teaspoon pepper.

Turkey Leftovers


Well, after all of the holiday eating, my husband and I decided we could use more soup in our lives. We made a turkey for Christmas, and I had a ton leftover, so I made my own turkey noodle soup. It turned out great. The recipe is below!


Turkey Noodle Soup

Ingredients:

1 tablespoon olive oil or butter
1 medium onion, diced
1-2 garlic cloves (or 1-2 teaspoons bottled minced garlic)
2 stalks of celery, sliced
2 carrots, sliced
4 cans (or between 7 and 8 cups) chicken broth
2-3 cups uncooked egg noodles
2 cups diced cooked turkey or chicken
Salt and pepper to taste

Directions:

Heat olive oil over medium-high heat. Add onion and cook about 2-3 minutes, or until it starts to get soft. Add garlic. Cook until fragrant (about 1 minute). Add celery and carrot and cook  for about 5 minutes.

Add chicken broth and bring to a boil. Add egg noodles and cook according to package directions for al dente (about 5 minutes). Reduce heat to low and add turkey, and salt and pepper to taste.

Source: I made this recipe up using what I had on hand. I wondered if I should add some herbs, spices, or seasoning salt and I decided that I would wait until the soup was finished and taste it to see if it needed anything else. I thought it was great just the way it was, so I didn't add anything extra. However, you easily could add your favorite herbs, spices, or seasonings.

As for the noodles, I used 3 cups of uncooked egg noodles. I would start with 2 cups and see if that looks like enough noodles to you. If not, add another cup!

Tuesday, January 1, 2013

An Old Favorite


Some foods just bring back memories, don't they? The recipe I am about to share always makes me think of high school and making dinners with my Mom every other Sunday night. Good times. Good food too!


Mediterranean-Style Chicken

Ingredients:

1 1/2 to 2 pounds meaty chicken pieces (breasts, thighs, and drumsticks), skinned
Nonstick cooking spray
1 (14.5 oz) can whole peeled tomatoes, cut up (use kitchen shears and cut the tomatoes while they are still in the can)
1/4 cup dry red wine or chicken broth (you can even do 1/4 cup chicken broth with 1 tablespoon red wine vinegar)
1 teaspoon sugar
1 teaspoon dried basil, crushed
1 clove garlic, minced
1 bay leaf
1 tablespoon water
2 teaspoons conrstarch
Hot cooked spaghetti
1/4 cup sliced pimiento-stuffed olives 

Directions:

Spray a 10-inch skillet with nonstick cooking spray. Preheat over medium heat. Add chicken and brown for 10-15 minutes, turning to brown evenly.

Add undrained tomatoes, wine or broth, sugar, basil, garlic, and bay leaf. Bring to boiling; reduce heat. Cover and simmer about 35 minutes or till chicken is tender. Remove chicken from skillet; keep warm.

In a small bowl stir together water and cornstarch. Stir into tomato mixture in skillet. Cook and stir for 2 minutes more. 

Serve chicken and sauce over cooked spaghetti. Garnish with olives, if desired.

Makes 4 servings.

Nutrition information: 312 calories, 29 g protein, 29 g carbohydrate, 7 g fat, 76 mg cholesterol, 242 mg sodium, 518 mg potassium.

Source: This is from the Better Homes and Gardens New Dieter's Cook Book, published in 1992, ISBN 0-696-01974-4.

Notes: I made this one with my Mom a lot in high school. This is such a great, basic recipe to have on hand. I would highly suggest increasing the amount of green olives you use though...1/4 cup is just not enough in my opinion!

Don't Fall Apart...Pull-Apart!


Oh, is there anything more sinful than sweet pull apart bread for breakfast, brunch, or dessert? It is way too easy to eat too much of this stuff. Why is it so good and yet so bad?

My advice to you is to make a ton of other things to eat so that people actually eat the recommended serving of these wonderful pull aparts. Or, make these when you have company coming over so they can help you eat it. If you don't make anything else, then someone might just possibly eat the equivalent of 8 rolls throughout the day.

So, enjoy these delicious rolls...with caution!


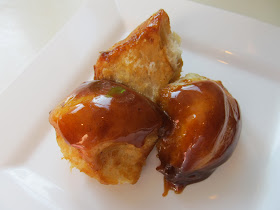
Above: I made this batch with instant butterscotch pudding. If you use instant pudding, it will still be delicious, but it won't be quite as caramel-like, it will be more sugar coated.


Butterscotch Sticky Rolls (Hot Rolls Pull-Aparts)

Ingredients:

20-22 frozen Rhodes bake-and-serve rolls
1/2 cup pecan pieces, or 1 cup whole pecans, optional
1 (3 oz) box regular (not instant) butterscotch pudding
6 tbsp melted butter
1/2 cup brown sugar
3/4 tsp. cinnamon

Directions:

Thaw rolls just until soft, but still cold. Cut rolls in half. Layer the following ingredients in a greased bundt pan: pecans, if using, soft but cold rolls, and one box regular (not instant) butterscotch pudding.

Combine melted butter, brown sugar, and cinnamon. Drizzle this mixture over the butterscotch pudding and rolls. Let rise until doubled in size, or even with top of bundt pan (roughly 3 hours on the counter, or overnight in the refrigerator). Be careful not to let the rolls rise up over the pan because they will continue to rise as they bake.

Preheat oven to 375 degrees F. Bake for 25-30 minutes. You may want to put a cookie sheet or some aluminum foil under the pan in case the butterscotch drips out of the pan (to avoid it making a mess of your oven).

Immediately after baking, loosen rolls from sides of the bundt pan with a knife and invert onto a serving plate.

Makes 10-12 servings.


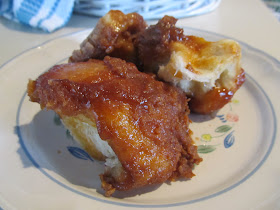
Above: Using instant pudding.


Above: Using cook and serve pudding.
 
Source: My family has been making this recipe for years. I believe it was originally found in the newspaper. It is a Rhodes recipe. You can find their current version of the recipe (which is slightly different) here.

Notes: This time (the picture you see above), I used instant pudding because that is what I had on hand. It doesn't lend quite as much butterscotch syrupy goodness, but it still worked and tasted delicious.


The changes that you will find when you compare this version of the recipe to the current version found on the Rhodes Bread website include the following:

The use of 24 rolls instead of 20-22
Using only a 1/2 box of pudding (perhaps they mean 1/2 of a large box of pudding?)
The option/variation to use vanilla pudding in place of the butterscotch
The elimination of the cinnamon in the brown sugar/butter mixture
Melting the butter and brown sugar together instead of stirring the brown sugar into the already melted butter
The new version of the recipe instructs you to dip each of the roll halves into the pudding mix (rather than just pouring the pudding over the top)
The instruction to cover your bread with plastic wrap sprayed with cooking spray while it rises
The baking temperature is decreased to 350 degrees F.
The cooking time is increased to 30-35 minutes
The instruction to cover your pan with foil for the last 15 minutes of baking time


Anyway, as for the changes, I say take 'em or leave 'em. This recipe is absolutely delicious both ways (and believe me, I have made it both ways).

I would definitely suggest rolling the rolls in the pudding mixture. I would also suggest using the whole 3 oz box of pudding mix.

I'm intrigued by the option of using vanilla pudding in place of the butterscotch. I will definitely have to try that one of these days!

We have made this with and without the pecans. It is delicious either way.


Cinnamon Pull-Apart Bread (Cinnamon Sugar Monkey Bread)

Ingredients:

3 cans (7.5 oz each) refrigerated buttermilk biscuits
3/4 cup granulated sugar
1 tbsp. ground cinnamon
1/2 cup butter or margarine, melted

Glaze:
4 oz (1/2 of an 8 oz. pkg.) cream cheese, softened
1/2 cup powdered sugar
1-2 tbsp. milk

Directions:

Heat oven to 350 degrees F.

Cut each biscuit into quarters.

Mix granulated sugar and cinnamon in a medium bowl. Add biscuit pieces, in batches; toss to coat.

Place half the biscuits in greased 12-cup fluted tube pan (bundt pan); drizzle with half the butter. Repeat. Sprinkle with any remaining cinnamon-sugar.

Bake 40-45 minutes or until toothpick inserted near center comes out clean and top is golden brown. Cool in pan 5 minutes; invert onto serving plate. Remove pan.

Beat cream cheese and powdered sugar in small bowl with mixer until well blended. Add 1 tbsp. milk; beat until well blended. Blend in enough of the remaining milk until glaze is of desired consistency. Drizzle over warm bread.

Makes 12 servings.

Nutrition information: 340 calories, 19 g fat, 35 mg cholesterol, 590 mg sodium, 40 g carbohydrate, 1 g fiber, 22 g sugar, 4 g protein.

Source: Kraftrecipes.com. You can find the recipe here.

Notes: My sister-in-law makes a monkey bread very similar to this. She didn't give me the recipe, she just described what she did to make it...and I found this recipe which matched her description perfectly. Except that she doesn't make the glaze for hers. So, when I made this, I skipped the glaze (hence the glaze free pictures). Next time I make this, I will definitely try it with the glaze. It would be great both ways.